If you want to refine, position and shape different spaces in your garden design, there are 3 Principles you NEED to follow. In this video and article, we’ll explore each of the principles and use a real life example to explore how these principles could help you develop your own garden design.
The 3 main landscape design principles you need to follow to create your perfect garden design are:
- Develop Criteria – what you want a space to look like, how you want to use it and when
- Use your surroundings to position a space within your design
- Use the requirements of the activity or space to shape and size it to suit your needs
You can watch the video below or on my YouTube channel, and/or read along to the post below.
3 Principles To Follow To Create A Great Garden Design – VIDEO
What Are The 3 Landscape Design Principles?
So, what are the principles you can follow to help create your own garden design?
Landscape Design Principle #1 – Develop Criteria
The first is what I call developing criteria.
Criteria are a short list of dot points that you put together to describe how you want a space to look, how you want to use it, and when you want to use it.
I generally only develop criteria for the main areas I want in a design – for specific activities that I want to enjoy, or main visual features I want to include in my yard.
Criteria help you define a space, which is very useful when designing because it ensures what you design “works” – it will (hopefully) look how you want it to look, be appropriately sized and shaped, and in the right spot in your yard so you can use it to it’s fullest potential.
I go into more detail in some of my beginner and blueprint guides.
Landscape Design Principle #2 – Use Your Surroundings To Position Spaces In Your Yard
The second principle we want to follow, which builds off the criteria you develop, is to use your surroundings (your context) to help position spaces in your yard.
This is a simple way to move things around, and make sure you don’t place a high profile space somewhere that doesn’t do it any favours – like putting an entertaining space where you want to enjoy some sunshine, in a dark, windy area.
Landscape Design Principle #3 – Use The Requirements Of The Space To Define It’s Size & Shape
The third principle, once you have some criteria for an area, and have a few positions you want to explore it in, is to use the specific requirements of that space – what you need to make it work for you – to define its size and shape.
In other words, making sure you make a space big enough, but not too big, so you can easily do what you want to do there.
A quick example might be a you want a vegetable garden. Let’s have it raised as well.
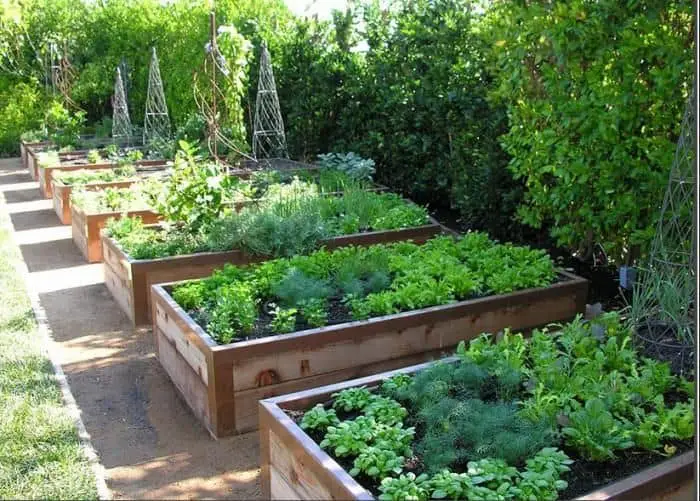
If you just draw some lines on a page and call it a day, you may end up with a growing area that’s actually a lot smaller than you anticipated.
Or worse, a lot bigger.
If you have some criteria for how you want to use the space – in particular how much time and effort you can put into maintaining a vegetable garden, and how much food you think you need to, and can, grow – you’re in a better position to size the beds to something you’re able to manage.
So, these are the three principles I want to explore with you today. And to help us walk through them, I’m going to bring in an example of a good project I found on Pinterest.
Analysing An Example Of Great Backyard Design – Gable House
The project is called Gable House by Edmonds & Lee Architects, and the landscaping was done by The Garden Route Company.
Now, I’m not certain if they did the landscape design AND construction, or just construction itself, but I’ll just use the term ‘designers’ to broadly cover both parties.
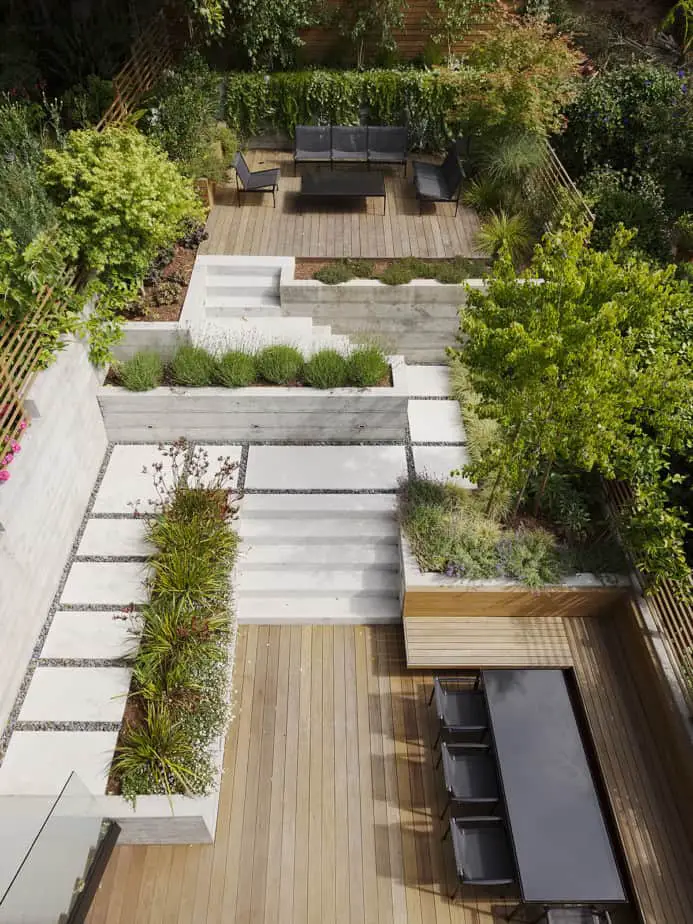
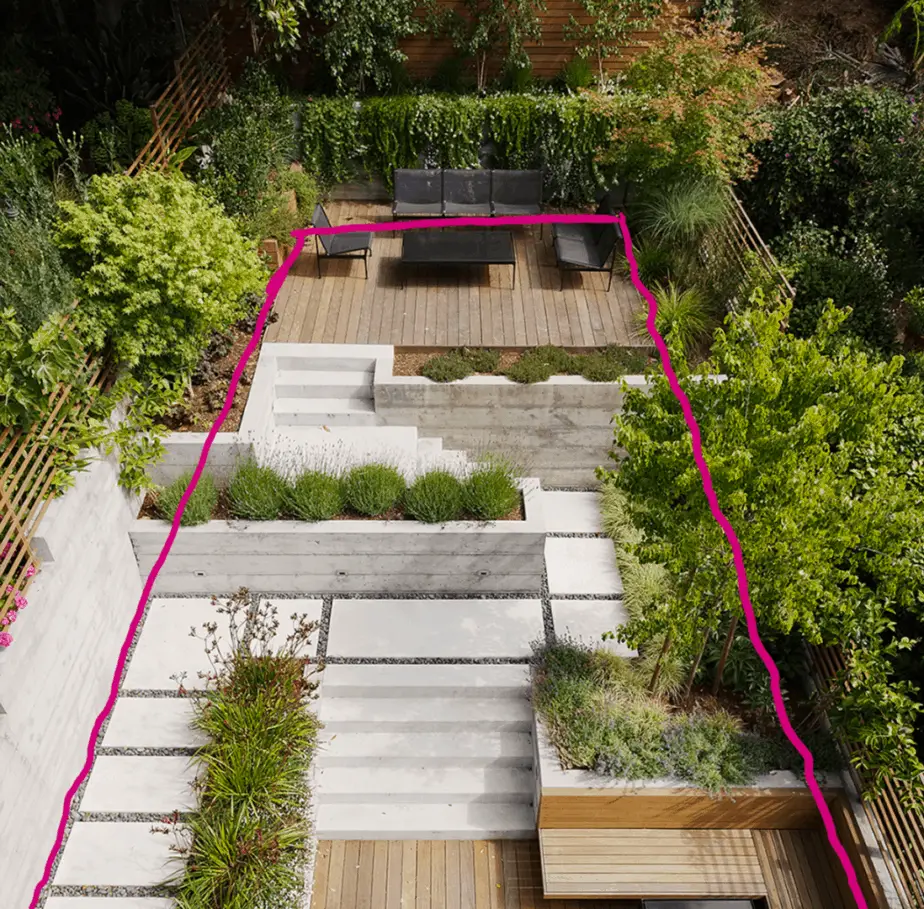
Now to try and illustrate my three principles, I’m going to focus on one area in the design in particular – this deck at the rear of the yard.
I’m going to refer to is as in ‘informal’ entertaining space – not really for sit down dining, more for drinks and light snacks.
We’re going to walk through the three principles I covered, and see, if by following them, we end up with a similar result – a similarly positioned space – that the designers ended up with.
Now, a quick caveat.
The process we’re following may not be what the designers actually followed. Areas in garden designs tend to appear in one of two ways.
They’re requested by the clients – and therefore explored and included in a design from the beginning – or they ‘fill’ a blank area in a design – something added midway through the process.
I’m not sure which one happened here.
It’s possible the clients wanted two spaces to entertain people, but it’s also possible the designers added it of their own accord, recognising this position in the yard would be a good spot for that kind of activity.
So the principles and process we’re going to explore may be completely ‘wrong’. Even so, I like walking you through this project because it allows me to illustrate these three principles anyway.
So for our purposes, we’re going to pretend this ‘informal entertaining space’ is something the clients wanted to include in the yard. Perhaps not in those words, but they requested a space they can relax, with some friends, and enjoy some drinks and light food.
So our job is to try and find not just room for it in the design, but to find a position that allows the users to enjoy the space to it’s fullest.
If you are your own client, which you probably are, maybe this is something you want to include in your design – in which case, the following steps should prove really helpful.
How To Develop Criteria For A Space – Informal Entertaining Example
Right, let’s take a look at the first principle we discussed – developing criteria – and how to develop some for this particular space/activity.
Aesthetic Criteria – How You Want The Space To Look
How do we want it to look? This first point is mainly about physical elements –materials, colours, shapes, the combinations of these things and the contrasts between them.
You can find examples of these everywhere – images online, apps, videos, magazines and books and even the real world. In some cases, you might not need to specify anything about how your space looks at all – you can instead draw from other areas in your design (or house) and use the same material, colours, shapes etc.
So for us, what do we write down, as a criteria point, for how we want this informal entertaining space to look?
We could suggest the clients want:
- Timber – maybe even a specific type, width and colour
Or we could suggest we’ll:
- Refer to other parts of the our design to inform material choice for this space – and colour, shape and the rest of it
So that can be our first criteria point for this space.
As I said you don’t need to specify anything about the physical look of a space if you don’t want to, or don’t have examples you like just yet.
But if you do, it’s helpful to articulate what you like as much as possible.
Try to focus on broader things like colour and shape, as it’s easier to find multiple options that fit those criteria, than it is to find a specific colour of timber or stone.
Use Criteria – How You Want To Use The Space
We’ve considered how it looks, the next thing to think about is how the clients want to use the space. We’re going to reverse engineer this a little, because there’s a few ways this could go, but let’s suggest the clients wanted:
- A space capable of seating about 6 people
- Somewhere they could relax, have some drinks, chat and maybe some nibbles
- Somewhere to enjoy some sun and read a book
Actually outlining the above – the actions they’ll take within the space and how many people they want to be able to seat – are important, as you’ll see when we finally shape the space.
Time Criteria – When You Want To Use The Space
Before we get to shaping however, we also want to think about when the clients are most likely to use the space. This doesn’t just mean when they’re available, but what time of day and what season they are most likely to enjoy it.
It doesn’t mean they can’t or won’t use it at other points, but having a target time when you want to enjoy the space at it’s best will help us position it properly.
So our clients might suggest something as simple as:
- Using the area mainly in summer
- Most likely entertaining in the afternoon and evening
These are straightforward, and often intuitively understood by many people. But explicitly outlining them as part of our criteria for this informal entertaining space ensures we think about it as we design.
And for these last two in particular, it ensures we don’t place our entertaining space in an area that is less enjoyable at these particular times of the day and year.
Our Final Criteria List For Our “Informal Entertaining Space”
We’ve now outlined our criteria (or our clients) for this space:
- Have a timber surface (colour etc. TBD) – or we’ll draw on other parts of the design and house to determine how it looks
- A space capable of seating about 6 people
- Somewhere they could relax, have some drinks, chat and maybe some nibbles
- Somewhere to enjoy some sun and read a book
- Using the area mainly in Summer
- Most likely entertaining in the afternoon and evening
How To Use Your Surroundings To Position A Space In A Garden Design
Now we can start to look at the second principle – using our surroundings to position the space.
There are two parts to this.
One is aligning to either existing things like the house, trees or other buildings, OR aligning to another element in your design.
The first is often called ‘the regulatory line’ and basically means you follow an imaginary line from say the house out into the landscape and align to it, or off it, or whatever, in your design.
Or, as I said, you can align one part of your design to another as the design is developed and worked on.
The second part about positioning something is to refer to the environmental and site conditions – where you have sun, shade, high points, low points, slopes, particular ground materials like rock – basically the natural elements of your site. Some of these are static like the ground, others are dynamic like sun, shade, wind and rain.
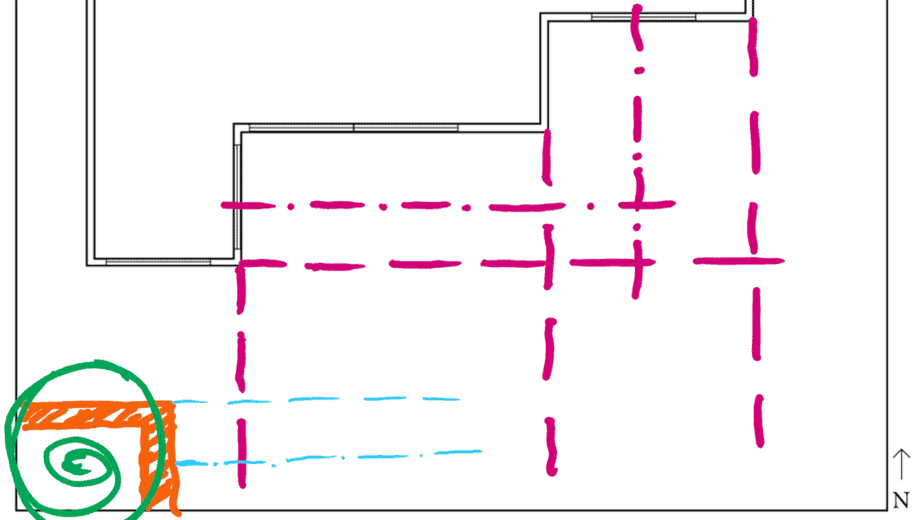
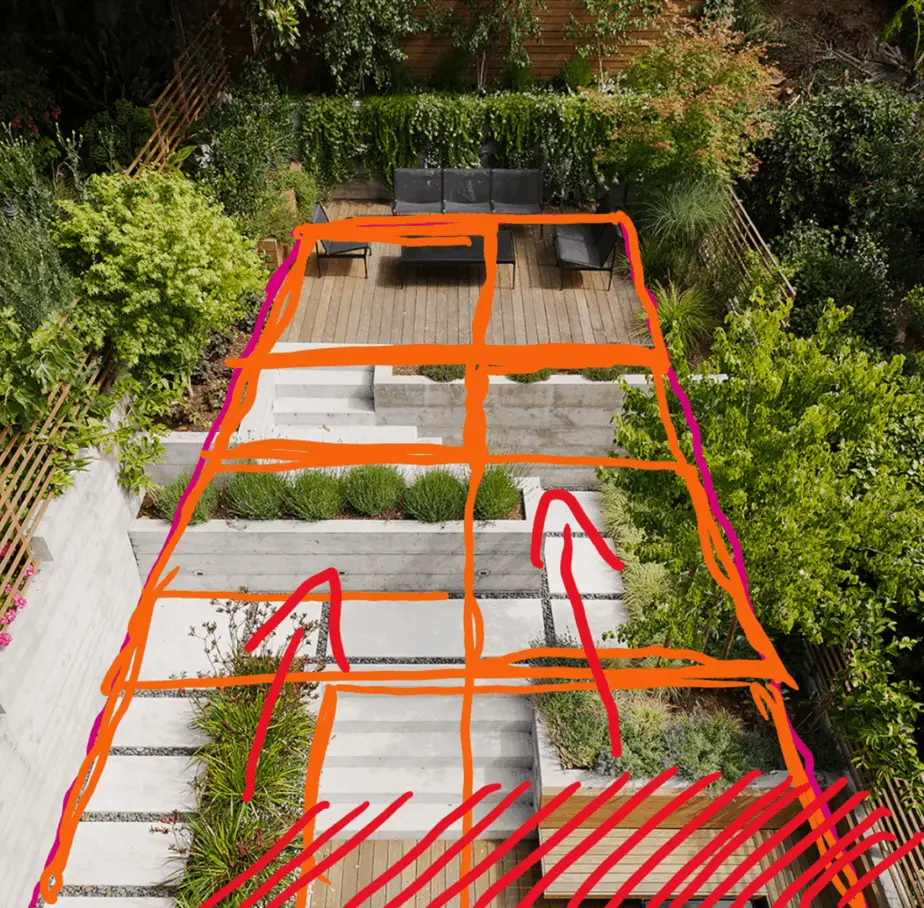
So we’re going to pretend this example design began as a simple flat backyard. When we look at yard itself, there are plenty of positions we could place an informal entertaining space. All of it depends on the size of the space – which we’ll look at next.
For now, we want to eliminate some of our possible options. And the best way to do that is to look at our criteria, see when and a little of how we want to use the space, and then remove positions that don’t tick those boxes.
A simple example is this area at the bottom. It’s closer to the house, which is good, but, from some site analysis we’ve done (again, something I talk more about in my links below) we know it sits on the northern side of the house. And the house is quite tall.
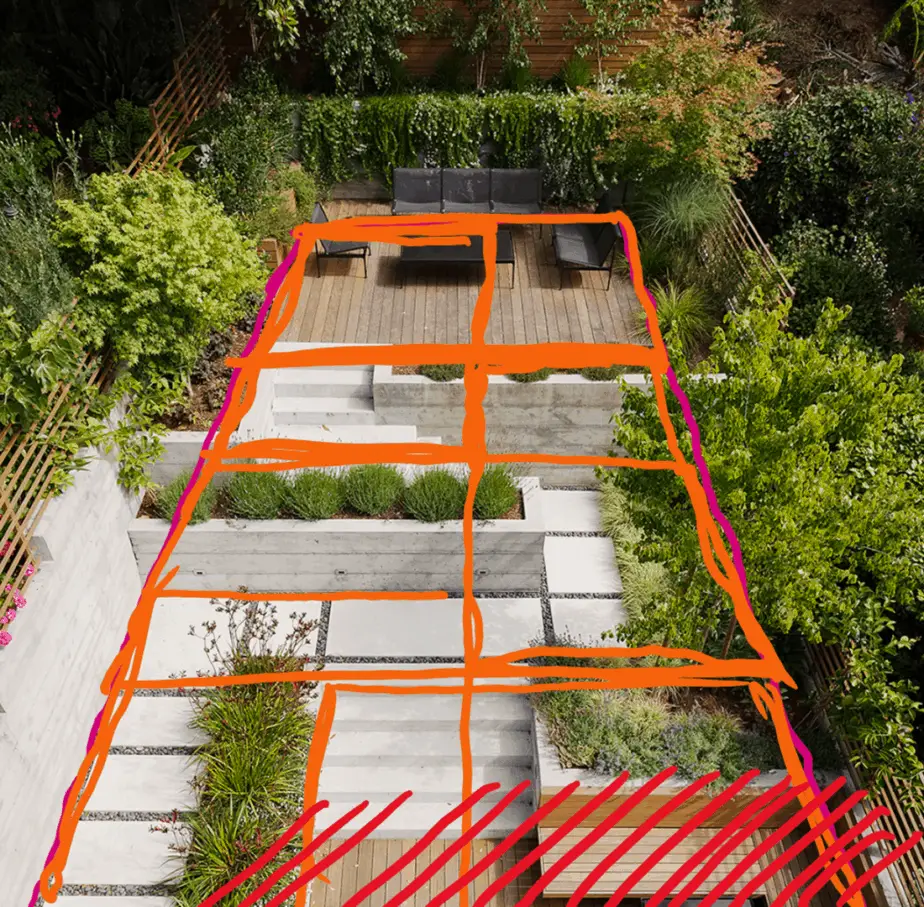
This means placing this space here will put in in a lot of shade – even in summer. Given we want the space to experience some sunlight, these positions won’t do.
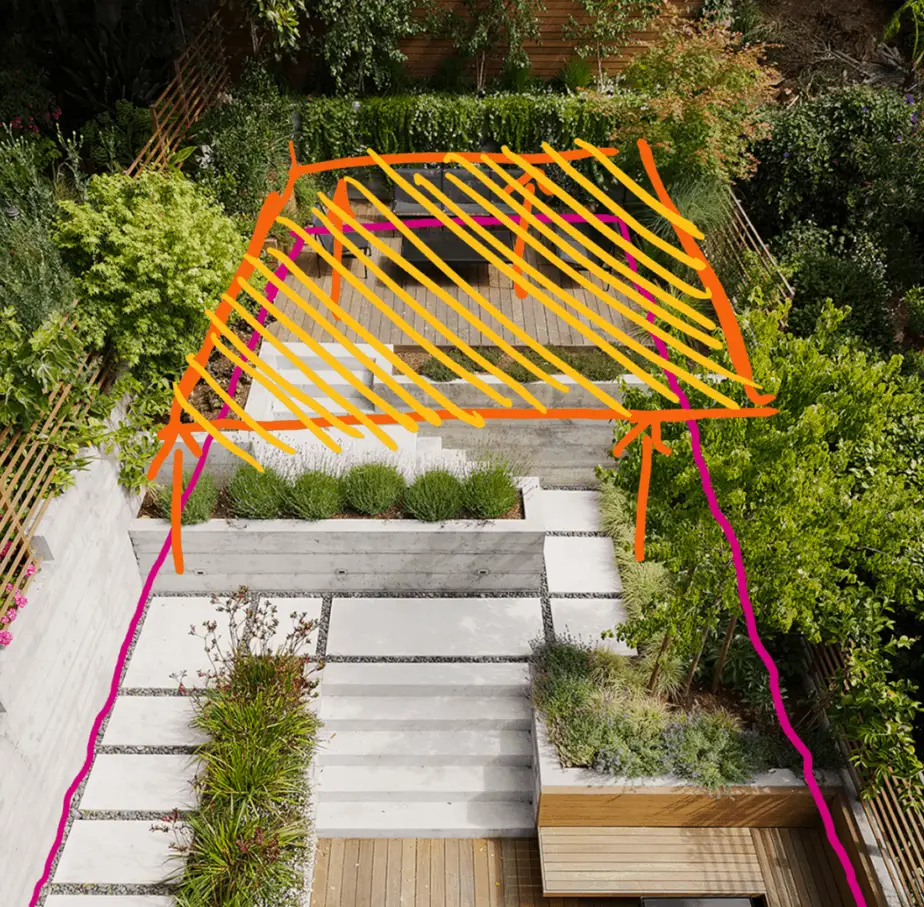
Our solution, as part of our initial design exploration, is to move this area towards the back of the yard. It’s not rocket science, but hey, design can be pretty simple if you just think about it.
As we move back, we are getting closer to the conditions we want – we are likely to get more sunlight, in summer, and probably in the evening (depending on the buildings either side of us).
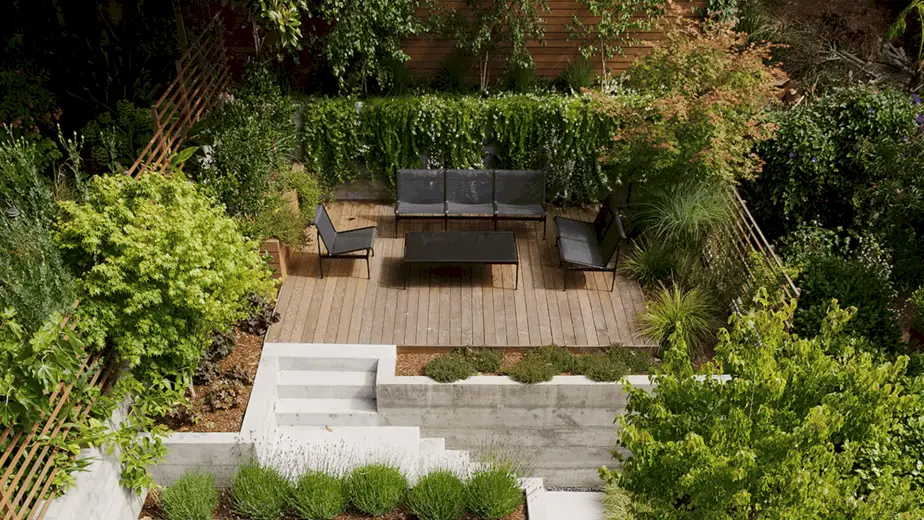
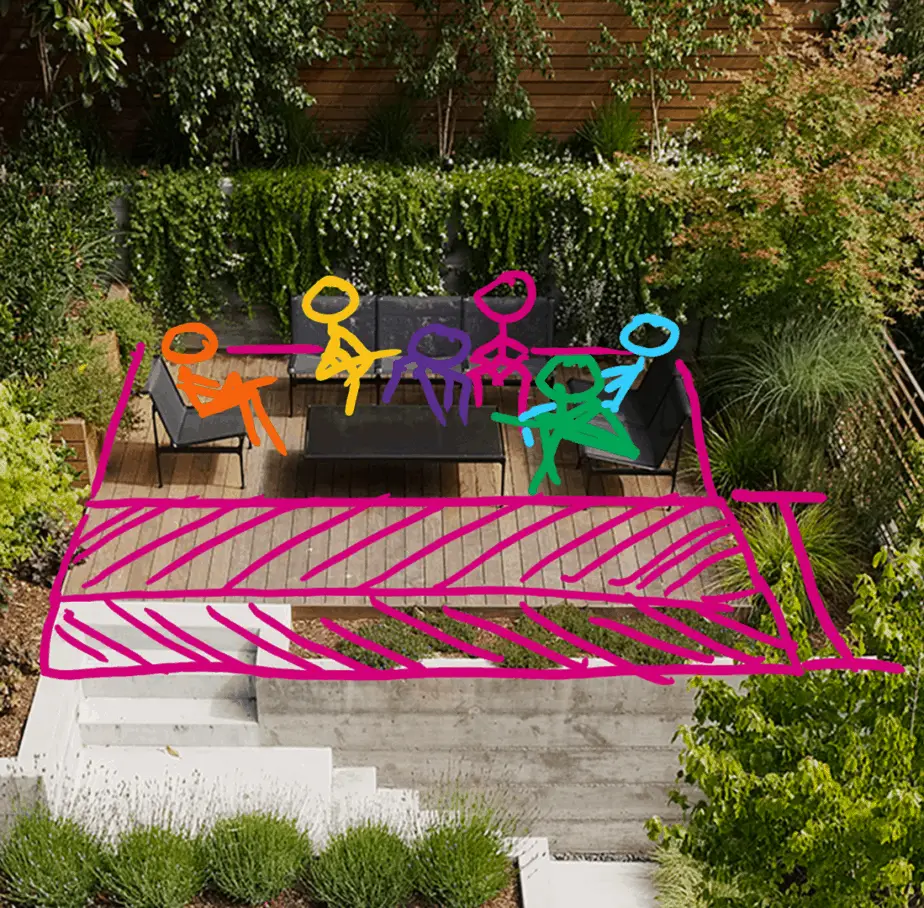
One really clever (yet expensive) thing the designers did was raise this platform to be higher than the normal ground level. This exposes this space to even more sunlight, and adds some dynamism to the whole backyard.
An even neater little trick I think they did was place this rear deck – informal entertaining area – at about the same level as the newly renovated house’s kitchen floor. So when you’re inside the kitchen looking out, you’re at the same level and can easily see people relaxing out there.
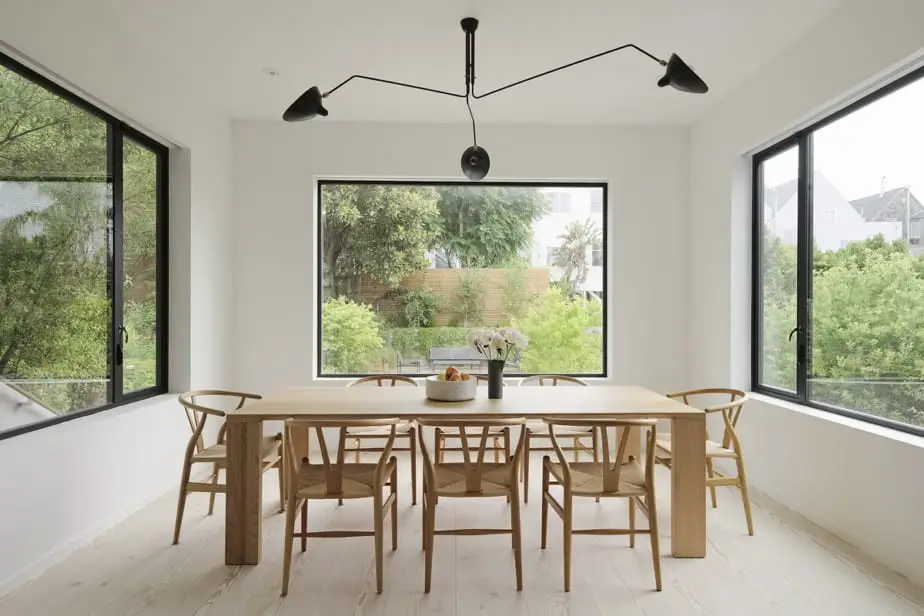
That’s a great example of the regulating line I was talking about earlier- but in this case it’s more of a 3D approach instead of purely in plan view. Love it.
So we’re in roughly the right area now – if we want an informal entertaining space that enjoys afternoon sunshine, during summer, we need to place it towards the back of the yard. If we could raise it, even better, but that might be dependant on cost.
But this whole sequence of considering when the space will be used and eliminating options is one really clear way you can use your surrounding climate and conditions to determine where things could be positioned in your design.
How To Shape A Space In Your Garden Design
OK, now we’re coming up to the final principle – shaping a space by considering the specific requirements it needs to make it work for you.
Our ‘requirements’ in this case are mainly our criteria – in this instance how we want to use it, and for how many people. One way to think about criteria when it comes to shaping and sizing a space is to use those criteria to determine the minimum viable area we need to make it work.
So let’s look at our criteria and see if we can come up with a minimum viable size for what our clients want to use the space for.
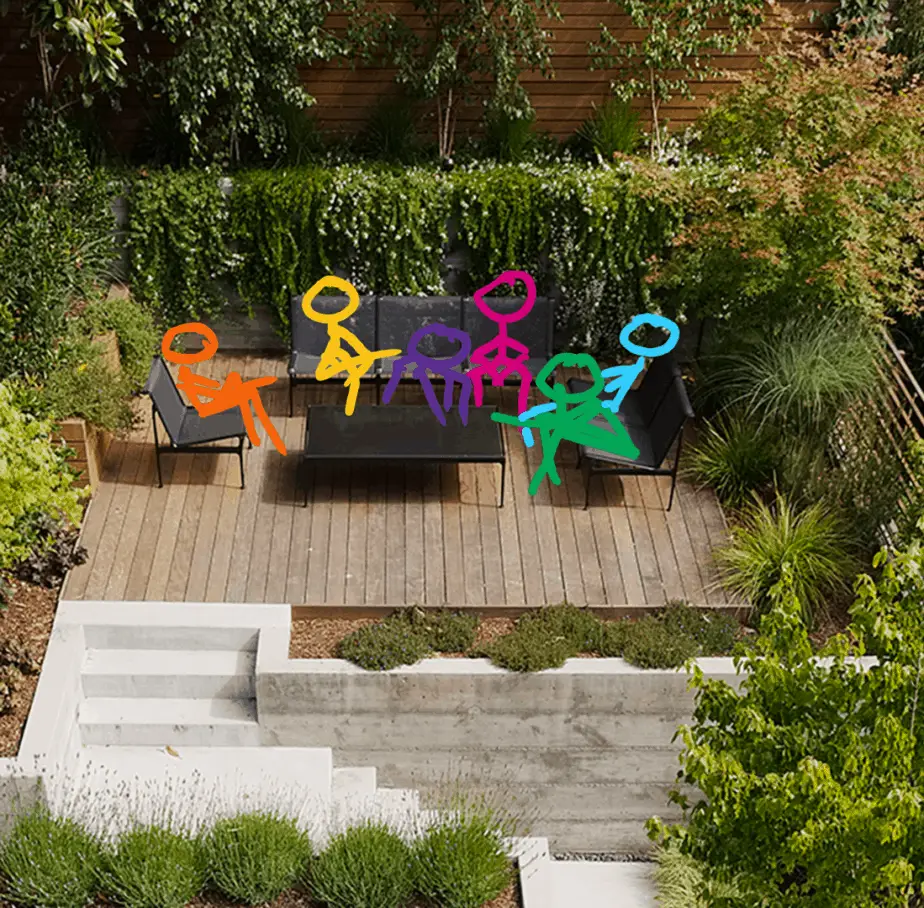
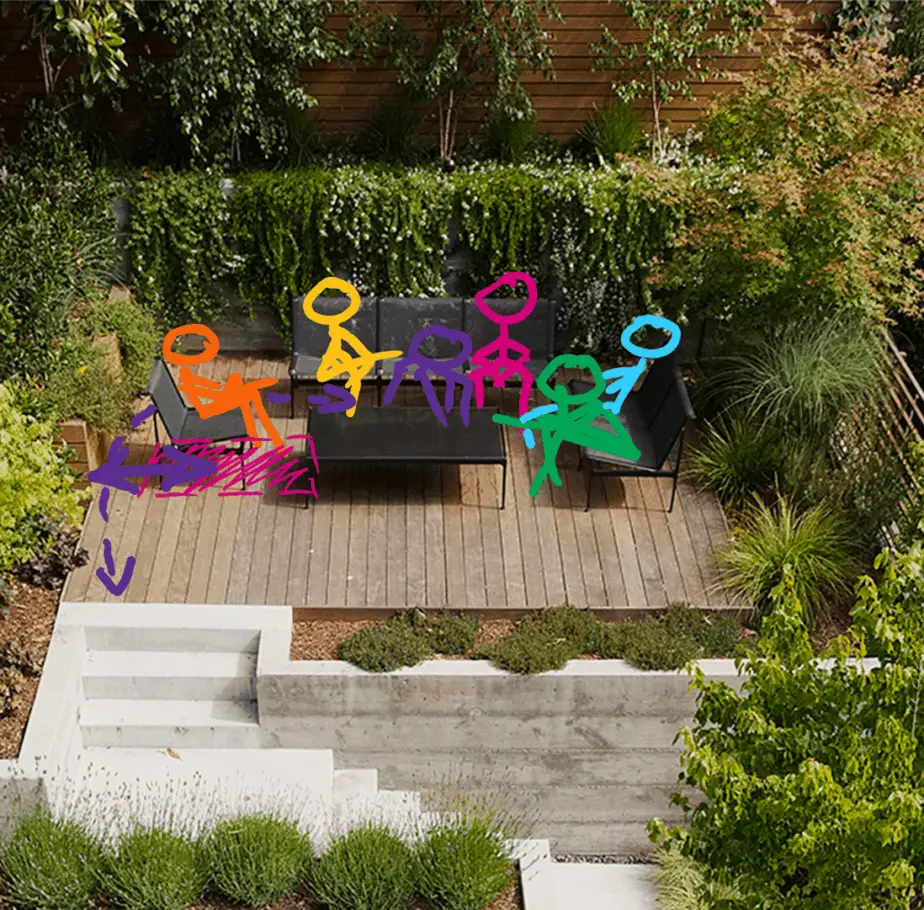
One is they want to seat around 6 people. The other is the nature of what they’re doing – sitting back, relaxing, chatting and sharing stories.
This doesn’t seem that big a deal, but if all we thought about was the number of people, I could put in a bench and say I’ve met the brief. It seats six, they can talk – all done.
But that’s not the nature of how they want to use this space.
Think about when you sit in a chair. The area you take up is more than the chair seat itself – you have your legs out in front of you and room at the side for your rooms.
Take it further and think about the fact you often move a chair in and out to get into it, or allow people to pass behind.
We are less likely to do that in our informal entertaining space, but just like a normal lounge room, you need to allow space around any seats for people to get by. So some room behind the chairs, and in front by peoples legs if need be.
Add in something like a coffee table to support drinks, food, books and maybe feet, and you’re suddenly covering a reasonable amount of area.
If you’re unsure how to determine how much we’d need, look at existing furniture and spaces around you – like the chairs in a lounge room, or the area of a lounge room itself.
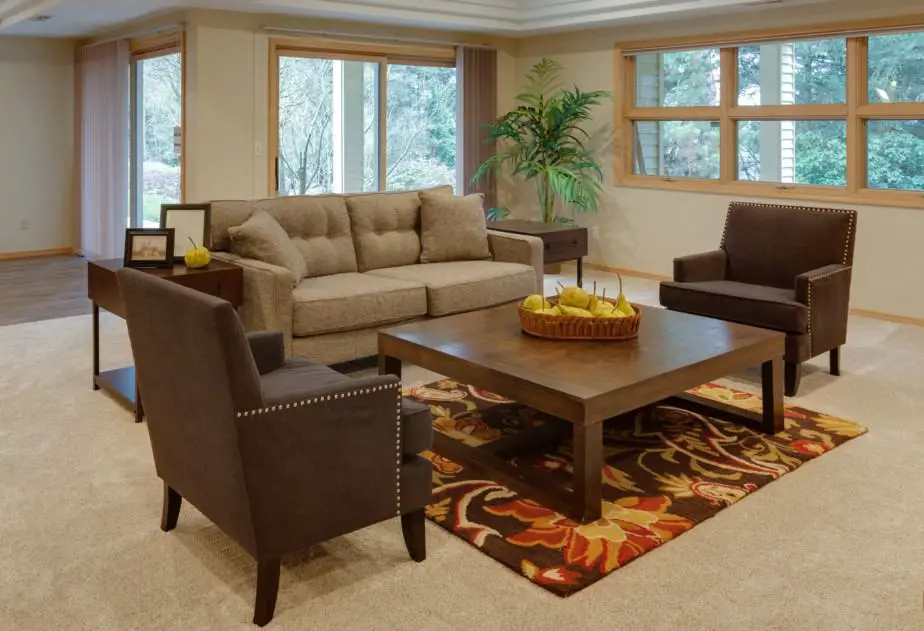
This gives you a ready made template to work from to measure out how much space we need to seat 6 people, and allow them to relax in relative comfort.
And that, really, is the best way to determine the minimum space we need for our informal entertaining area.
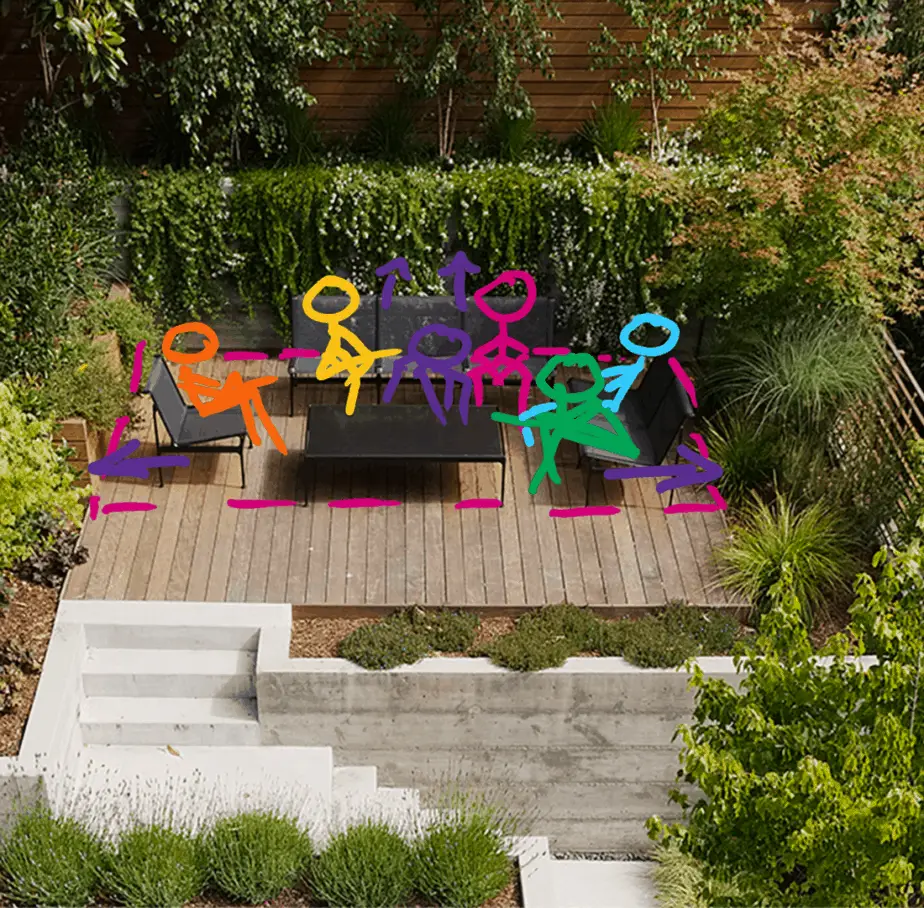
You can orient things in different ways and move them around – in fact, I’d encourage you as you explore different design ideas – to do that.
Move these components within a space – the chairs, tables and anything else you think it needs to make it “work” – around in different configurations.
See what works best not just for the space itself, but how it interacts with the spaces around it. And if you explore having different spaces around it – not just the garden beds we see here – you’ll find you need to orient the components within this space differently to make things work.
In the example we have here, all the components are mobile, so the orientation and position of those chairs and table matter less. They’re flexible, they can be moved around. But, the important thing is they have the space to do so.
Considering Spaces Around This One In Your Garden Design
There is one thing I want to draw your attention to around what the designers did on this occasion. I mentioned above that you need to ensure you have room around your chairs and things so people can move through the space while others are sitting down – you don’t want them clambering over each other.
But I also said you need to consider how this space interacts with others around it. And this design provides a great example of that.
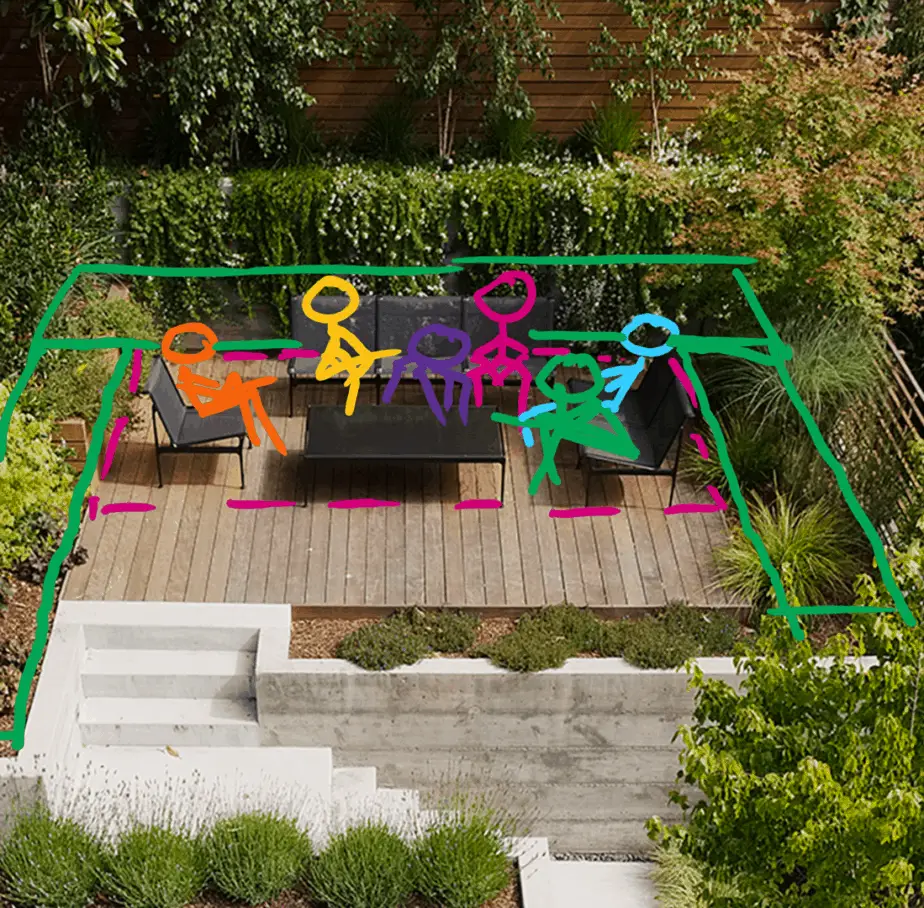
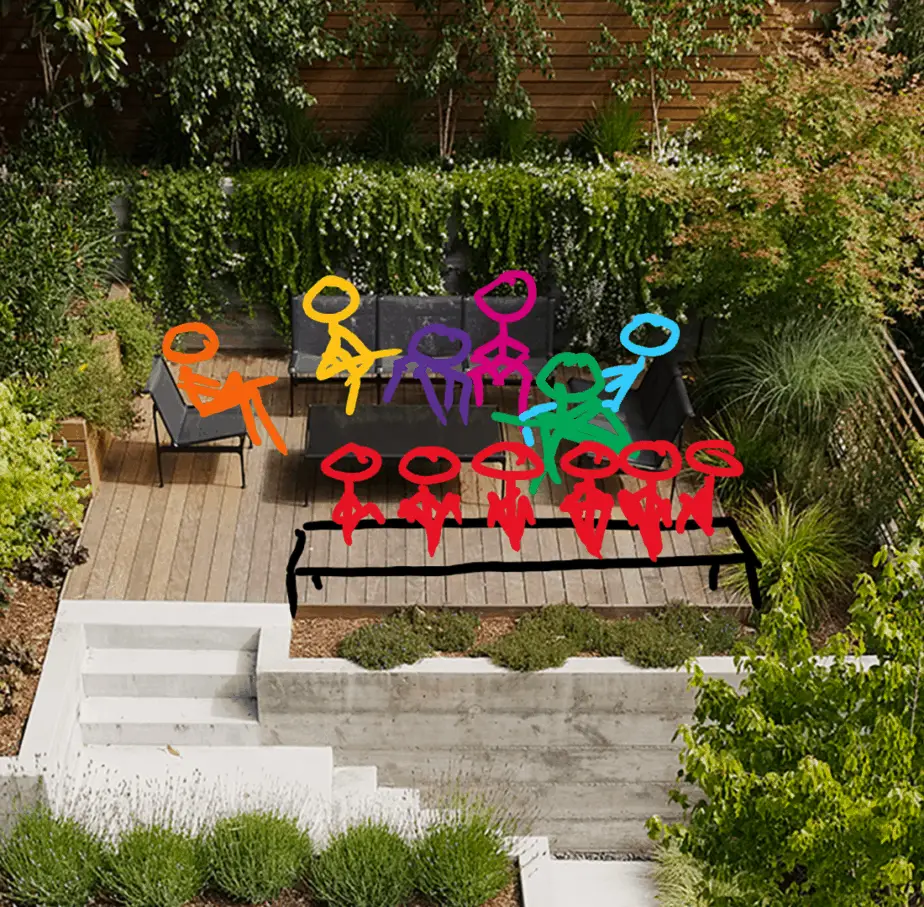
You can see we have three garden beds along the left, back and right sides.
Now I usually think of garden beds as “features” – visual elements that are intended to be, well, features, rather than a space you physically occupy to “use”. Although you need access to maintain them, you’re not really going ‘into’ them like you would our informal entertaining space here.
This is important because, as you can see, this means we can push components back – the chairs and tables – closer to these garden beds.
No one needs to go around the back or the chairs, really, to get to other parts behind the space. So the designers reduced the size of the deck slightly which probably allowed the garden beds to get bigger.
I’m speculating a little here, but I hope you get the point I’m making. When we look at sizing a space, we consider what we need to make it work.
But good designers think about the other areas around it, and how this space will interact with those – and they’ll notice when they can take advantage of things, like space – which is in short supply in this small yard.
The flipside occurs on the other side, where there is plenty of room. Perhaps for easy access, or to add more chairs, or simply to fill the space up to the steps. It’s likely to be a mixture of the three, and could have evolved over a few different iterations of the design.

So I think, looking at this informal entertaining space, this design is probably the minimum space I’d feel comfortable with for the criteria we originally set.
For our version of this design, we could expand it a little if we like – perhaps widen it a bit, or have a narrow raised bed at the back.
But ultimately, for this design in this small yard, that extra space for this deck is unlikely to add much value to the space itself. If you had a larger space – and perhaps your yard would have more room to spread out – then you could explore how big you wanted to go.
Maybe make it much larger, until you align with another regulatory line in the design, house or site.
Or you think about how cheap or expensive the space is likely to be. If it’s cheap, feel free to cover a larger area – get more bang for your buck. If it’s expensive, keep it to a minimum size and let other, cheaper areas (like a garden bed) fill in the space.
Engineering vs Art In Garden Design
I’ve talked a little bit elsewhere about the idea of engineering vs art in design.
When I think about introducing more ‘art’ into a design, I tend to think about this balance. Between ensuring the space does what you need – the minimum size you need to make it work – and the maximum size you’re willing to expand it to.
All that possible space in between is something of a spectrum, and you can explore different ways to fill it – that’s where your own artistic approach can take over.
Summarising The 3 Landscape Principles That Position & Shape Your Garden Design
So, I think I’ve rambled on enough here. I hope you found this little exploration useful. Let’s quickly touch on the three principles we went through, and how you can apply them to your own designs.
Develop Criteria
- What you want a space to look like, how you want to use it and when
- You don’t need to know all of these right at the start – you can chop and change your criteria as you go – finding more examples, taking points from other parts in your design, or adjusting how you want to use a space and when
Use Your Surroundings To Position A Space In Your Design
- Generally more about when you want to use the space
- Most helpful for the major areas in your design
- You will have clashes, where certain spots are good for multiple activities or spaces
- If that’s the case, you’ll need to try and combine the areas to cover multiple things, or prioritise which one goes where
- Really think about the best conditions for this particular space – it’s not always about sunshine and shade – you might need to consider things like wind, rain, neighbours looking into your space – all kinds of things
Use The Requirements Of The Activity Or Space To Shape And Size It
- Generally about how you actually use a space
- The physical movements within it
- What you need to make it work (seats, tables etc.)
- You can use existing things around you to get an idea of how large, small, wide, narrow, tall or short something often is, and start with those dimensions
- Once you have an idea of these dimensions or requirements, every time you design the space, you have a benchmark for whether or not it will “work” for you – the minimum viable area for a space
- As you get more comfortable, think about the areas around this space and how they interact with it
- Do you need to maintain access all the time to an area nearby?
- Can you save some space and use it better elsewhere?
- Lastly, you don’t need to stick to the minimum size – that just lets us know you’ve designed something that should work for you (it meets all your criteria) – you can expand the space to be larger, until you meet other parts of the design
- This is where the “art” can come in – where you don’t need to justify why something is a particular shape or layout. As long as the space functions how it should – according to your criteria – you can go a little crazy with the outer edges if you like
And that is it for todays post. I hope you found it interesting and a useful way to position and shape spaces in your design explorations.