If you’re looking to improve or update your backyard and/or garden, there are plenty of cheap DIY landscape ideas you can look to for both inspiration and actual implementation/construction.
The problem that many DIYers don’t realise until later, is that each little idea they add has no connection to any of the others around them, or your yard overall.
For some people this isn’t a concern, but for others, it becomes a problem they try to fix by – you guessed it – adding more “projects” on top of older projects, to try and make things work.
The real solution, that I talk about all the time in my content, is to create a full, site wide – or backyard wide – landscape or garden design. As we’ll see, this eliminates a lot of problems and helps you plan how you will use your time, money and effort.
We’ll look at that in more detail shortly, but the other thing to touch on – the main focus of this article – is how you can incorporate some of the DIY landscape or garden ideas you find into a broader design.
I’ll walk you through five DIY examples I found interesting and discuss how they can not only fit into a backyard design, but help inform the overall look, style and feel of your whole garden.
How To Solve The “Isolated DIY Project” Problem
The positive part of little DIY projects – and the reason they are so popular – is they are simple, achievable tasks you can prepare for and build in a few hours or days. They can make an empty or dead space more usable and can liven up an area – completely transforming it into something that is more than the sum of it’s parts.
I mentioned above that the main issue with DIY projects you find is they are isolated projects. They sit in one part of the yard and there are no steps telling you how to tweak it or adapt it to suit your particular garden style or look.
The solution to this problem is to do the research and exploring during your design process.
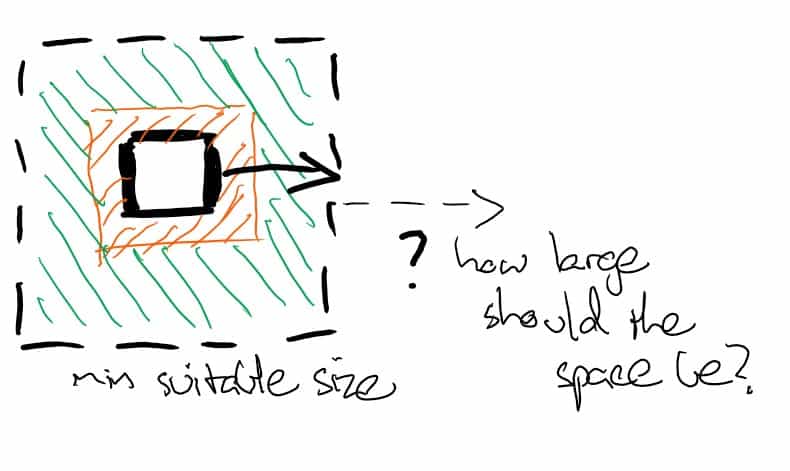
If you want to include a space like a fire pit, do some research before you even put pen to paper. Look at what materials you need, how much space you need, and the likely time and cost to build it. This information is crucial to helping you position where you want the fire pit to go and how large or small the area can be.
By repeating this process with other DIY related projects, you can quickly develop a rough layout of a complete garden design.
You can dot your individual “projects” around your site, and rather than try to squeeze isolated things together, you can have elements of different spaces cross from one area to another, improving the connections between them.
Why Creating A Complete Garden Design Saves You Time, Money & Effort
If you have a backyard or site wide design you are working towards, you can plan ahead on many important things. Even a good draft design will give you approximate:
- Dimensions
- Quantities of materials
- Costs for materials
- Time to source materials
- Time to build project/area
- Effort required to source and build
This may sound trivial, but how many people waste their long weekend trying to pick between options, sourcing the correct materials and preparing the area they are working on?
If this information was known in advance, many projects would begin on Saturday morning and end Saturday night, instead of dragging on over the whole weekend.
Another benefit of having a site wide plan is you can pick and choose which part of your design you want to work on first, then complete the rest in stages.
You may have months or years between building your different areas, but because you are building to a ‘master plan’, you know everything will work together, with no issues trying to reconcile or connect spaces.
Relatedly, if you want to try and recycle or upcycle materials – for ethical or monetary reasons – you can be far more specific in what you search for.
Instead of looking for something to build a path with, you are looking for a specific amount of bricks, of a specific colour. Or you keep an eye out for second-hand timber – again, a specific amount of a certain type or colour.
This approach works particularly well if you plan to build and develop your garden over a long period of time, and you have room to store the things you find until you plan to use them.
And if you stumble across something unexpected that you simply have to include in your garden – no problem. Add it to the pile and see if you can adapt your design to make it work.
Speaking of adapting your design, a third benefit is you have the ability to chop and change your design during the build process.
You can respond to having more or less money, more or less time, more (hopefully not less) DIY ability or any number of other life circumstances or events. By taking stock of what you’ve built vs what you have left to build, you can alter your design to meet these changes.
Perhaps you increase the size of an entertaining space. Or add in some items like BBQs or pizza ovens. Or provide a space for a children’s play area. Or reduce the size of your lawn. Or deal with a drastic change in lifestyle (like an injury or illness) by making all spaces suitable for wheelchairs or strollers. You get the idea.
So you can see the benefits of having a full design to work from. The question is, how do I create a plan filled with items I can actually build myself?
How To Turn Individual DIY Projects Into A Cohesive Garden Design
My recommended approach for beginner DIY garden designers is to follow these basic steps:
- Create a scaled base plan to trace/draw over
- Conduct some site analysis to identify problems you want to deal with and opportunities you want to take advantage of
- Create a ‘skeleton’ plan highlighting these areas
- Look for inspiring ideas that handle similar problems or enjoy similar opportunities
- Create a first rough draft, placing these ideas in their relevant spots
- Create more drafts, where you swap new solutions/ideas in and out, move things around in the design or explore more creative ‘hunches’
This is outlined in more detail with examples in my 6 Step Beginner’s Guide, but for our purposes, Step 4 will be the most important.
In this case, not only do we want something that inspires you and is a solution to a problem or takes advantage of an opportunity – we want something you can feasibly build yourself. Now, or at some point in the future, without requiring a course in landscape construction.
Luckily for you, finding DIY projects and examples is the easy part. Youtube, Google, Pinterest and Instagram are flooded with ideas. Spend five minutes on any site and you will stumble across 10 different DIY landscape ideas.
The key from following a process like the one outlined above is that you are a bit more specific and structured in how you respond to problems or enjoy opportunities. You’re not just browsing mindlessly – you’re browsing with more intent.
You know you have a position in your yard that captures plenty of sunlight – what DIY specific things can you find that allow you to enjoy that space?
Or perhaps you have a problem with water collecting and pooling in a particular spot – what kind of DIY solutions can you discover to handle it?
I guess the difference between a generic landscape design approach and a DIY specific one is you are likely to keep the design simpler. While the ideas may start as isolated DIY projects, working on paper allows us to find ways to link the different things together.
Let’s jump into how we approach that now.
How A Fire Pit Can Shape A Space In Your Garden
Let’s start with an off the shelf product many people may want to add to their gardens. If you came across something like this square fire pit from stonewoodproducts.com, how would you incorporate it into your garden?
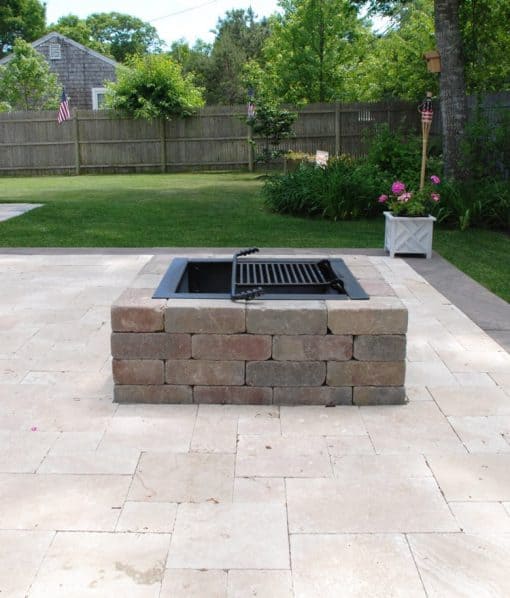
The first thing a square fire pit says to me is it suits a formal garden style. Add in the various stone finishes and you end up with a classic, more colonial style of garden. Trying to make this fire pit mesh with a natural, curved garden, is challenging and I wouldn’t recommend it.
So how would we use this in a garden design?
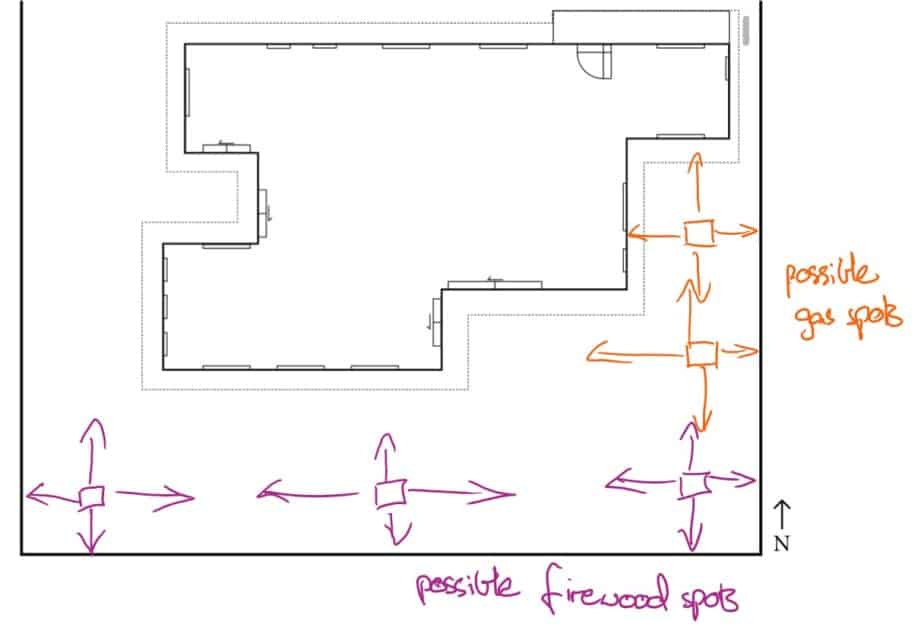
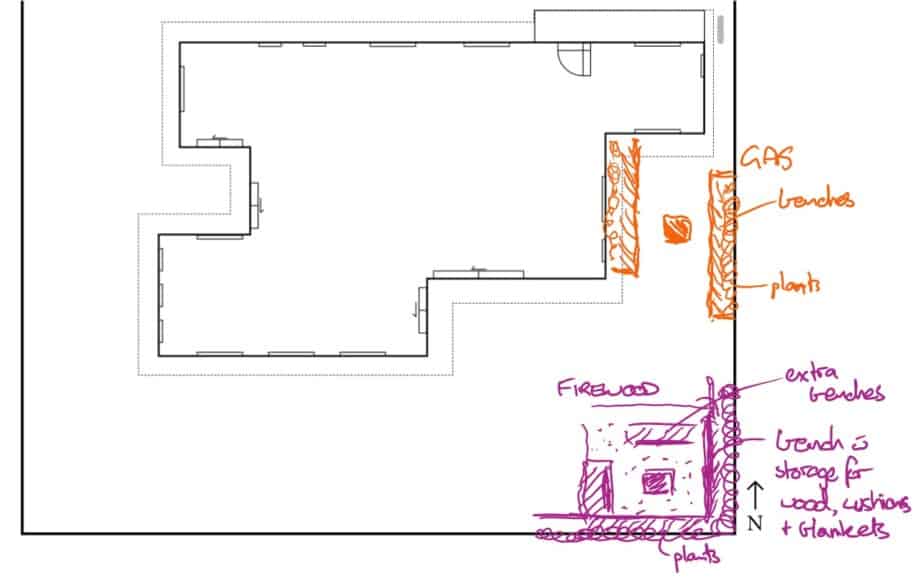
The first thing to think about is does it need any specific connections or equipment to make it work? If you need some sort of storage nearby, for gas or other materials, consider where those items could be stored, and safely.
If you need it near an existing gas line, as part of your site analysis, determine where the nearest point is and consider how far away from that line you’d be willing to move. This will limit the suitable positions for this fire pit.
Alternatively, if you are looking to use firewood, this may flip the scenario – you may want to place it further away from the house. This let’s you keep firewood – and things that enjoy hiding in firewood – away from you building. It also makes smoke less of an issue.
The second thing to consider is the layout of the space itself. Think about how it will be used – more importantly, how much space you want to have around it.
Too small a gap from fire pit side to the edge of your sitting space and users will be too hot. Too far away and you’ll have a large, empty space behind your seats. This can be hard to judge without using it, but reading some reviews might give you an idea of what is appropriate.
The flip side of how the space functions is how the space looks. As we noted, the square shape is quite formal, and something we will look to mimic in the borders and edges around our fire pit sitting area.
Another thing to consider – are you opting for fixed or moveable seats? What kind of material are you looking to use? Do they need to have storage or cover nearby to store cushions or blankets?
You can start to see that there are a lot of little things to consider when it comes to something simple like a fire pit – and we haven’t even touched on the ground material around it. You’re likely to opt for a hard surface like stone, or perhaps softer like gravel – but certainly not grass.
Finding solutions for all for all of these little details is what separates good designers from great designers. And reducing the number steps required for you to use the space will ensure you do use it as often as possible.
If you have to waste time bringing out seats, cushions and blankets each time you want to use it, you’re less likely to use. It’s human nature.
Having done all this work, you may determine a position or two in your garden where you think a fire pit will work best.
From your research you know the minimum ‘offset’ you need – the distance from the edge of the fire pit to the edge of the seating area (including seats).
And you know the approximate shape of this edging – here we’re likely to be straight lines, square corners. Finally, you have planned spots for storage and other materials if needed.
All of those elements reduce where other things you want in your yard can go. If the fire pit occupies one or two potential spots, other activities or spaces can’t go there. And if you need seats, benches or storage around it, that takes up room as well.
Finally if you want to keep certain things away from the fire pit, that will impact how you layout your garden design as well.
All of this from a simple DIY fire pit. Let’s see how other DIY ideas or projects can influence other parts of our garden design.
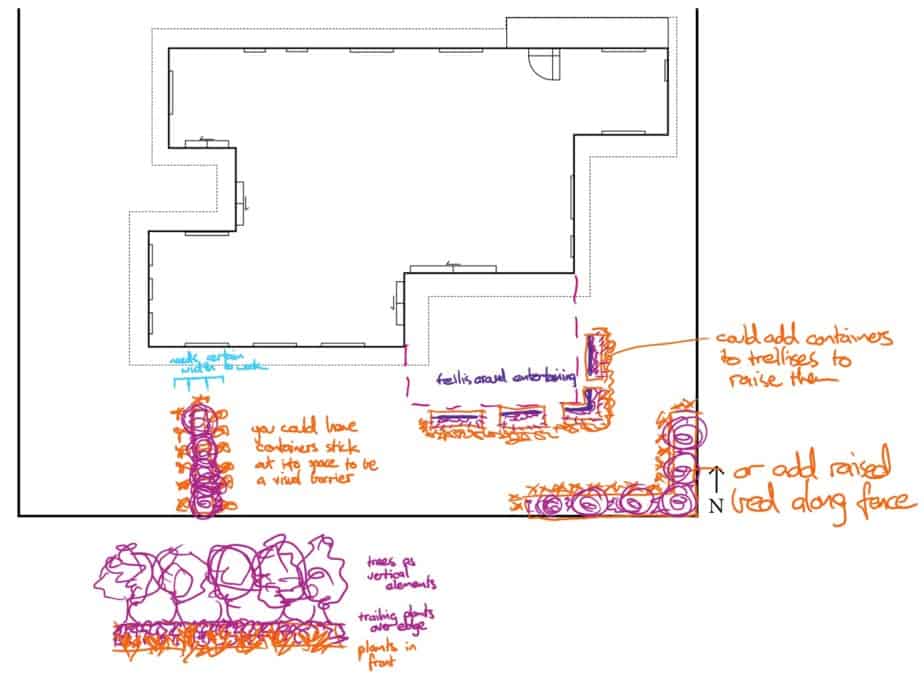
Using DIY Trellises To Provide Quick, Cheap Screening
I touched on this approach in my other DIY landscape ideas article, but thought it was worth exploring again.
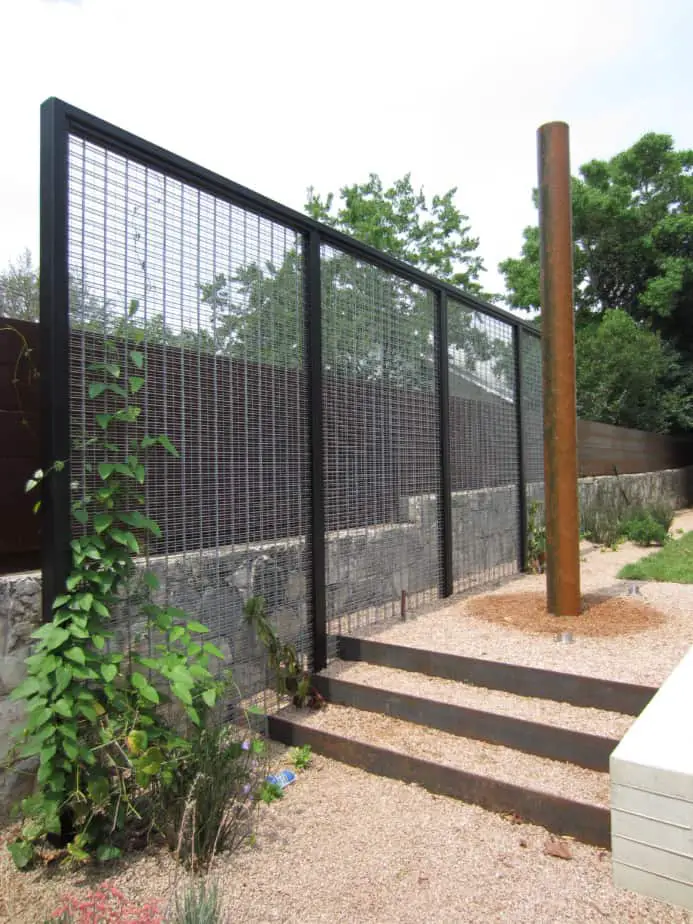
Deanna and her partner from homesteadandchill.com put up some simple framed wire trellises as a series of screening elements. This is different to many peoples approach of planting a cheap, boring hedge that takes 2-3 years to provide any kind of privacy.
While the screens shown here have a vine that will provide cover, if you want some privacy straight away, you could fit a cheap opaque material behind them – like a board, layers of mesh or canvas. Just ensure they aren’t wind traps – allows some small gaps so breezes won’t catch them and blow them over.
The idea above is a great example of a solution to a problem – if you have areas you want to make more private, or reduce neighbouring oversight, something like this is a great solution. But how would it influence a design?
The first is by it’s location. Dealing with a problem means it is likely to sit in a specific spot – along a property boundary, or around an entertaining area (wherever that ends up being). Somewhere you want to screen off, to keep private.
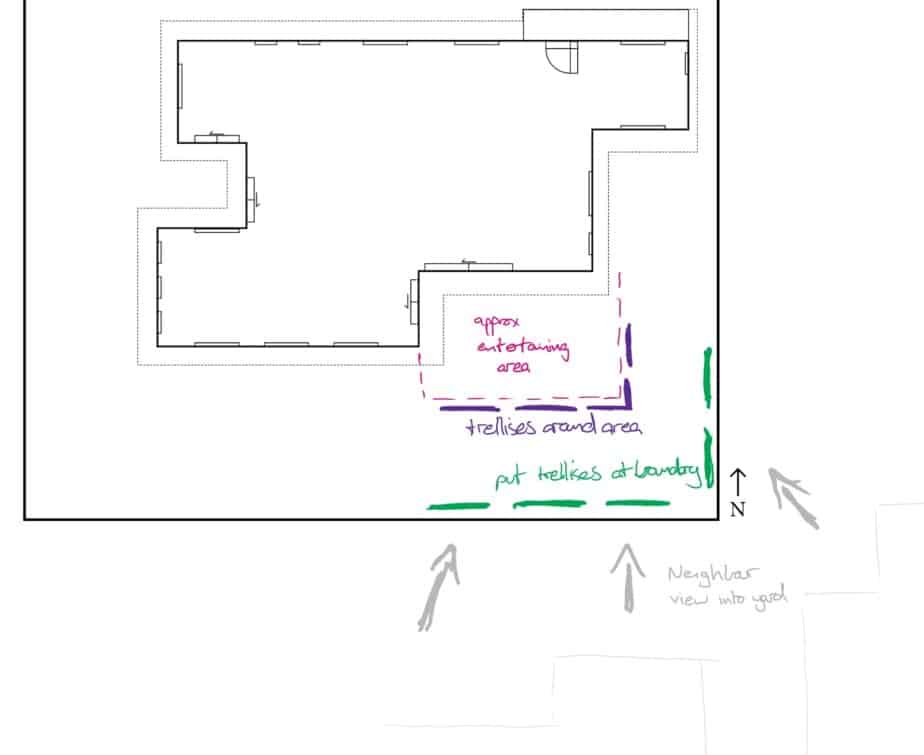
The former means you can place it in that same location in every design you explore. The latter means the position of trellis – and it’s dimensions – may change depending on where your ‘private’ area is.
It’s dimensions may change if you want to raise or lower the height of certain sections. You may do this to allow more sunlight in, or you only need to block out certain views, or for purely aesthetic purposes.
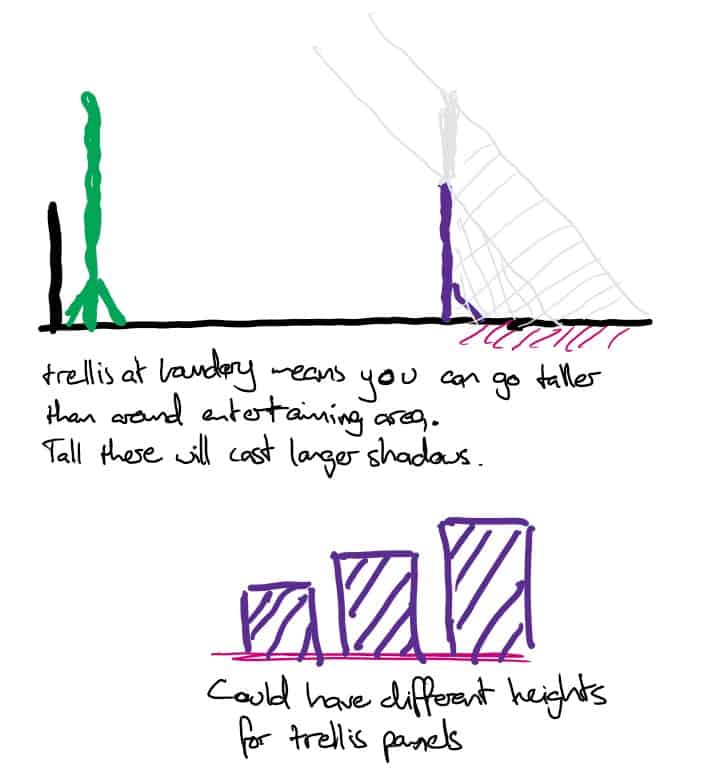
If you want to block sight from the South (in the Northern hemisphere) or the North (in the Southern hemisphere) then you want to find a balance so you don’t end up creating a large wall that blocks all sunlight simply to have some privacy in your sitting area.
Another way this idea can influence your design is through material choice. If you plan to have a number of trellises – along a boundary or throughout the garden – then the materials you use to build them (and the plants you choose to climb them) will have a big impact on your style and colour palette.
This is less about getting the specific materials from a DIY project like this, and more about recognising whatever you choose to go with – for frames and plants – will be a strong part of your gardens aesthetic.
The example above uses timber frames, which work well with the more natural, cottage garden aesthetic. But if you want something more contemporary, you may need to opt something different. Different colours, sizes and materials.
It’s the same with your planting climber choice. Whatever you decide needs to work with the rest of your design. The foliage colour, flowers and perhaps even the branches and stems could help influence other areas in your design.
This can become an opportunity, particularly if you like the materials in the DIY idea you are using as inspiration – or to actually copy and build.
Simply take your preferred materials for your frame, trellis and plants as a starting point for the rest of your design. If you weren’t sure what plants or colour palette to use, now you have a point to work from.
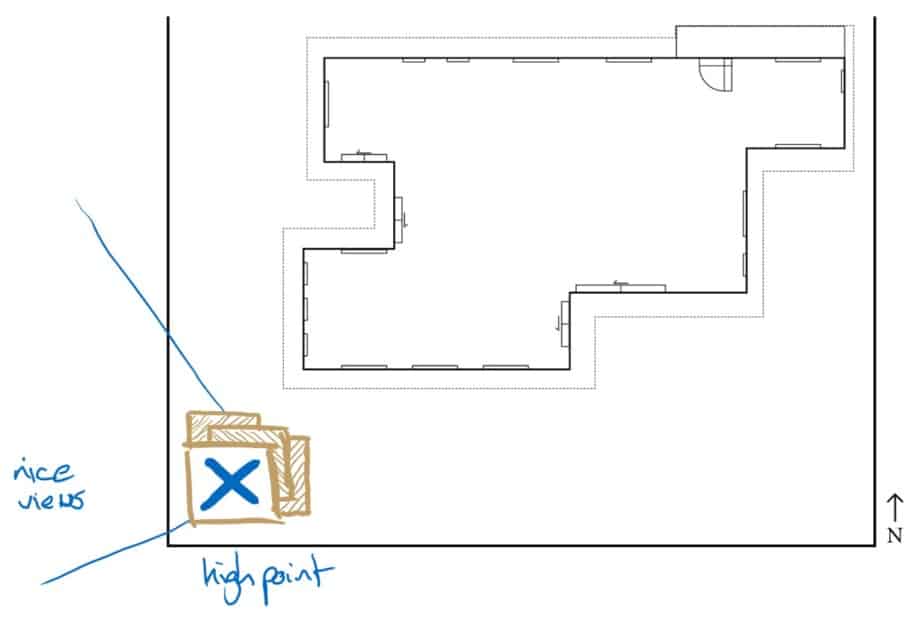
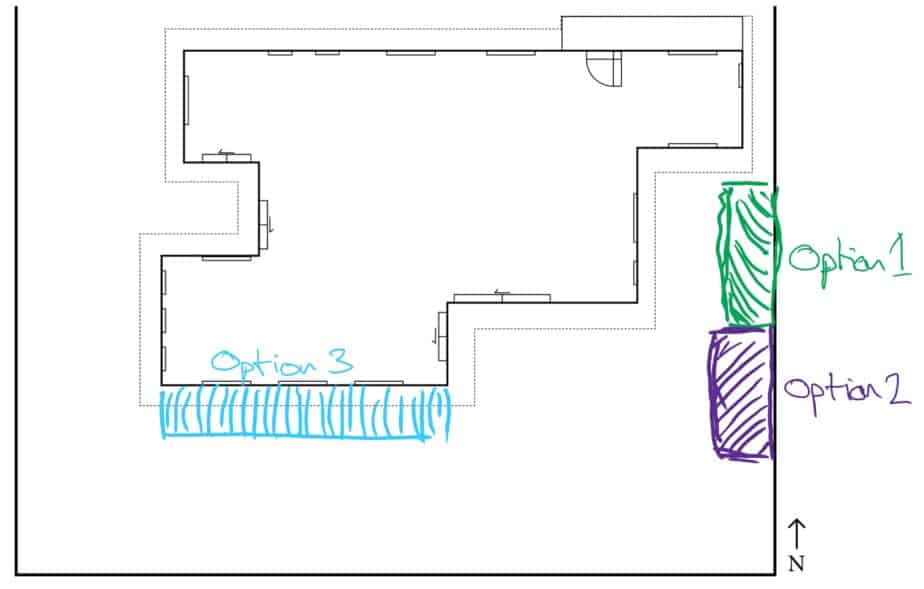
Taking Advantage Of Views With DIY Viewing Platforms
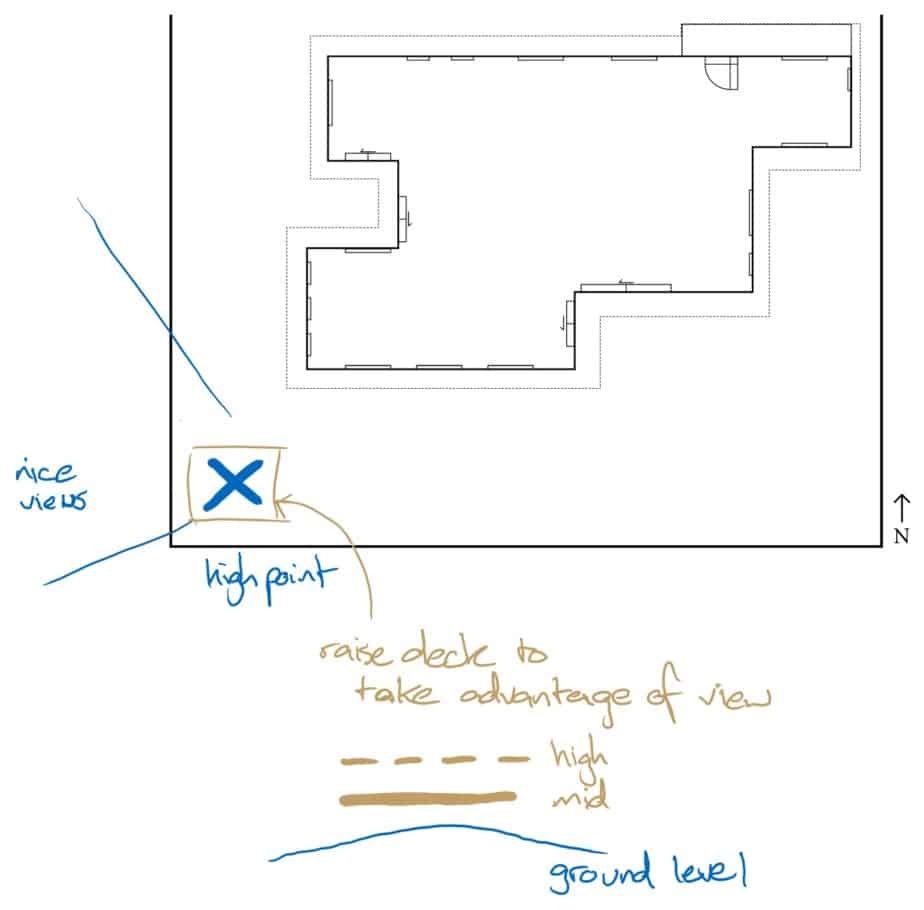
This is a bit of a cheeky option, as it’s basically a DIY deck or sitting area, but the point here is that instead of randomly placing it in the corner of your yard, you could take advantage of an opportunity like a lovely view.
When people try to design backyards, they design from a birds eye view, looking down. They then just draw random shapes and lines, or put certain activities or features in somewhat random positions.
This idea – to try and take advantage of a nice view or object that sits outside your property boundary – is likely to force you to do two things:
- Walk around your garden/ backyard to see if there are any views worth highlighting – take a ladder if you need to and see what you can discover
- Plan a simple DIY project in that spot to take advantage of this opportunity
So if such a view pops up in your garden, think about how you can work with it.
If the view is only from one position, now things get interesting. You have a set spot in your garden where this ‘activity’ has to take place – no exploring alternatives in this case. The rest of your garden design needs to work around this point in some way.
Another thing to think about is whether you can raise the level to provide even more of a view. Taking the deck or surface higher from ground level may add complexity to the build – taking it out of range of your abilities (or price range).
But, it may also provide even more opportunities to play with your design – adding terraces, steps or other ways of bridging the gap from the top to ground level.
Now that we have an idea of where (and maybe what) this viewing point looks like, you can also think about the view from there to the external point of interest.
You may not want to have anything in between this point and your property boundary. This line of sight ‘tunnel’ then changes your design further.
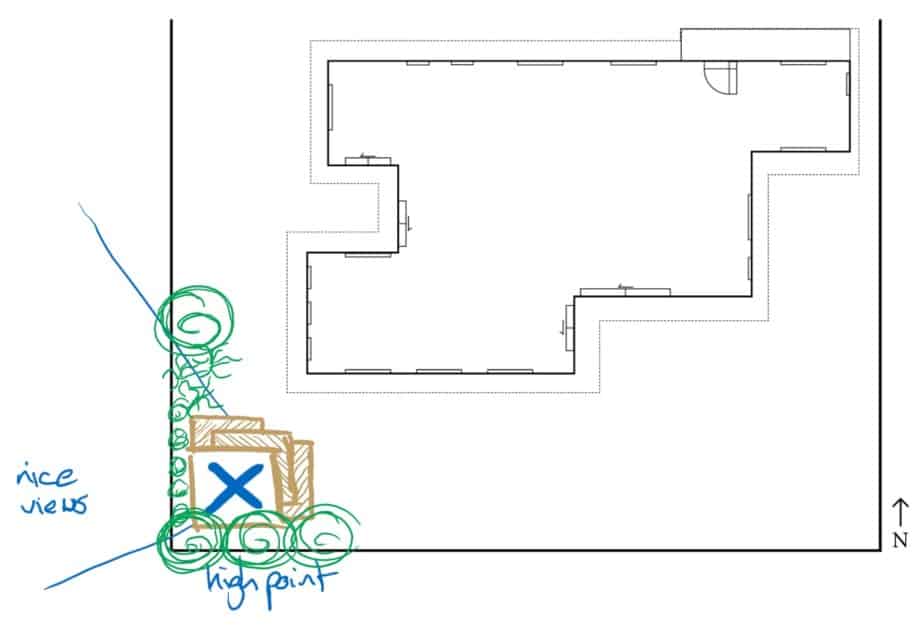
Finally, how subtle or obvious will you be in ‘framing’ this view? Is it something that viewers need to discover as they reach the viewing spot? Or will you point it out with some sort of frame or overt set up?
Whatever you choose, this entire process is likely to impact a large part of your design – indeed, the DIY part (the viewing spot and/or the framing) is not really the focus at all.
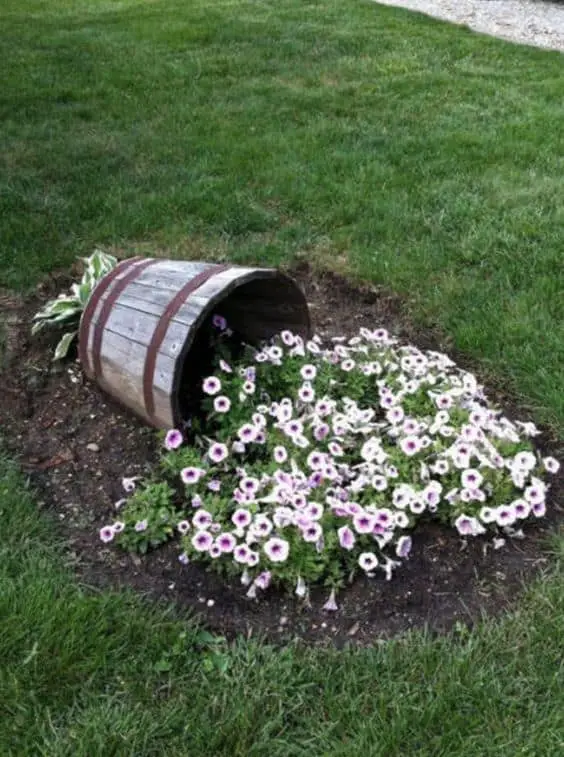
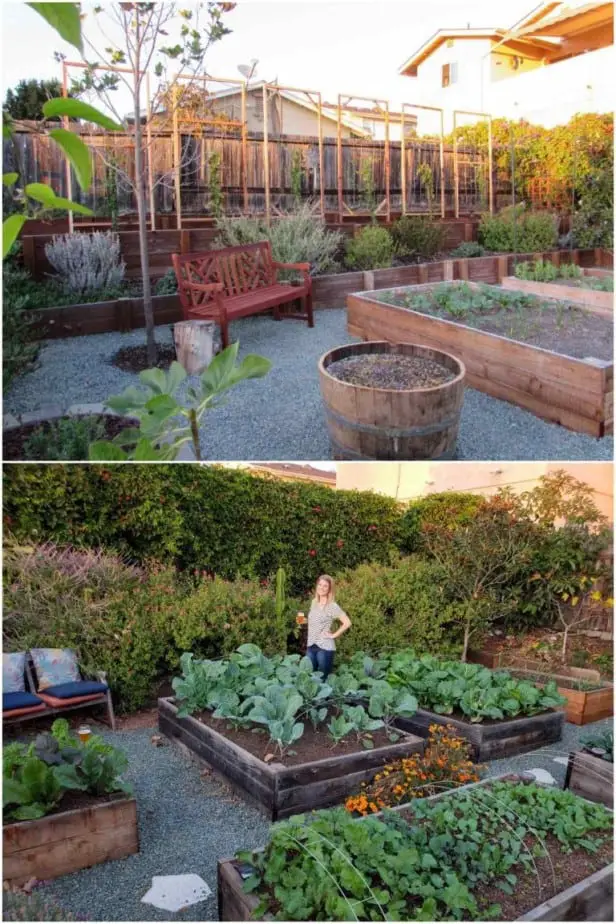
Starting A “Seed” Bed To Give Your Garden A Head Start
This idea is all about having a first, origin or “seed” bed that you plant the majority of the main plants in your garden. Now you don’t plant literally all the plants here – just a small collection of them.
Once they reach maturity, or a certain size, you can propagate your plants, taking cuttings or dividing them to spread them around your garden – essentially for free!
If you plant to build over few years – doing DIY projects when you have the money, time and inclination – having a garden bed with some growing or mature plants set up will save a lot of money.
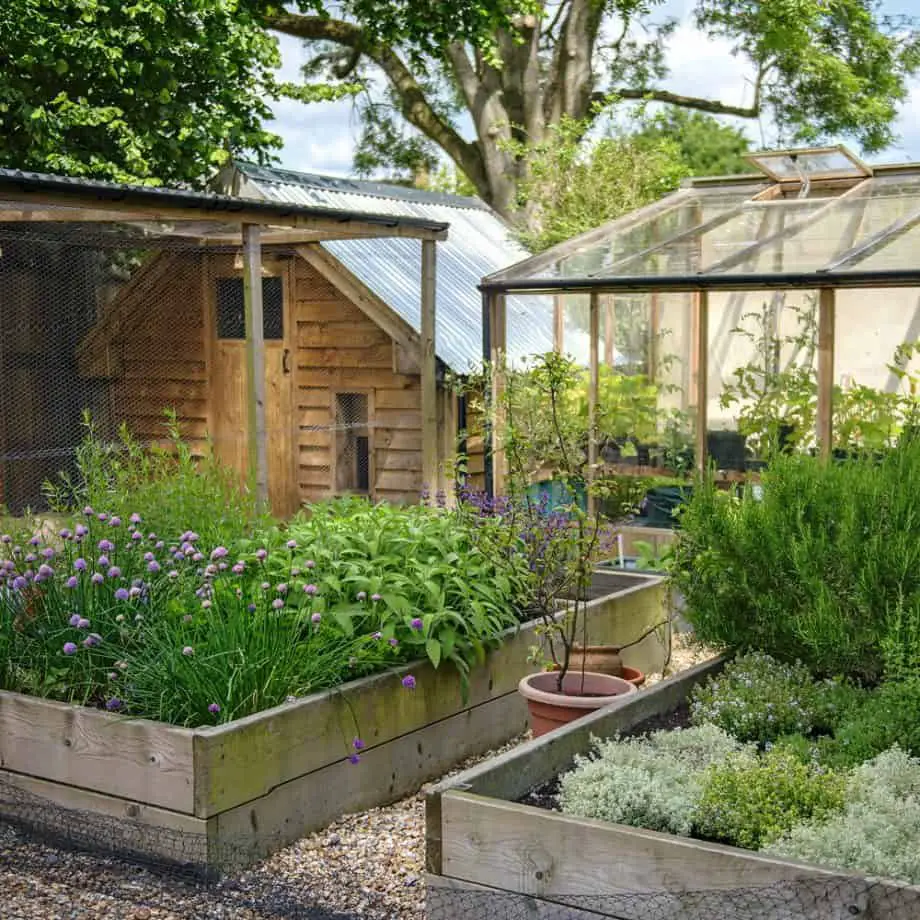
If you complete, say, the third phase of your garden build – a space that has a few garden beds around it – instead of going out and spending money on new plants once again, take what you can from the “seed” bed. If that bed was the first thing you created, it may have had a few seasons head start to grow and reach maturity.
Now you can take cuttings or divide plants from this seed bed, spreading those items around to your newly made beds. Pretty soon you’ll have garden beds across your yard that share plant and colour palettes, tying all the different spaces together – cheaply!
This works particularly well if you have a core few plants that are background or filler plants around your garden. You can grow those early in your seed bed, propagate and spread cuttings when you create new beds.
Or, add those to existing beds to tie the DIY project to your existing garden. That gives you freedom to still add different feature plants or rotate things through if you want to.
A tweak on this method is to forgo one seed bed and instead have different plants in different spots around your garden. It operates the same way, but you have individual seed beds rather than a single spot.
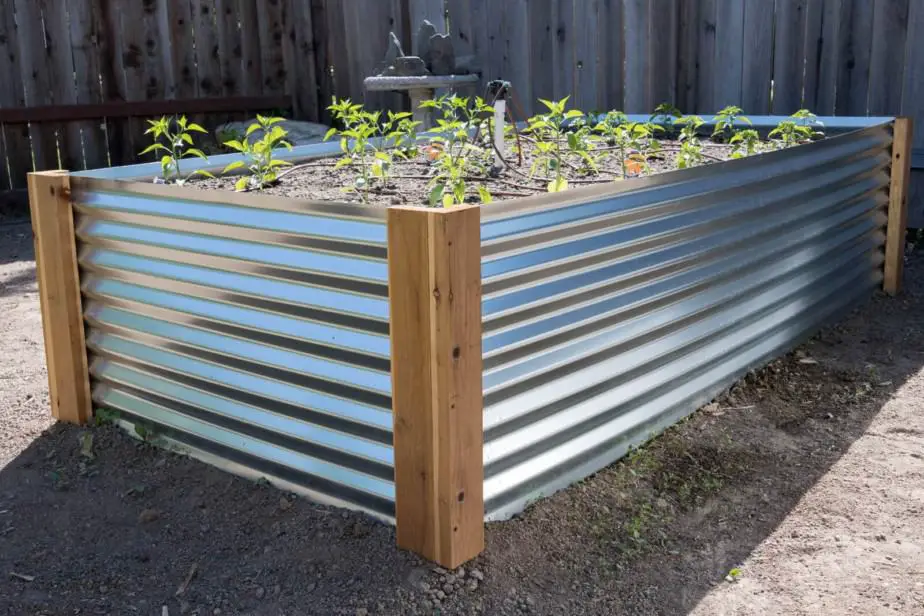
Cheap Ways To Add Layers & Height To Your Garden
Another tip from my previous article involved using cheaper forms of raised garden beds to raise a layer of plantings off the ground.
This works really well if you want to have a lush, full garden bed as part of your backyard, but don’t want to wait years for plants to reach full maturity and provide that aesthetic – and perhaps visual disruption function.
It may also reduce the money you spend on plants – you can opt for smaller plants to begin with as they are already creating a second layer.
That said, the kits or containers – and filling them with soil and/or other materials – will add to the cost. Despite that, in many circumstances, it may work out cheaper than purchasing more mature plants.
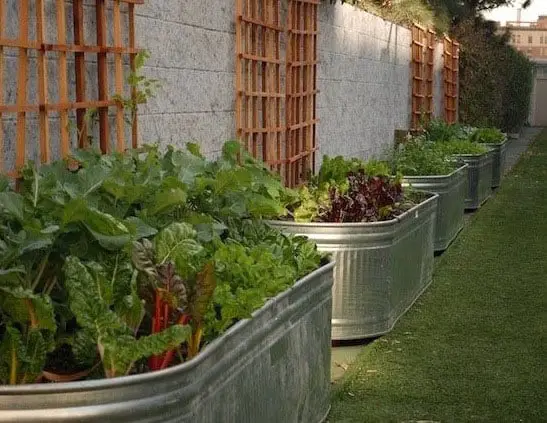
The idea is simple – buy some DIY raised bed kits or containers from a hardware store and put them in your garden bed. Leave a layer of soil or garden bed in front so you have space for the front layer of plants. The aim is to have those cover up the front of the raised beds as much as possible.
Another way to cover the cheaper raised beds is to include an edging plant or groundcover to trail over the side, adding more depth and colour.
Once again, how can this influence a design?
Well for starters most of these kits come in standard sizes. This means you have a minimum width for your garden bed – the raised bed and however much you need for the front layer of plants. This means you may or may not be able to use them in certain positions.
Secondly, it is likely to change how many plants you use in the rest of your garden. Having a large, almost wall, of plants in a location adds some volume to an area.
Depending on your style and preferences, you may want to have this DIY idea in a particular spot, rather than all around your garden.
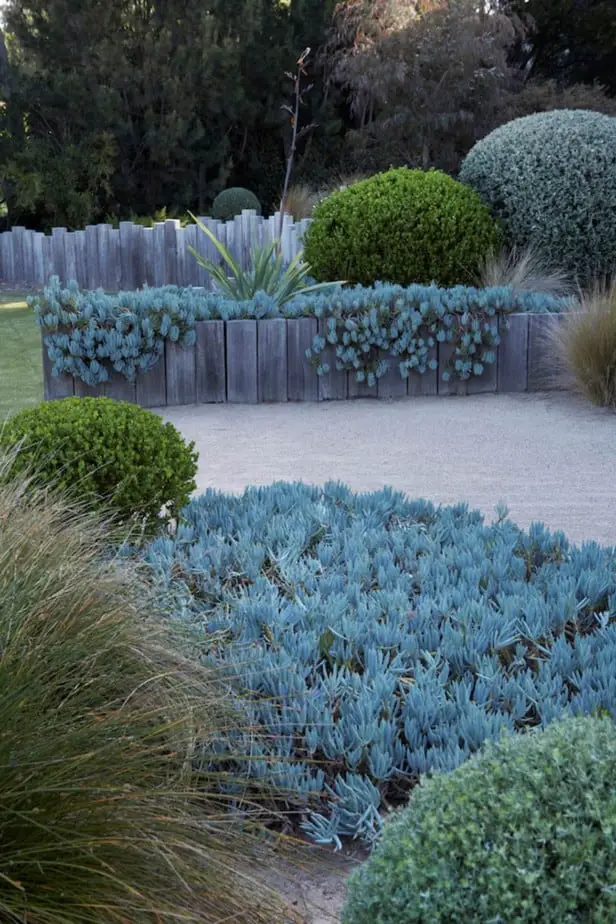
Another way to use this concept is as a barrier between spaces – almost a living fence. You could plant smaller plants and trees in the raised bed, adding some height to them.
This may make them large enough to fulfill that visual barrier role. Suddenly you have the ability to compartmentalise spaces in your yard using predominantly plants and greenery.
Again, this means your barrier needs to be a certain width, to accommodate a front layer, raised bed and rear layer.
A third option is to combine this with the DIY trellises from above – to add some height to them as well.
This is perhaps the least likely DIY landscape idea to actively influence the design overall, but it is a good illustration of how the dimensions of an item you want to use can impact where you place it and how you use it.
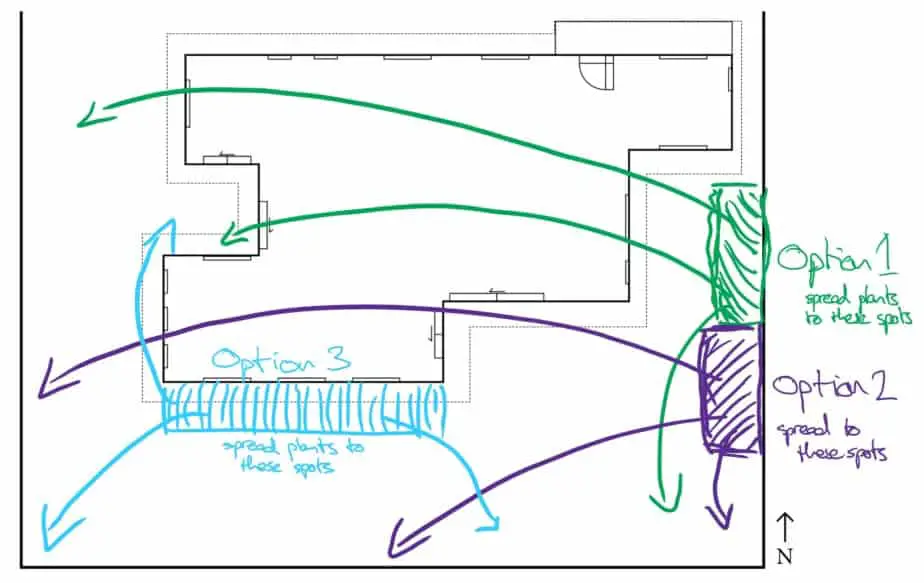
Combining All DIY Landscaping Ideas Into A Garden Design
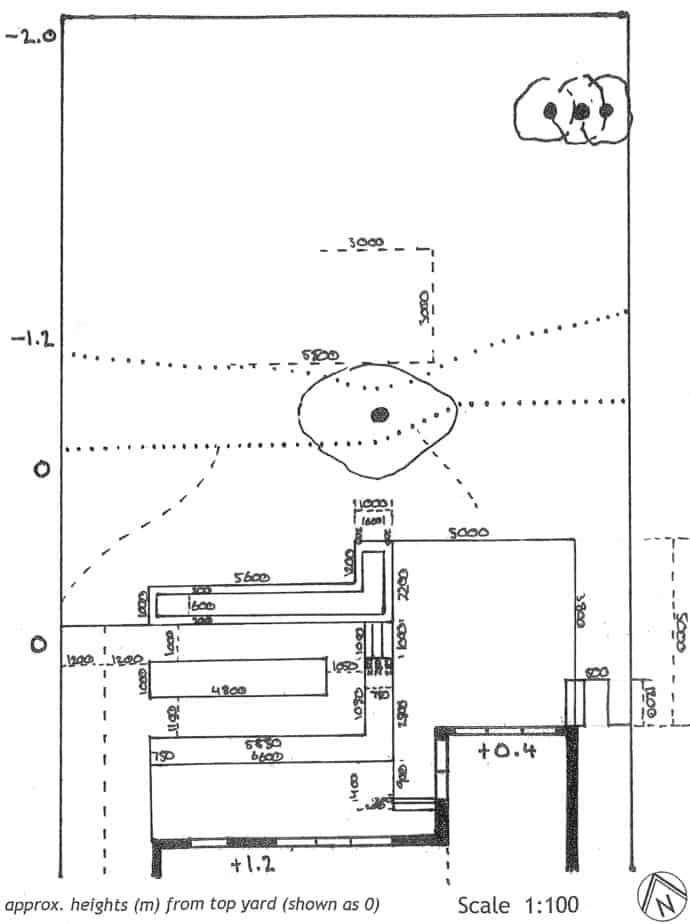
For a bit of fun, let’s add each of the DIY ideas we looked at above to see how they work together, and what we could do to make things work a little more cleanly.
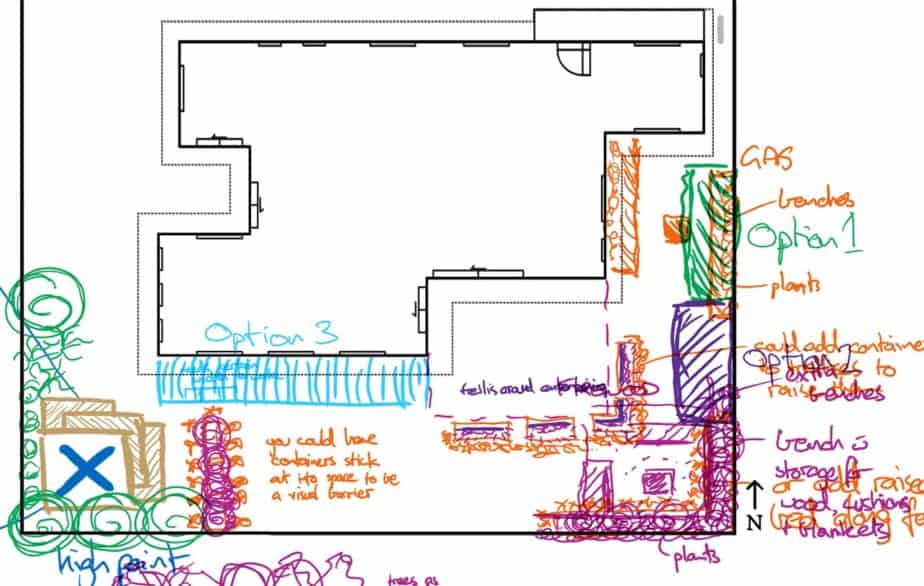
Obviously some of my explorations overlap, so it looks a little messy. For the fire pit, my fuel decision – gas or wood – impacts where it would go. That would have flow on effects on where I place my “seed” bed.
If I want to provide some privacy for my entertaining area (and I keep it near the house) I can choose to place it along the back fence/corner, or around the space itself.
Again, depending on what I want to prioritise – privacy or fire pit – that would impact where the other goes, which then flows back to other spaces.
As an example, I’m going to opt for the gas fire pit and the trellises around the entertaining space. I’ll also partially hide the raised viewing deck behind a row of DIY containers/beds with some trees and plants in and around it.
This plan still needs a few other elements to connect the spaces together but you get the idea of how it could work.

Start with the seed beds to get plants growing.
Maybe work on the entertaining area – or in this case (because I haven’t though through what I want it to look like) the surrounding container/trellises for privacy.
The issue there is if you have to move them to lay down a hard surface for the entertaining space. If that might be the case, make the containers mobile, and wait to plant things in front of them until you ‘set’ them in their final positions.
After this, work on the fire pit. Buy the fire pit, build the surrounding bench seating (with under-bench storage spots) and lay a gravel flooring.
Next you could do the raised viewing deck or the other container plants that separate it from the rest of the yard. Plant in and around them and within a few years you will be moving through a sea of plants.
Around that you can add some stepping stones/slats or path. I added some slats to see what it would look like. I’m not enamoured with them and may change them depending on other parts of the design I developed.
This isn’t a final design, as I said – I could look at other examples of DIY entertaining spaces, or vegetable gardens, or children’s play areas or any other activity I could add in some of the empty spots.
All of this exploration is interesting and fun, but what do you do if you have some existing elements you want – or have – to keep in your garden?
How To Design Around An Existing Garden
Creating a design around some of your existing garden isn’t all that different to what we’ve covered above.
Where the process changes is you actually do the steps I outlined above – base plan, site analysis, opportunities/problems, RESEARCH, sketch and explore other ideas.
You can see I emphasised research, and that’s because if you do the research first for a DIY idea – understand what’s required to build, the dimensions of things and material needs – you can adjust your plan on paper to make it work with your existing garden.
This way you get to explore multiple approaches, adjust things as you design, and ensure that when it comes to actually implementing the project, you know it will fit within your existing framework.
Another benefit of designing on paper first is you may choose to ‘remove’ some of the spaces you “think” are permanent – or don’t plan to move yet – and open those areas up to be incorporated into your ‘new’ design.
So even if you don’t have the time, money or the ability to remove or alter the less interesting – or harder to change – parts of your garden, that may change in the future.
And if you put it in as part of your garden plan, that might give you the drive and determination to actually remove or change the parts you currently think are too hard.
If they really are too challenging to remove or alter, then you need to include them in the base plan you will be designing on. Add them in, and then go through some of the exploration and thought process I went through above.
Find DIY ideas you like, research what you need to make them work, and then explore different positions and layouts.
See if you can use existing colours and materials from your house and garden within these DIY projects. Or vice versa – see if you can add some of them back into your existing spaces.
As you can see above, adding all the DIY landscape ideas I looked at into one design still left plenty of room around the garden. In reality, this may have been existing spaces I can’t change – or don’t want to change.
So I hope you can see how you could add DIY ideas around your existing garden in a more interesting and less isolated way. How you could blend them into your garden – or tweak your garden to better mesh with them.
And that’s it for today’s post – I hope you gained a better understanding of how to think about using DIY ideas more broadly in your designing.
You can still create an incredible garden design full of DIY projects – it’s just about understanding how these projects will impact spaces around them, and trying to make them work with each other, rather than against each other.