
Want to know how to create the perfect landscape design for you and your family?
The key to creating an amazing landscape design is to define what you want, use your environment to shape each space, and to keep exploring beyond your first ideas.
I’ve seen this “process” work first hand while practicing, and while researching my Masters of Landscape Architecture.
Who Is This Guide For?
Anyone who is interested in designing their own incredible garden!
This process can be applied to spaces of all sizes, styles and locations. So if you want to design a small part of your garden, your front yard, backyard, or your entire property, it will work for you.
For projects where you want to focus on small sections, simply reduce the number of iterations your work through. The concept – developing garden ideas and testing them in different places – is still the same.
In many ways it’s fractal – the same process to follow regardless of the size or needs of your project.
How to use this guide
This is the basic version of my more in depth ebook “The Garden Design Process”.
I outline the 8 basic steps you can follow to ensure you create a landscape design that perfectly suits your house, site and especially your lifestyle.
Along the way are links to other articles exploring some ideas in greater detail. Feel free to read through these if you are interested in seeing examples or my more in depth thoughts about design.
It’s Up To You…
It’s up to you how much effort you want to put into your design work.
You get to decide how much research you want to put in. And how many ideas you want to use as inspiration.
So if you have a small space and basic needs, you might not need dozens of different iterations and explorations. It’s all up to you.
That said, I guarantee the better you define what you want, the better your final landscape design will be. In fact, you’ll probably end up with multiple options you want to test further.
The more you analyse the site, the better your placement of certain activities or features will be (more on those below).
And the more you explore beyond what you first design – or what you assume is correct (or conventional) – the more interesting opportunities you will find.
In short, these three things are the key to developing an amazing landscape design that will suit your needs, use your surroundings, and be something utterly unique. There are more steps to explore, particularly some steps to help you design ‘creatively’.
Contents / Links
Here is a list of links to each of the main steps in the process. It will help you navigate to specific points if you want only want certain information:
- Defining What You Want & Landscaping Ideas
- Create A Scaled Base Plan
- Landscape Site Analysis
- The ‘Design’ In Landscape Design
- Fitting Landscape Ideas Together
- Refining Your Landscape Designs
- Drawing Your Final Landscape Plan
- Getting a Quote & Landscape Construction
Refer here if you want to quickly move between sections.
Let’s have a quick look, before starting the process, into a few tips on how to think about landscape design.
What is Landscape Design?
Design is often noted as a combination of ‘form and function’. Form is what something looks like, function is how you use or experience it.
Landscape design is a way of shaping an outdoor space to look a certain way (it could be a certain style, colour or material palette). It also facilitates things happening – the function, or use, of a space. Cities, streetscapes, parks, gardens, backyards, front yards – they all accommodate different functions.
A mark of good landscape design is a space that caters to many needs for many users. And it takes into account the dynamic nature of the outdoors – think changing weather and how the needs of users change over time.
This dynamism and inability to completely control environments sets it apart from other disciplines like architecture, interior and industrial design.
What isn’t Landscape Design?
Poor design – or more specifically poor design process – comes from two things:
Arbitrary drawings
A linear process
Don’t be arbitrary
Drawing shapes on a landscape plan is not, to me, a mark of good design. I tend to consider this approach to be “painting, not designing”.
Many other guides and resources suggest drawing some basic outlines of common garden design features. To draw paths, entertaining areas, garden beds and other spaces without thinking about your surroundings – or what those areas need to work properly.
You’ll see why considering those things are so important as you work through this guide.
That said, there are times when it’s fine to be relaxed and save time by drawing arbitrary lines. But first, you need to test your landscape layout to confirm good positions for your main activities, features or garden ideas (more on these below). Once you know what works, you may be fine to free hand draw your garden design layouts.
This way you are using your surroundings to determine suitable positions – a mark of good design.
Non-linear
This process, like all design, is not linear.
It is an iterative process. Iteration is like repetition, but you tweak your approach each time in response to new information – to correct a mistake, or explore new ideas.
In this way it’s kind of like a helix – circular, but you’re moving forward every repetition.
- You design something
- Test it or get feedback
- This gives you new information
- Update design based on new information
- Repeat
You’ll see this approach play out throughout this process.
Another thing to mention is the importance of pushing beyond your first ideas. It’s easy to do a little drawing, find something you like, and call it a day. If you want to really explore and find the best, rather than ‘good’, you need to keep looking – exploring as many options as possible.
But, as I’ve said already – all of this depends on how deeply you want to get into the landscape design process. If you’re happy with using what I outline here to find ‘good’ – then that is a perfectly acceptable outcome. If you want something that works, then ‘good’ will be more than enough.
Using Online Landscape Design Software & Apps
These are common tools people want to use when trying to develop their garden or landscape design. I have my reservations about how effective they are, but I can’t deny they can be useful for many people.
So if you do want to use some landscape design software tools or apps, I’d recommend using them AFTER you have gone through the first 3 steps of this guide.
Then, once you get to Step 4 (The ‘Design’ in Landscape Design), you can opt to switch over to testing things with these software or online tools. They won’t allow you to explore ideas as quickly and thoroughly, but they may prove useful to you.
What You Need To Start
Before you begin any design work (especially if you are planning on drawing ideas), you’ll need a few materials.
Make sure you have:
- White paper to draw a scaled base plan onto (A4 or A3 – whatever is easy to print and scan)
- Trace paper – non-waxed baking paper works tremendously for this (one side works better than the other, test it out to get it right) – it’s also very cheap!
- Black markers – can get more colours if you like, but black may be enough
- A ruler with multiple scales on it
- A tape measure
You also need your architectural house plans – if you have them… This is what you will refer to when creating your scaled base plan.
Additionally, it’s good to have an area where you can pin up or easily group your work. Because this process involves lots of sketching and making notes on many pieces of trace paper, it’s nice to have somewhere to keep everything together.
You also want your site analysis, and any images or ideas you want to explore, nearby for easy reference.

1. Defining What You Want & Landscaping Ideas
These tasks are often done in parallel.
You write a list of what you want > search for some examples > find something interesting not on your list > add it to the list > search for more examples. You get the idea.
For a more in depth look at this process, check out the Landscaping Ideas page. There you will learn where to look for landscape and garden ideas, and more importantly, how to use them properly.
For this basic guide, I’ll summarise it as follows:
- You want to think of all the things you want to do (what I call activities) and see (features) in your garden, backyard, front yard – wherever you are designing
- In some cases you’ll find things you want to include that don’t fit one of those categories. In that case, have a miscellaneous garden ideas group – things you want to find room for in your design if you can. These may be interesting little ideas you’ve stumbled upon. Things you could add to other activity or feature spaces
- Write all these things down in a list – your list of everything you want in your landscape design
- Get a separate piece of paper for each of the main activities, features or garden ideas you think you want to include. Your paper doesn’t have to be big – half a page or smaller will do. On each one you will define your criteria for that activity, feature or garden idea
- What are criteria?
They are specific points you want to include in your design, to make the space work for you. You find them by looking at inspiration you like – images and the world around you. Take note – and try to articulate – what you like about each piece of inspiration, and add them to your list of criteria for each activity etc.
- The list of criteria can and will change as you explore and find different ideas you want to try in your garden design. That’s OK – the list will expand and contract, until you find things you’re happy with
- What kind of things can be on your list of criteria? Examples include:
- Physical things – certain materials, colours, shapes, finishes etc.
- Settings – the layout of a space, or the combinations or contrasts between things (generally physical things, like the point above)
- Specific requirements for an activity or hobby (e.g seating at least X number of people when you entertain, or a vegetable garden where you can grow X number of things) – requirements for a space often help determine the minimum size you need to make it work for you
- How you want to use the space. Includes:
- When – what time of the day, the season, or the year – like entertaining people in the afternoon or evening
- What conditions you want (or don’t want) to use the space in – like entertaining in a sunny (or not so sunny) space
- Work through this process for the main activities, features and garden ideas you want to include in your landscape design
This looks like a lot to consider.
And it can be.
But trust me, thinking about what you need, when you want to use it, and the kind of conditions you want to enjoy it in will help immensely in creating an amazing landscape design.
I need to do this for every space?
No, you don’t need to do this for every activity, feature or garden idea you have on your list. Just the main, big ticket ones could use this approach.
That said, if you want to, feel free to apply the same process to the smaller ones. Do all of them if you have the inclination. The more criteria you define for different activities, features or garden ideas, the more interesting the overall design process will be.
And don’t feel like you have to completely define how your want your space to work right now. As you go through the design process, you may stumble upon things you want to add, alter or remove. This is just a way to help you define “success” for any activity or feature space you design.
If you want an easy way to work through this process, check out my free Landscaping Ideas Generator Guide. Sign up and get my ‘cheat sheets’ and videos you can use to follow a similar process above. It’s probably the best way to develop criteria for your different activities, features or garden ideas.

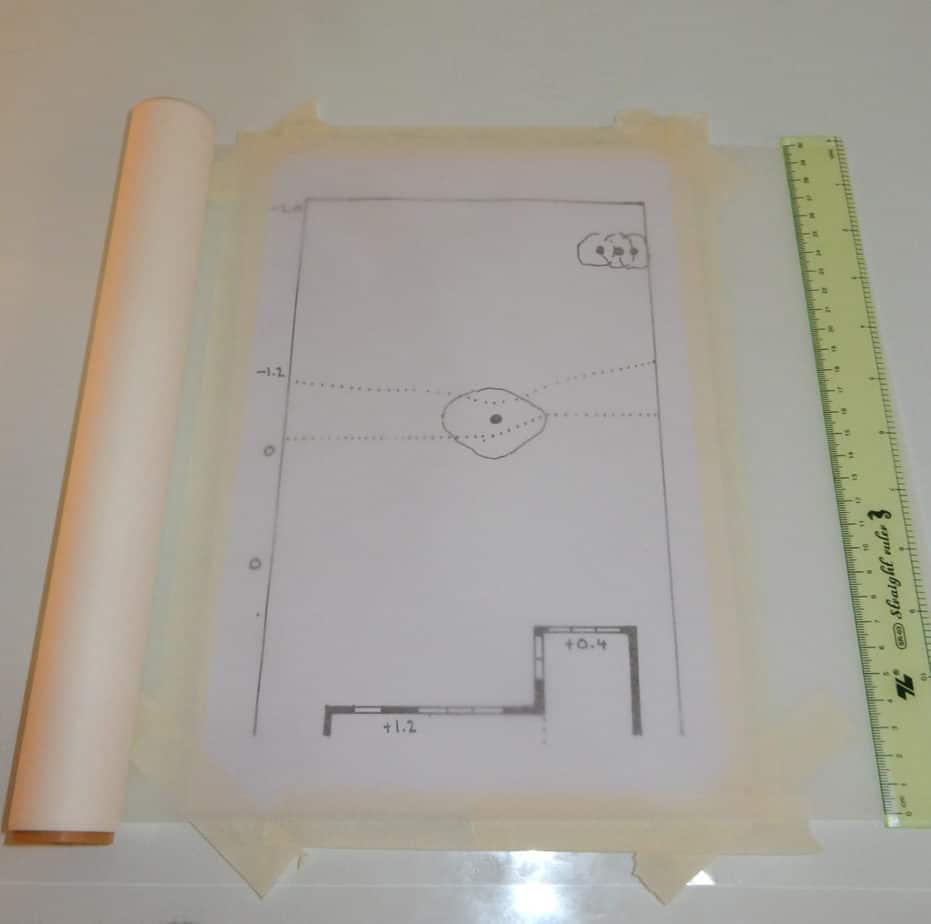
2. Create a Scaled Base Plan
The next step in this process is to create a base plan to work from. You will place your trace paper/ baking paper over this plan as shown in this image below.
You will also use the scaled base plan in the next step in the process – your landscape site analysis (and particularly how to visually represent what you find).
If you are opting to try and use landscape design software or apps, it still pays to create a scaled base plan. However, you can probably stick to a basic version – more on that below.
So what makes a good scaled base plan?
A useful scale
You need something easy to understand and easy to draw. For metric – 1:100 is perfect. You may need to muck around a little to determine what works best for you. It needs to be large enough to draw in some detail, yet small enough to fit onto an A3 piece of paper (I find any larger paper becomes too difficult to print and sketch on). If your site is larger, it may be worth drawing at two scales – a larger ‘masterplan’ scale and have a smaller scale to zoom into different areas
Align the edges of your house to be parallel to the edge of the page
This makes it a lot easier to draw garden designs, as you most likely draw ‘out’ from the house. Drawing up and across – to scale – is much easier when things align to the edge of the paper
A North/South arrow
Depending on your hemisphere, the sun will shine from one of these directions. Being able to clearly see this on a plan is vital to understanding how sunlight and shadows will impact your design
Clear thick lines
Something you can see through multiple sheets of tracing paper
Your house plan – to copy from
This allows you to reference the measurements on the house plan, so you can accurately draw your site boundaries.
Don’t just trace over the house plan itself. When things are printed they tend to fall out of scale. Use the measurements the plan provides and draw them out yourself.
You may be lucky and find your house plan is not ‘out of scale’. Simply measure a line on your house plan. If the measurement of the line matches your ruler, you can be confident it is accurate. If that’s the case you can scan/copy the house plans to use as your scaled base plan.
You may find you want to add information (what I outline below) or remove unnecessary information, like excessive house measurements. Then you can simply trace over the parts of the house plan you want to keep, and add in any additional info you think you need.
So what do you need to actually show in your scaled base plan?
You should show (if relevant):
- The site boundary
- Your house – including door and window positions (note the heights of windows if you can)
- Existing things on your property that will remain – large trees, buildings etc.
- Easements and other restrictions – this information is VITAL – you don’t want to go through this process only to discover your landscape design is not legal, or requires unnecessary permits to complete
- Neighbouring elements that could impact your site – large buildings, walls, trees or even windows that overlook your property (even excessive noise that you may want to deal with). I usually draw these in a lighter, thinner lineweight – so it’s still visible, but not to be confused with what’s on your property
Make sure your plan is to scale, with all the points mentioned above.
What You Need For A Basic Version
For a basic version – something suitable for your landscape site analysis – you want:
- Your site boundary
- Your house
- Neighbouring elements
- Existing items you will retain
This should be enough to allow you to place trace paper over the top and sketch your landscape ideas, and represent any landscape site analysis you do.
Now is a good time to make a few copies of it. If you like, you can add a few things to each of them. Measurements can be useful – to save you have to double check with a ruler each time.
You can also add a lighter grid overlay onto your base plan. Choose the best measurement that makes sense for you (eg m2 squares). This is a nice touch so you know roughly how large items are when you are drawing designs.
Choose to start the grid near a corner or edge of your house. You most likely draw from the house out towards your boundary, so starting the grid there makes sense.
One thing to be careful of. A grid works best on flat terrain. The moment a slope appears, the squares (should) start to skew. This is because from above, a meter square on a slope actually covers less area on paper. Rather than try to work around this, I think only apply a light, soft square grid on flat areas. It’s not required, but can be helpful.
Keep in mind, your plan will never exactly match reality. You need one to get close to reality, but once you begin construction, things will most likely change a little as you go.

3. Landscape Site Analysis
This is something landscape architects and landscape designers put a lot of work into, but most people don’t bother with.
Good landscape design uses your surrounding environment to help determine plan layout, and to shape spaces.
We’ll look at what you need to research, and how you can represent it visually – so you can easily refer to it to inform your design drawing.
Site Analysis = Your Surrounding Context
Another way to think of site analysis; it is all the things around you that impact your property. I break it down into two levels:
Macro Conditions – broad environmental conditions and regional climate – things like:
- Rainfall
- Wind strength and direction
- Storms
- Temperature
- Snowfall
- Extreme events – floods, droughts, fires, blizzards, cyclones etc.
You want to get basic historical data on changes across the year, seasonal and yearly averages and extremes for these events.
Micro Conditions – physical properties of your property (and other things outside your property boundaries – trees, buildings etc.) and how these macro conditions interact with this area:
- Soil quality – pH level, soil type (check how to determine this here)
- Ground slope – high and low points, approximate gradients (see how to measure these things here)
- Where sun and shadows fall (notably in summer and winter)
- If you have too much or too little exposure or cover in an area
- Where water will flow and collect – and perhaps how quickly it will or won’t drain away
- Wind direction and strength – how buildings or objects trap, funnel or influence the wind
- Easements and regulations – noted on your scaled base plan, but worth mentioning again
- Building permit requirements – many councils require permits for work of a certain size. Knowing these thresholds can help you dodge or use them
Like macro conditions, you want to consider or note the extremes and changes across the year. How they interact with your immediate surroundings. I’ll show you how to visually present this shortly.
Where Do You Find This Information?
Online sources such as your countries weather organization (in Australia that is BOM) generally have all the macro weather info you need. Monthly data is good as it shows variation across the year – and may show monthly maximum and minimums.

Soil quality can be determined with testing kits.
Other micro conditions may require a bit of guess work. Take a walk around your property and try to determine high and low points.
For sun and shade, try to guess where shadows extend in winter and summer. Winter shadows are longer, while summer are shorter. You don’t need to know exact positions, just get a sense of when spaces are in sun or shade throughout the year.
Finally check out large surrounding objects and try to guess how they affect wind. If you have the macro data – strength and direction – you can look at how it might flow through your site now.
For development & building permits and other regulations, your local council hopefully has documentation or building codes available. And they can be complicated. This link shows you a summary of regulations on building a deck in my home state ACT. It outlines exemptions from permits/approval and links to Building Regulations/Codes. Fun stuff to try and decipher.
This can be annoying to look through, but trust me – you don’t want to surprise yourself later when you require a permit application for your plan.
If you struggle to find anything, try contacting a local drafting, engineering or landscape design business. They may point you in the right direction or offer to help you.
That’s A Lot… A Simple Version?
If this seems like a lot of work – and you don’t think you need all this information – I’d recommend trying to find, or estimate, the following:
- Soil quality
- Sunny and shady areas – throughout the day and year
- High and low points and slope
- Wind direction and strength
- Easements, regulations and permit requirements
All of this is useful to experts. Horticulturalists can help you choose appropriate plants based on these conditions. And builders can help you properly place things like large walls, structures, trees or retaining walls – if needed.
If you want a bit of a visual walk through, check out this run through of taking site inventory by Y Garden on Youtube.
It’s a little different to what I’ve outlined above, but I like her process as it gets you to focus on what elements within your garden you want to be wary off and what you may want to keep. And what elements surrounding your site could impact your design.
Now let’s look at easy ways to represent all this information.
Representing Your Landscape Site Analysis
Once you’ve found whatever information you need above, you want to present it so it’s easy to refer to at a glance.
The easiest way to do this is to create multiple pages that each represent different things. You simply get the data, place trace paper over your base plan, and draw in related information.
For example, you can show wind strength and direction like below. Arrows signify where the wind comes from and the size of the arrow indicates strength. Colours equal different months, and presto – an infographic showing rain and wind for Summer.

It’s nothing amazing. But it makes sense to me at a glance. And the extreme rainfall figures give me a useful thing to aim to ‘manage’.

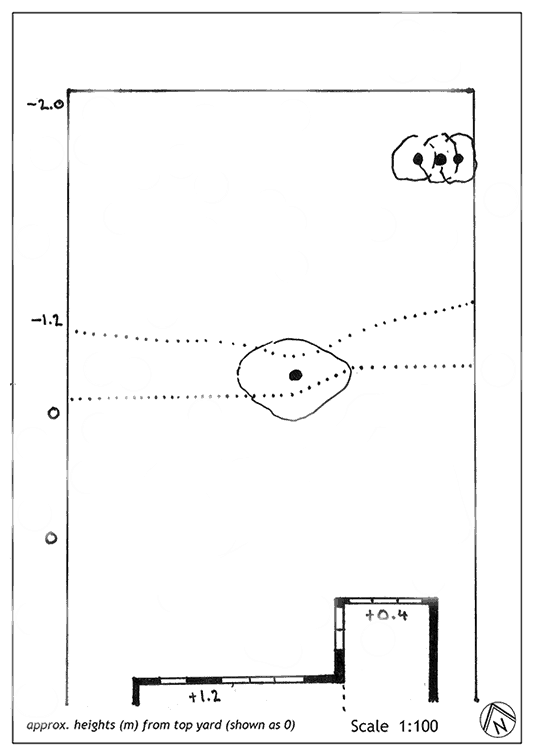
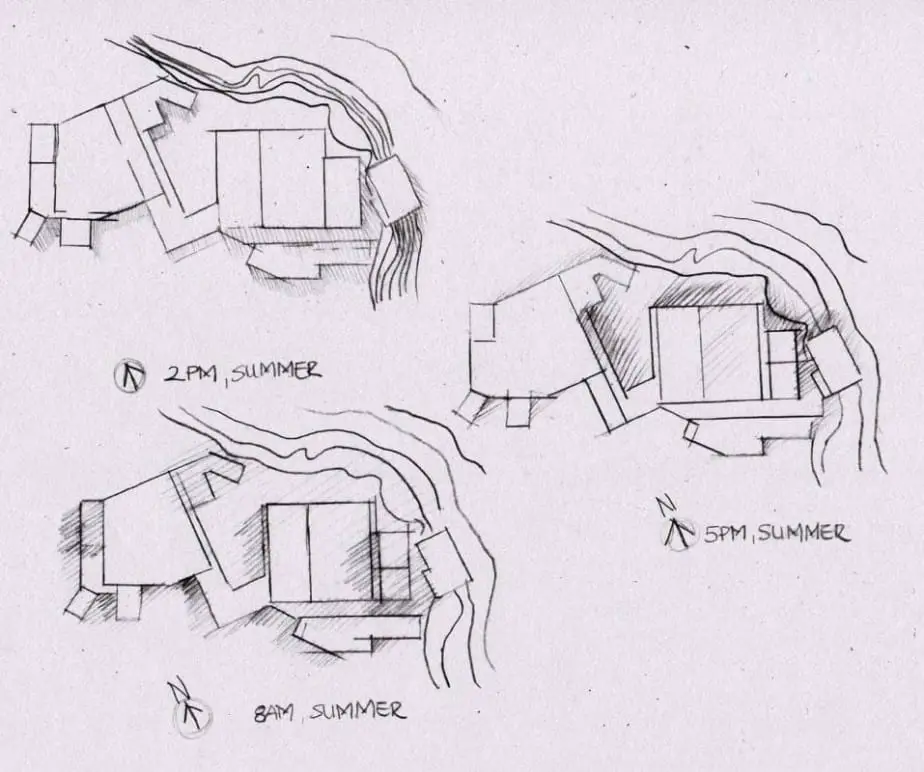
These are some examples of site analysis for architecture – by Agata Krawczyk. Above shows views across the site. Below shows estimated shadow patterns throughout the day during summer.
You can break this info up by month, or season, or try to show how one elements changes across the year. Whatever you do, make sure it makes sense to you when looking at a glance.
I like seasonal plans, because I tend to use spaces more or less depending on the time of year. Entertaining may be more common in summer, so seeing what the wind, sun, shade and rain are like then is useful to help me place that activity.
On those elements – try sketching rough positions where shadows fall throughout the day. And how that changes in different seasons.
For rainfall, just drawing or printing out bar graphs can be helpful. Adding lines to show extreme high and low points can be useful.
Draw a section (or side) view of your site to show the slope/gradient. Draw it (roughly) to scale and add in some measurements and spot levels showing the high and low points.
When it comes to actually drawing these, use a variety of different line-weights, colours, hatching, or arrows. Anything that makes sense to you at a glance.
Don’t Forget The ‘Extreme’ Events
Try to point out the extreme events in your analysis.
You would like to ‘over engineer‘ your landscape design so it can cope with extreme events. Don’t worry – you don’t need to work it all out yourself. You’ll rely on some expert advice along the way, and asking them if your design can handle these extremes is a good way to ‘engineer’ it.
You’ll see examples below on how to use all this information to help inform your design decisions. And honestly, even if you only refer to these sketches a little, simply researching it will bring value.
You live in a dynamic environment that can have a big impact on how you enjoy your outdoor spaces. Recognising this means your design will be better than simply drawing lines on a page.
Once you’ve done your landscape site analysis, it’s time to jump into some designing.

4. The ‘Design’ in Landscape Design
Before you begin drawing, sketching and exploring, collate all the work you’ve done so far:
- Criteria notes/list you developed for your activities, features and miscellaneous garden ideas
- Your favourite images or inspiration for them
- Your landscape site analysis
Another thing you may want to add is a few rough ‘position’ plans. It’s a way to carve up your site into approximate spaces.
Things like spaces between buildings and property boundaries. Or extending lines from your house – walls, corners etc. – into the garden. Sometimes similar ground conditions or materials – slopes or rocky areas – help ‘define’ a space in your yard. You can see this basic idea in the image below.

It’s really about using common sense to break your property down into little spaces. Chances are you will blur these lines a little as you go. Or change them later on. Still, to start with, they can help you with drawing design ideas quickly.
Developing Landscape Ideas, or
“Crafting Puzzle Pieces”
The first way to approach ‘designing’ is to do what I think of as ‘making a puzzle piece’.
You take one of your activity, feature or garden ideas – and test it in different positions in your garden section, backyard, front yard or whole site.
I tend to think of each piece your create as a single ‘idea’ or ‘concept’. So you build your design by exploring landscape ideas to inform an overall landscape design layout.
Start by taking a piece of trace and writing the name of your first activity, feature or garden idea at the top. This page will be your reasoning behind why this thing will or won’t work in different positions in your garden.
The aim of this approach is to get you to think beyond your initial beliefs on where things should go. True testing requires you to eliminate options, something I’ve mentioned a few times already.
How to ‘Test’ if an Idea Works…
You test an idea by combining your criteria for each activity, feature or garden idea with the landscape site analysis you just did.
A third component to consider is your specific motivations and goals. How much time, money and effort are you willing to commit? To both the design process outlined here, and the build itself?
The way to work through this is to look at each position you outlined and ask whether or not the thing you want to place there can work in that spot.
If for some reason it doesn’t, you simply write a note on one of your pieces of trace about why not. If you think it is a suitable position, you can write some notes about why it will work.
Or better yet, draw on the other piece of trace a rough design drawing of how you think the space could function. Something quick and easy, based on your current idea of what the space would look like.
So It’s Like A Process Of Elimination?
Yes, exactly. This process of elimination should help you cull poor quality spaces (for this specific activity/ feature etc.). And it should (hopefully) show you multiple spots you can explore this activity or feature in.
I say activity or feature because often miscellaneous garden ideas can fit in tight spots, or become an addition to a space – rather than occupy a position themselves.
So the way to eliminate spaces is by looking at what you need for the space to work (your criteria) and ask whether the site conditions (from your landscape site analysis) make it hard or easy to accommodate it.
Even if these points are positive, you may determine it would be too expensive, too difficult, or some other reason that makes you think you personally can’t make it work.
My approach to design, outlined in my guide and other posts, is to explore and iterate many ideas, even if I don't think they will initially work.

This means I try not to 'self-edit' straight away by considering price, time frame and other factors based in reality. Only later on do I apply reality, once I've had a chance to explore a little.

That said, if you want something quicker and easier, with minimal iterations, it's fine to start eliminating positions that you think won't work now. The point of this exercise is to get you to consider more than your first choice. To look at multiple positions and ask questions.
Let’s look through an example and see how this plays out.
Entertaining Area Example
My activity will be an entertaining area. Obviously something many people will want to include in their own garden design.
I have a few key criteria I made, based on inspiration and ideas I like. I’ll work through them one at a time, starting with the most important one and working my way down. This should help eliminate positions right away.
I want my entertaining area to:
- Be able to seat 20 people if necessary
- Catch afternoon and evening sunlight
- Be used mainly in summer, occasionally in winter
- May need some form of shade – depends on position in backyard
- Prefer timber decking as the main material – open to other options however
One of the criteria for this space is the ability to seat 20 people when we want to entertain. This sounds tricky, and like it requires a lot of space, but we’ll see how I go when we do some testing and sketching.
One way to approach this is to consider how much space someone needs to do this activity – sitting, eating and drinking. If you’re not sure at all, the best way to find out is to measure things around you.
Have someone sit in a chair – not right up to the table, but relaxed, lounging. Pull out a tape measure and see how much space you think they need – length and width. Also consider people moving behind them while they’re seated. How much extra space does that take up?

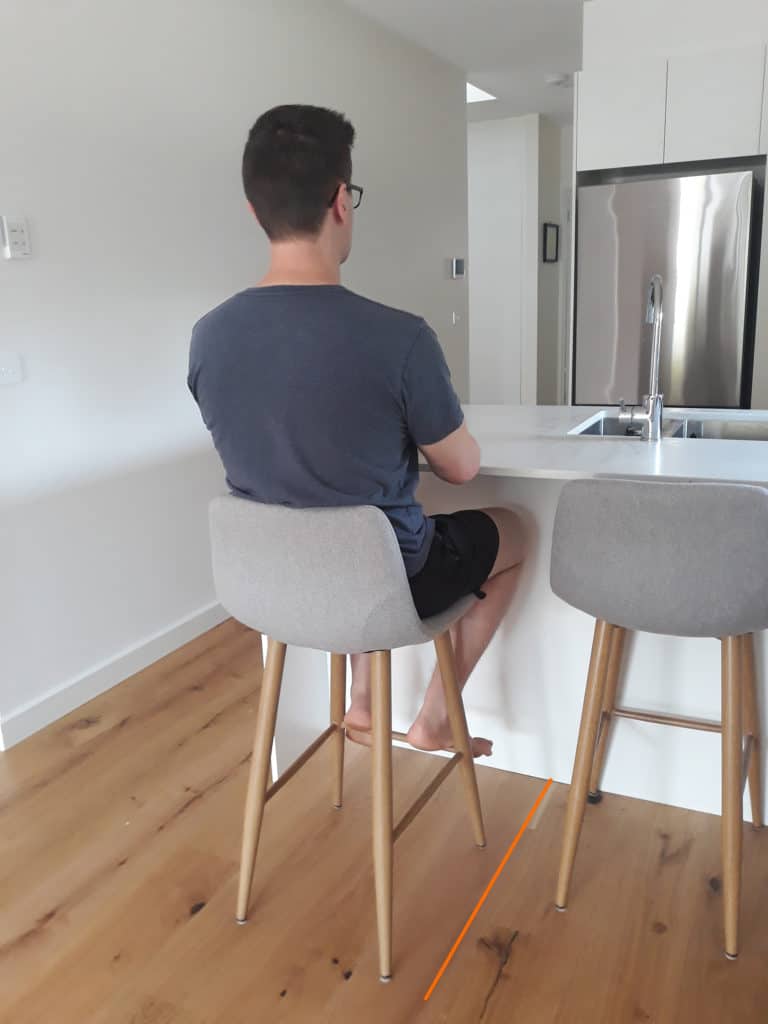
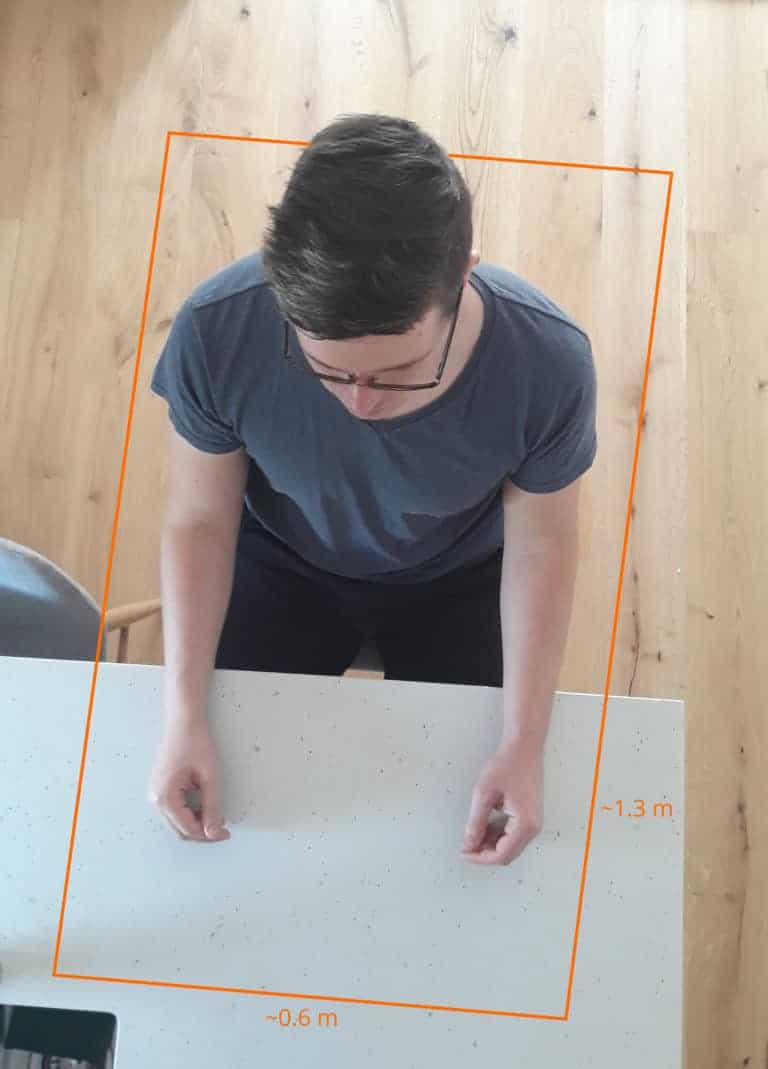
My measurements suggest around 1.3 m deep, with around 60 cm wide – a pretty substantial space.
Multiply this area by 20 and it looks like, to seat everyone at a table, I’d need 15.6 m2. And that’s the minimum!
Realistically I might want to spread the space out a little. And I’m unlikely to have one table to seat 20. But, this does give you an idea of the space we’d want to start with, as an area, to design my entertaining space.
With this as a rough guide, let’s look at a few positions and see what I can eliminate and what I can maintain, and why.

What Positions Work? And What Don’t?
We can see a few positions down the side of the yard are too small – 4, 5, 10 & 11. 4 is possible, but quite narrow. Another negative I didn’t note is it would overlook the neighbour’s roof, unless it had screening plants. But then screening plants would block much of the afternoon sun. So not a great position so far.
6 & 7 are sloped areas between the flat top yard near the house and the sloping lower yard away from the house. 6 has very large rocks that would be extremely expensive to move.
7 is a slope, but normal ground conditions, so easier to build on. Building on any slope would still be more expensive for an entertaining area however, as it would require terracing or decking.
8 is large and sloped. It’s certainly feasible to create a good entertaining space here, but it is quite exposed to wind and sun during the day, and sits in some shadow in the afternoon/ evening.
9 is the lowest point of the site, meaning water drains in that direction. It won’t sit there because the neighbouring house is lower down the hill, so water will flow through this space and under the fence. Again it is sloped, requiring more money to fulfil our needs.
I could try to make any of the sloped areas work by terracing or stepping the area. This could be done creatively to actually build seating into any spot – like steps to sit on. Or even a mini amphitheatre to entertain in and around.
This actually sounds quite interesting and unique, so I’m going to keep it as a position to explore further. One drawback for position 9 is it is a long way from the house. Now many designers, and subsequently most people, think you should always have your entertaining spaces near your house. It makes a lot of sense, and may be what happens here.
Assuming this is the ‘best’ means you don’t explore further…
But, if I’d blindly assumed that is the best spot, I wouldn’t have bothered to explore other positions. And find other potentially interesting ideas like this one. Even if I don’t use that idea here, I can always look for other spaces to use it.
Additionally, if you blindly place it somewhere because you ‘think’ it should go there, you may ignore your surroundings. This is why it’s important to consider your surroundings – especially how the weather impacts your site.
This is why I suggest this kind of methodical approach, at least for beginners, to the design process. You should be finding reasons something doesn't work, rather than the first thing that does.
Once again, if you’re after something more simple, straightforward and easy to do, then you may not need to go to this level of complexity.
Of trying to imagine all the ways you can make a space suit the activity or feature you have in mind. It is what I suggest in my guide The Garden Design Process, but I recognise this isn’t for everyone.
Hopefully by now you understand the concept, and have worked through one of your activities, features or garden ideas. And tested them in all your positions and determined what you think will ‘work’ and what won’t.
Repeat
Next, it’s time to repeat the process with another activity or feature. Choose another one, and see how suitable each position is for this one.
This should be quicker than last time, because you have a better understanding of the individual positions – the slope, sun, shade, high points, low points, oversight… all the site analysis stuff. You’ll learn how this information impacts each position and get a sense of how it would affect your activities or features.
Obviously if this one is different, it will interact with spaces differently. Try have some fun by imagining how it could work in unorthodox positions.
Again, if you want, you can sketch down a few ideas on how you’d make the activity, feature or garden idea work in different positions. And add notes about why it won’t work in others.
Repeat this process for as many activities, features and garden ideas as you like. Once again, up to you how many you want to work through.
Once you’ve done this, it’s time to flesh out the puzzle pieces a little.
NOTE: If you have garden ideas that are normally 'peripheral' - garden beds or the like - try to place them in positions you wouldn't normally consider.
So if you have an open space near the house, think about how your 'garden bed' could work in that spot. Is it groundcovers, or mass plantings, or other things? If you put a little thought into it, you'll find ways to make it work. And this may throw up interesting options later on.
Shaping Your Landscape Ideas =
Smoothing Out The Puzzle Pieces
You may have done a few sketches already. Or just stuck to eliminating positions. Either way, it’s time to start sketching.
This can be scary if you think you aren’t creative, artistic, able to draw- all the negative stuff.
I want to impress upon you now – and you’ll see with my sketches below – that this is meant to be messy. You’re working things out, not creating a masterpiece.
The scale of the base plan is a guide at this stage. I’d rather you sketch out a rough shape representing something, than take your time to measure out the dimensions. That can happen later.
For now, try to draw your layout for your chosen activity, feature or garden idea in quick shapes and patterns. Get your ideas down first, refine later.
Get Started!
So, start by drawing your first activity or feature in one of it’s suitable positions.
Use the specifics of that position to help determine the layout. Draw the little components in it. The paving, decking, borders, benches, walls, steps, chairs, plants, structures – all the bits that make up the space.
You can do multiple drawings of a space if you like. If you think of something different, draw it.
Next, choose another suitable position. Draw a layout there. The important part here – something I hope I’ve impressed on you enough – is that this layout should be different to your first.
Let this new position inform the layout. Are things slightly different here? Different exposure to weather, oversight or other things? Maybe the ground is slightly different. Maybe it is now in a corner compared to being out in the open.
Go through all your suitable positions and sketch out different garden layouts for each.
Quick and dirty – concepts are more important than accuracy at the moment.
And don’t forget to push yourself a little. Push boundaries and follow hunches. Ask yourself, each time your explore ideas, “what happens if I?”…
Once you’ve done it for one activity, feature or garden idea, repeat with the rest.
You’re building up your collection of landscape ideas – your puzzle pieces. They’ve been shaped by your activity or feature requirements (criteria) and the environment (site analysis). The key to good design.
Now let’s see how to piece them all together.
5. Fitting Landscape Ideas Together
This next step is straightforward, but can take some time.
Take the various landscape ideas you drew.
Get a new piece of trace to place over your scaled base plan. Like I suggested before, outline the property boundary and/or house outline – so it’s easy to place the plan again later on.
Pick your first activity or feature to place first. Draw the landscape idea (or one of them) you developed last step. Again, doesn’t have to be amazing, just a rough outline of things.
Pick another one, and draw that piece in another suitable position.
Keep repeating this until you have filled the plan.
Now, you may find a few things as you go:
- Some positions work well for multiple activities or features
- This means you need to choose which one gets priority – don’t worry, you’ll do multiple puzzle plans, so other ones will get to test here as well
- Some positions may not be suitable for any activities, features or garden ideas
- this tells you that you need to stretch your imagination a little more, or look for more ideas that could work there
- You may not have enough positions for your activities or features
- again, comes down to prioritising
- may signify you’re trying to stuff too many things in your space
- OR… it could give you an opportunity to do some more advanced design stuff like layering multiple activities, features or garden ideas into a space (outlined in more detail in The Garden Design Process)
- You may not have enough activities, features or garden ideas for your site or positions
- this isn’t too bad, as positions are currently arbitrary – you can tweak them any way you like
- if you do find a lot of empty space, you can either:
- expand your current pieces to fill more space
- leave blank spaces to fill later (with miscellaneous ideas, for example)
- search for more landscape ideas you’d like to try in your design
These decisions may come down to your preferred landscape design style. Check out my Design Spectrum piece for a bit more on how flexible design can (or can’t) be.
Fitting your puzzle pieces together will bring up some problems. We haven’t planned out things like pathways. Try to add those in. This will change the layout of pieces slightly.
In fact, draw the landscape layouts a few times and change how the pathways work. Think about what materials they’d be made from. How you want people to move through the space.
Don’t go to crazy – the image below shows how designers create layouts with one thing in mind, but people often use them differently.

It’s not only pathways you need to consider. How do different activities or features interact with their neighbours? Are there now random walls or other things that are awkwardly placed?
This is your chance to try and fix some of those weird edges. One way to think about it is to imagine yourself moving through the space.
Do things get in the way? Block things like sun, wind, or sight where you don’t want them to? Or does the ground slope, requiring steps or things that you haven’t included yet?
You don’t need to perfect the plan yet, but imagining yourself moving through it can help a lot.
Go ahead and draw this plan out a few different times to explore these little quirks – if you have any.
Repeat…again
Once you’ve done a few iterations, time to start again. Place your activities, features and garden ideas in different positions this time, and see how things fit together.
Again, you want to see how they fit together and if you have any rough edges. Draw out a few different ways to address any weird problems you see.
And that is the key to this process. You have:
- Determined what positions are suitable for an activity, feature or garden idea
- Shaped your landscape ideas, or puzzle pieces, using your surroundings
- Made pieces for as many activities, features or garden ideas as you want
- Added them all to a plan
- Tweaked things here and there, iterating on the layout, to see how things work
If you’re interested in exploring more options, you can start to let some activities, features or garden ideas creep into other spaces. This approach often gives landscape designs more of a flow… a sense of cohesion and continuity to them.
Let’s have a look through a few landscape design ‘puzzles’ I developed for the top yard of the site. Notice how roughly and quickly they are drawn. These landscape designs share the same set of activities and features; I’ve just switched them around, seeing how different positions change the layout of each one.

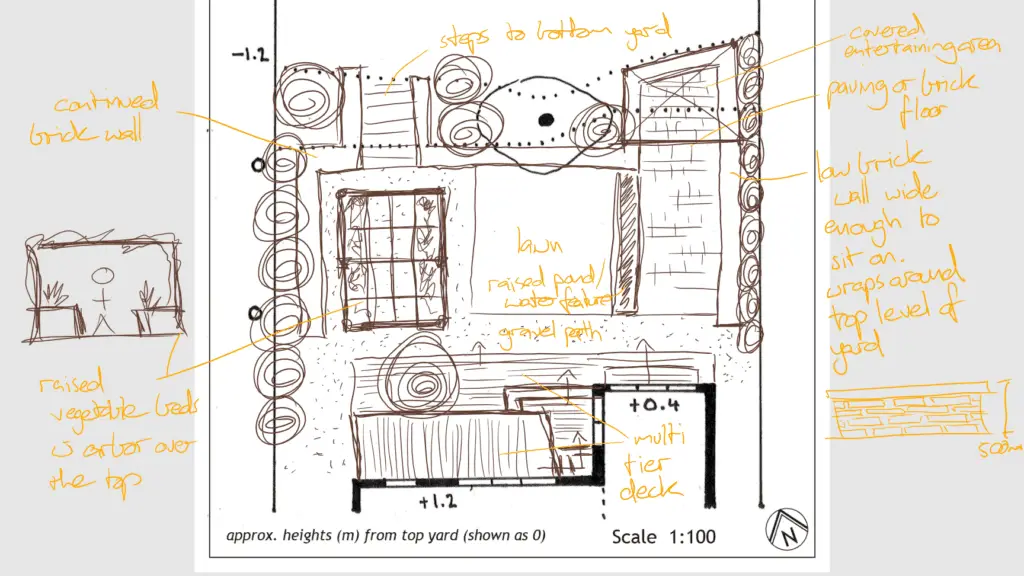
Hopefully you get the idea based on the landscape design drawings – or puzzles – above. They’re roughly to scale, but not necessarily straight. This allows me to quickly draw something, annotate ideas or concepts on it, and move on to explore other ideas.
Once again, it’s all about getting creative and trying many different combinations of activities and features in different positions.

6. Refining Your Landscape Designs
There are two parts to this, and you can choose which way you want to go first.
- Talk to experts if you can (builders, landscapers, horticulturalist, engineers, other designers etc.) to see if there are any issues with your favourite landscape designs
- Do your own refining work by redrawing your favourite designs to scale, drawing sections and/or creating models
Up to you which option you choose first. You may do bits of both as you go.
Remember, the design process isn’t linear. You ask the question, get an answer and update your designs to reflect new information.
If you don’t want to approach experts, do a little research about how to create what you want.
Now is the right time, after exploring lots of different landscape ideas, to do the research most people do right at the start. If you want to DIY, look at how to do that for your specific design scenario.
If you need help finding specific plants or options for a space, research what will work for you in this specific situation – you have an idea of the conditions, and where it will be, so you can be more specific in what you ask. This will get you more specific answers.
Who else can give you specific answers? Experts…
Instead of researching yourself, you can save time by asking an expert . You now have specific problems you want specific solutions to. This makes it so much easier to resolve.
Rather than ask them “what should I do here?” you have a specific thing you want to do. You can also describe the conditions in that place.
Feedback or answers here will help you refine your plan. You find things that tick your criteria – like suitable plants for this position that do X things you want (like flower a certain colour, or at a certain time of year, or with a particular perfume).
Sometimes you may find that nothing will tick those boxes – maybe there are no plants that work.
That can be annoying, but it’s still good feedback. It will help you refine. Do you need to change the position of that activity, feature or garden idea (maybe garden bed) to get what you want? Or do you go with plants that work better in this position, but still suit your needs?
This is why the process isn’t linear.
Redrawing Your Landscape Designs
Redrawing to scale helps you get a better sense of the actual size of things. You see where if new ‘gaps’ appear in your design. This image below shows one landscape design plan I developed, drawn with a ruler to scale.
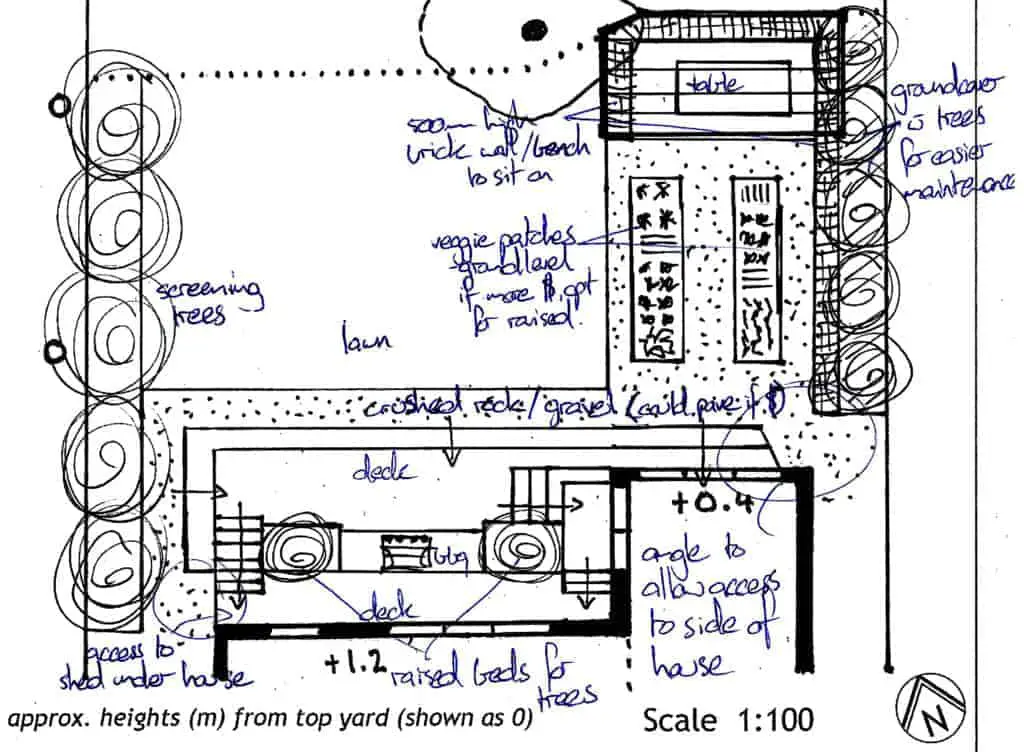
Redrawing the design to scale helped me understand where different sections were too close together. Or where I needed to tweak the design to allow access – such as the angled edge of the steps to access the right side of the house.
On the left side I noted ‘access to shed under house’. This refers to a small cavity beneath the house, which sits beneath the steps in the this design. One thing I’d want to do is draw a scaled section view to ensure there is enough clearance to access and open that door.
If you’re not sure what size things should be – like seats, benches, steps etc. – look at existing things around you for an idea. Take out your tape measure and use them as guides for your design.
Remember, almost everything around you has been designed. That means standardised things have been tested and iterated on thousands, maybe millions of times. Use this wisdom to help you.
Asking Experts – Horticulturalis, Landscapers & Landscape Designers
I mentioned above that asking specific questions gets specific answers. There are some other things you’d like to ask experts, which will help you out immensely.
Firstly, make a copy of the landscape design – or designs – you want to show someone. You want to refer to things and take notes on the feedback they give you.
When you do chat to someone – horticulturalist, designer, landscaper etc. – you want to get the following information:
- Does your design (or the parts this expert can help you with) work?
- For plant choices, are they suitable? Too large, small, poor environment etc.?
- Are there any structural points you are missing? Required drainage, conduits, footings etc.
- Have you done something illegal? Building permanent objects over easements, for example
- What options can they suggest (if you aren’t sure what material, plant etc. you can use in a space)?
- If you have specific materials you want to use, you want to see if they are:
- suitable for your conditions
- a suitable price
- available to purchase and have delivered etc.
- On price, you want to ask for multiple options at different price points – more on this below
- Do you need engineering, permits or other things to get something approved and/or built?
- Relatedly, are there building standards you should be aware of that you need to abide by, or you can use?
- Any comments or resources you should use to determine industry best practice – more on this below
- You want to understand the sequence in how this project would be constructed. Have you put activities, features or garden ideas that require heavy machinery in hard to access places? Are there access requirements for machinery or other work?
- Finally, if you wanted to build in stages over a period of time, what approach would the expert take? Would this change the sequence of what you built?
Getting multiple price points is very useful. This way you can maintain your design layout, but if you need to change your approach for any reason, you have back up options.
Maybe you discover your preferred option isn’t available. Or too expensive. You know you have back up options at different prices to allow you to complete the job. And maintain the style, appearance, functionality you want.
Understanding best practice isn’t necessary, but can give you more piece of mind. When it comes to creating your final landscape design plan, you can mention best practice approaches in your annotations.
This means whoever is quoting the work should quote the method you outline. This ensures your work will be properly built. Also, in the event of an issue, you can point to your specification requirements and prove they weren’t met.
This knowledge is also helpful for DIY builds.
Sharing Your Landscape Designs With Family & Friends
Beyond sharing with experts, I recommend sharing your landscape designs with family and friends. It can be hard sharing with others, scared they will critique you, but there is a trick to it.
The aim is to get some feedback. See if you’ve missed anything. If you do have an idea of prices of things, you can give a better estimate of the cost of your design. Or how to build it.
Just like teaching something to someone else, you soon realise where you are unsure of things. Or made leaps or jumped to conclusions about something. It can help to know what other people think and prefer – their subjective opinions.
Just don’t go changing your whole design based on someone else’s random opinion – especially if they haven’t put in level of thought your have.
Pacing Out Your Landscape Designs
One final way to refine your landscape design is to go outside and walk around your yard.
Imagine how the spaces will change. Use things like builders chalk, spray paint, string line, or any other method to ‘draw’ your design on the ground. At a 1:1 scale.
Imagine yourself walking through it. What you see.
You can also imagine how your design will change the way the weather and environment interact with your site. Do walls or things change where wind will be funnelled? Or where sun and shadows fall? Or where rain will flow and collect?
Remember, your plants will grow. How big will they get? Will that change things for the better or worse? Do you have back up options should your current choice be unsuitable (or unavailable)?
You won’t get answers for everything. You won’t know exactly how things like plants and trees will grow. But considering this gives you an appreciation for how things will change over time.
And that is it for this step. It can be scary sharing your hard work with others. It’s helpful if you know where you need answers, so you can ask very specific questions – as I mentioned above.
Also remember, everything you learn brings you closer to a better, more professional and refined landscape design.

7. Drawing Your Final Landscape Plan
You have put in a lot of work to get here.
This step is about taking all your refined work and creating a ‘documentation package’. Something you can give to someone that contains all the information they would need to build the project for you.
Even if you plan to DIY, this set of plans will be useful for you.

What Do You Need?
Click the links to learn more about what each plan does, and how to create it. A documentation package often contains the following:
Landscape Design Plan – your plan with nice finished drawings on it and annotations explaining each area. I’ll touch on this more below. You want to specify:
- material (specific size and type if you know it)
- area or lineal measure (meters or feet) of the space or edging
- who is supplying material (useful if you plan to provide some things)
- who is providing labour to construct it – not necessary if you DIY, but useful if outsourcing
- notes and industry standards for preparation and finishing of areas
Measurements Plan – simplified version of the landscape design plan, with dimensions for each space.
Landscape Planting Plan – in many cases this may not be necessary. You may be better of placing the plants on site. But, it may help you determine the quantities of each plant choice.
Landscape Lighting Plan – if you have an idea of what lighting you’d like to include (may need expert help with this kind of thing, but the plan is more about placement of things rather than specific equipment at this stage).
Sections and Elevations – basically side on views of different parts of your design. Useful if you have sloped areas, or steps. Make sure they have measurements on them as well.
Engineering/ Drafting Plans/ Building Permits – you can’t produce these – you need an expert to legally develop them – but they would form part of your documentation package. Talk to your builder or landscaper to see if these are required.
Project Spreadsheet – a spreadsheet with everything in your project listed line by line. Breaking up supply and labour can help here, especially if you are supplying some things yourself.
- NOTE – in some cases, landscapers or builders won’t fill in an itemised quote. They provide a total project cost. This doesn’t mean your spreadsheet is useless, it’s just a way for you to keep track of expenses as you go
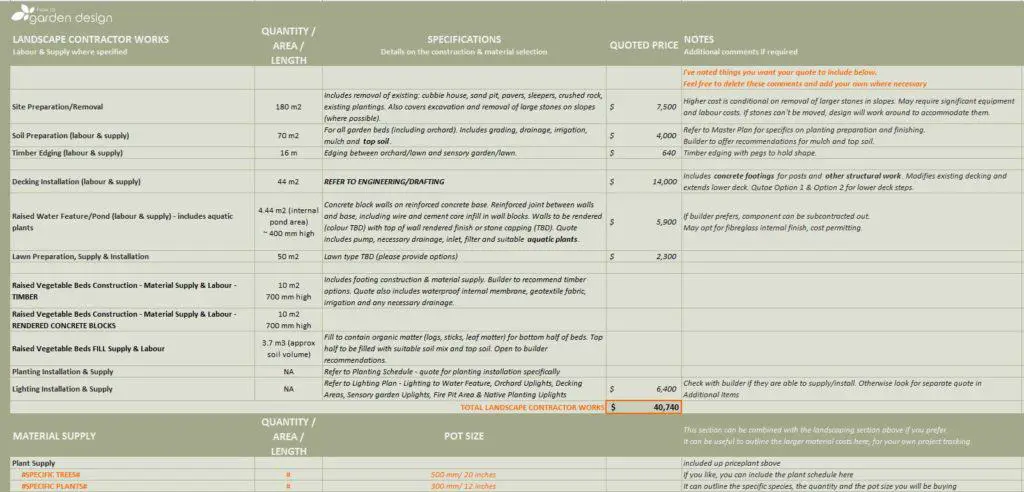
Feel free to download a free example spreadsheet. Use it as a template or basis for your own project if you think it will be helpful.
Realistically, for 90% of people, the top two are all that matter.
The Landscape Planting Plan is useful to do a rough version of, as it helps you determine approximate quantities and all your plant types.
For the Landscape Design Plan I mentioned multiple things to add to your annotations. As you can see below, the supply and labour points are generally the same across the plan.
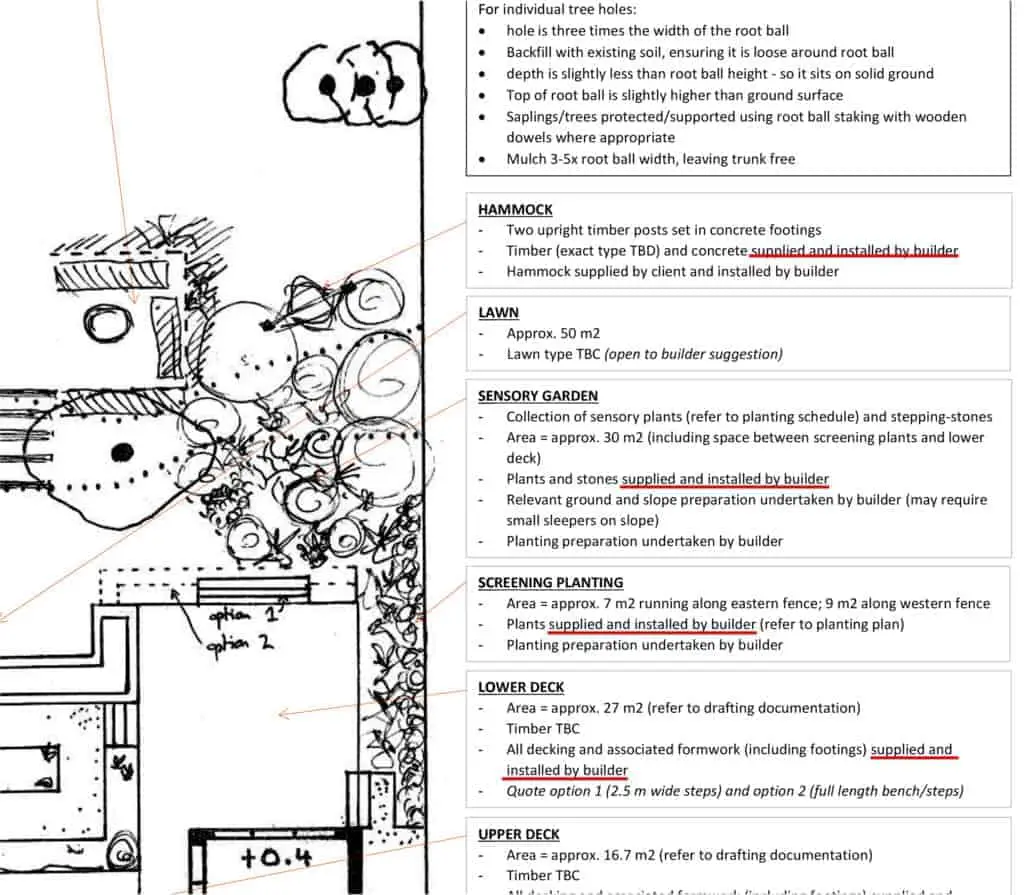
If you are having a landscaper build it, they are better positioned to supply most materials. They may have prior relationships with suppliers, and can get them at cost price. If you try to purchase them yourself, you may be paying 20% or more on top of cost price.
Sometimes you may be collecting materials yourself over time (like DIY) or can get certain things yourself. In this case you want to pay for labour rather than supply and labour, so you want to ensure that is clear.
Industry Standards – Building Codes
For industry standards, see if you can find building codes. Sometimes you can simply mention the code in your annotation. “constructed as per AS 1684 ” or something like that. Google a few local landscape design companies and see if they provide good examples.
This guide from Forest and Wood Products Australia Limited provides a great walkthrough of specific standards for building a domestic deck, including images of constructions requirements. If you like, you could include a Details Page as part of your documentation package, including some industry standard technical drawings.

Like I said, this level of effort is on par with a professional project. It may be completely over the top for almost all people who read this.
But I wanted to cover it on off chance it helps someone. If you’re unsure what you need to create, think about how much information you need to provide in order to get your project supplied and built.
If you are a little anxious about outsourcing your construction and want to cover all bases, it can pay to take the time to look for your state specific building standards. You could mention somewhere on your plans you require all work to comply with Standards XYZ.
Once you have your landscape design plan and anything else you need, it’s time to tender your project (if needed) and build.

8. Getting a Quote & Landscape Construction
This can be the scariest part for many people.
Especially if you have never gone through any construction process before.
But believe me, from following this guide, you will have waaaaaay more information than most clients provide to professionals. This should be a good thing for both of you. They get a clear idea of your project. You get a more accurate quote.
So, how do you choose who to hire?
If you have spoken to experts previously, it makes sense to engage them again.
They probably know more about your project, and they (hopefully) won’t point out any major issues with your landscape design that require fixing (although this is possible, and, once again, is just more information to help you create a stronger final version).
One way to limit your pool of options is to focus on builders or landscapers registered with your state or nations major industry – e.g. Landscaping Victoria, for Victoria, Australia.
You may opt to ask multiple contractors for quotes and compare prices and timeframes. This gives an idea of the approximate cost of your project, how long it would take, and when people can start construction.
If you do this, simply contact them and send through your documentation package. Often landscapers want to meet at your house so they can see the site. Have a copy of the documentation for them to keep, and another for you to take notes if you need to.
If you haven’t asked any of the questions above – or talked to experts yet – now is a good chance to do so. See if you need to do any minor tweaks or changes to your landscape design. Maybe even share multiple designs with them and get feedback on what works best.
If you do receive quotes back, you can note them in your project spreadsheet – free download – comparing different contractors.
This is especially useful to compare what work people can and can’t do (such as supply materials or specific specialist tasks). And from here you can keep track of the specific tasks in the project during construction.
Trust Your Gut…
Honestly, I can’t provide much advice beyond trusting your gut when it comes to hiring.
Read reviews.
Look at previous work.
Ask more experienced friends and family to offer opinions.
As I mentioned before, stick to registered builders to provide piece of mind – and a way to handle issues through a third party.
…And Get A Contract
Perhaps more important than getting the perfect builder is having a good contract in place for the project.
I cannot stress enough how important it is to have one developed, to protect yourself and provide recourse for action should something go wrong.
The Landscaping Victoria industry website states the following:
“Always have a contract in place – would you build a house without one? Landscaping is no different. A professional landscaper will have a contract that clearly sets out what work they will be doing, how much it will cost and the payment stages.
The deposit should be no more than 10% of the total contract pirice for projects up to $20,000 and 5% for projects over $20,000. This is the law. Payment requests after the deposit can be for larger sums and should match up to works completed or materials ordered that are commensurate with what has been received. For example it is not unusual for a landscaper to invoice for a large proportion of the project cost when all the materials are delivered to site.
All landscaper builders should carry public liability insurance – check that they do. Similarly landscape designers should carry professional indemnity insurance.
If your project costs more than $16,000 and you are using a Registered Building Practitioner to carry out any sort of domestic building works, they should provide you with domestic building insurance. Domestic building insurance covers you if the landscaper/builder dies, disappears or becomes insolvent. Unregistered landscapers cannot offer domestic building insurance.”
Hopefully your local council, landscape or building industry have contracts you can use as a basis for yours. If not, google is your friend. You can find numerous templates or examples there.
The contract should cover what work is being done, time frames for commencement and expected completion, the cost of work and payment instalments (and their approximate dates) and importantly a conflict resolution process.
Landscape Garden Construction
Once terms are agreed to, it’s important to set out an understanding of what to do if (more likely when) things don’t go as expected.
This means agreeing to what kinds of decisions the landscaper/builder can make without your permission, and what they should consult you on prior. An easy rule of thumb is anytime additional funds may be needed, they should consult you beforehand.
It may be you need a subcontractor – electrician, plumber etc. – to provide a service (that you may be required to pay for). Obviously things like this you’d want to know before they organise one.
Every project is different, and they all have little things that pop up to keep things interesting. If you’ve taken the precautions outlined above, this should drastically minimise the number (and scale) of issues you experience.
Remember to stay patient and communicate with your team often. Before long, you’ll have a garden, backyard, front yard – whatever – that you didn’t think was possible.
DIY Landscape Tips
If you do want to DIY build your landscape design, you have more flexibility in how you approach this.
It can pay to keep an eye on second hand websites like craigslist, gumtree etc. If you know what materials you want, and what quantity, you may get lucky and find it going cheap. You can buy it and store it for use when you do start to build.
If you did get multiple price points for a space – different materials, finishes or layouts – you are in a better position to switch to those options mid-construction. If you build over a period of time, life may intervene, changing the build moving forward- making you glad you have back up options.
This is why having a finished landscape design is so useful. You have something you know will work. That you can work towards over time. And adjust and tweak if you need to – all while knowing your changes should work with the rest of the design.
Finally, completing a full design and build of your garden/ landscape will be an amazing achievement.
Being able to share it with family and friends, and show off your design skill and ingenuity, is something you’ll always be proud of.
Conclusion
We have come to the end of the guide. Hopefully you found it informative and useful. Most of all, I hope it gave you the confidence to start exploring your own ideas, and put a plan into action.
As I’ve said, this is the basic version, with numerous offshoots providing more info if you’d like it. I have an advanced, professional level guide available, if you’d like to explore the garden or landscape design process in more detail.
Thank you for making it all the way to the end. If you do create an incredible design from following this process, please let me know!
And if you follow through and build the project (or have it built for you) please let me know of your experience and the final outcome! Feel free to email support@howtogardendesign.com or leave a comment below.
Any information you can share from your experience will help others in their own landscape design journey.