In researching this topic, I came across a number of useful ideas to make a garden suitable for wheelchair users. One thing that became apparent was how expensive, and often garden and site altering, these changes could be.
With my background in landscape design, I want to explore these ideas in detail, and how they can be combined into a more cohesive site design.
Developing and building a full design that caters to many, while still meeting the more specific needs of a wheelchair user, could help absorb or justify the costs of altering or rebuilding an existing garden.
And the better the designs suits the specific needs of the wheelchair user, the more time and enjoyment they will gain from it – and want to share it with others.
Before we explore that further, let’s touch on the ideas themselves, and the main categories they fall under.
The key to creating any garden or space for wheelchair users is to focus on three (well, kind of four) main things.
One is to meet their reach:
- Bring things closer to the user by raising garden beds, tool storage places & workbenches
- Make sure raised beds or benches have as few ‘catches’ as possible – especially beneath beds or at corners
- Add a trellis to support climbing vegetables/plants – start it a little lower so it is harvestable at a comfortable height
- Make things more mobile by putting them on caster wheels
- Have multiple connection points for water and power
- Make use of vertical space with planters on pulley systems
The second is to expand their access:
- Make spaces flat, but with good drainage to prevent water pooling
- Make slopes shallow, not steep – 1:15 is good, 1:20 better
- Keep paths, entertaining and other ‘hard’ surfaces firm and smooth – but with grip!
- Provide plenty of shelter and lighting along paths and in open spaces
The third key is to reduce overall maintenance requirements:
- Consolidate specific gardening activities into one area
- Reduce manual watering by using drip irrigation and timers
- Use low maintenance materials in other areas
- Organise for family, friends or contractors to maintain areas the wheelchair user can’t or won’t
The fourth is more about how people use the space – little notes and tips to make it a more enjoyable and active space:
- Provide places for other non-wheelchair users – family, friends etc. – to sit and/or join. This puts everyone on an even level, talking face to face and not straining your neck looking up and down
- Have something to easily rest tools or materials on nearby – something permanent in the space, or brought out when gardening. A bucket with a hard lid or little trolley/trailer could trail along behind the wheelchair user if needed
- There are tools catering to wheelchair users, or others with specific needs or challenges, that reduce stress and tension in joints and muscles – very useful for working long periods in positions that would otherwise cause stress or strain
Depending on your situation, you could incorporate a few, or all of the ideas above into your garden.
Before we do look at a whole garden design or two, I want to look at the 11 ideas above in more detail. Let’s go through the key things one by one.
Meeting The Wheelchair User’s Reach
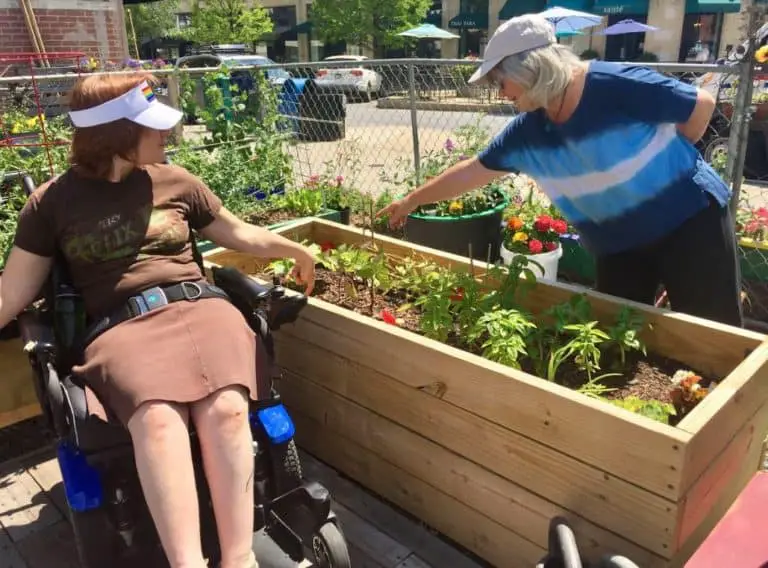
This isn’t rocket science really. To allow wheelchair users to continue their garden pursuits, the best approach is to bring things within reach – and the easiest way to do that is to raise things up.
Bringing garden beds, working benches and storage places ‘up’ to tabletop level achieves this goal. Having plenty of hanging hooks for tools around the place will makes things easier. Or carry them in a tote bag or trailer as you go.
As mentioned above you can add trellises to grow taller plants like tomatoes. If you position the height of your beds properly – slightly lower than normal (perhaps 18″ or so (45 cm)) – you will have an easier time harvesting them at full height.
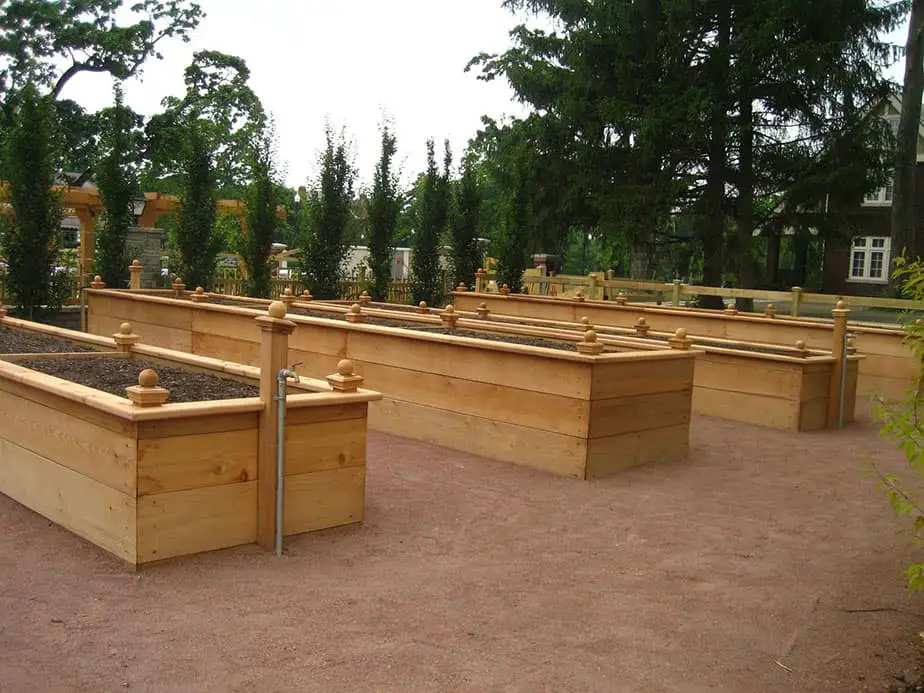
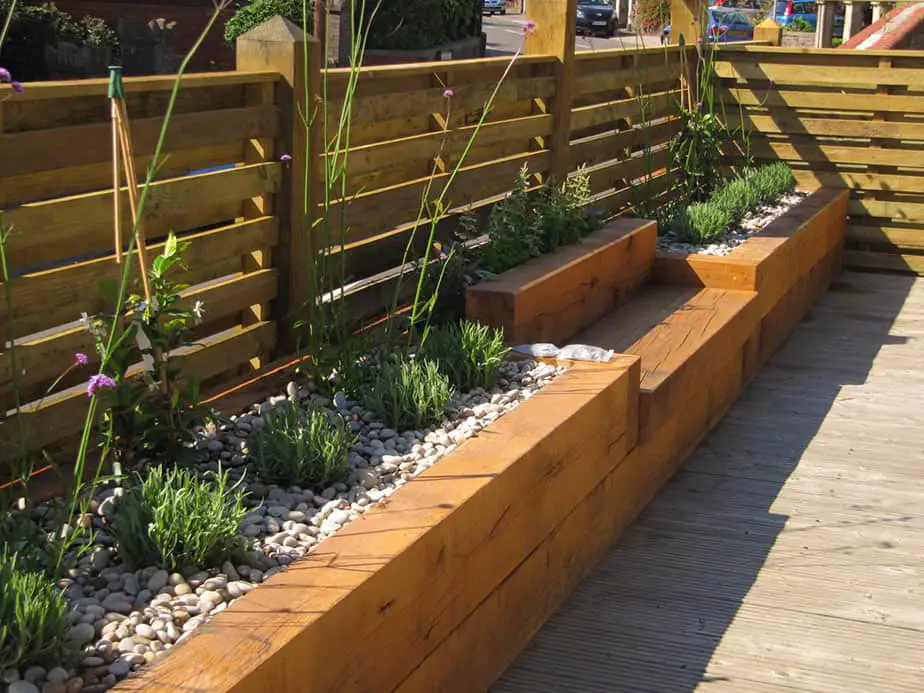
This raised bed concept is flexible. You can have permanent raised garden beds, that look stylish, and can be enjoyed by everyone. Side on access to these beds is easier, although there are ‘desk’ like benches that don’t lead to excessive bending to the front.
Just keep in mind potential catch points – sharp corners, poles or bars beneath raised beds, hooks or poles sticking out into pathways. Try to keep edges open and clean all around the beds for easier movement.
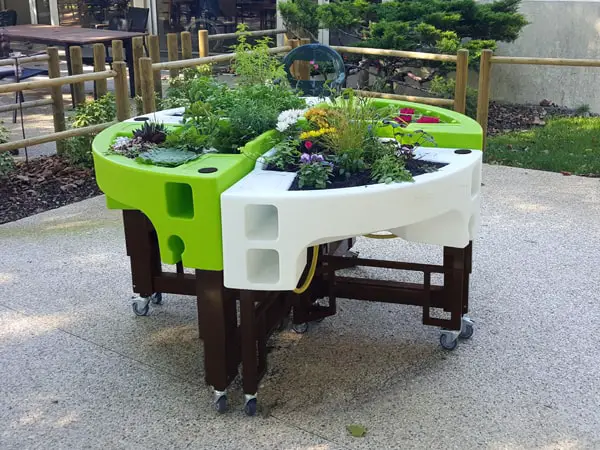
Another option to consider is mobile raised planters – on caster wheels – rather than permanent beds. This means can you shift things around in small spaces, or to fix or maintain the planter boxes themselves. Finally you can move them to protect your plants from harsh weather, or to get more sun exposure.
In terms of measurements, I honestly recommend pulling out a tape measure and trying to figure out suitable heights, widths and lengths for your specific situation.
Beds about 24″ high (60 cm) work well for many for side on access, while you would probably add around 10-12″ (25-30 cm) for front access beds. A width of no more than 3′ (about 90 cm) should allow users to reach across the bed without too much strain.
But, as I said, take your time to measure out suitable heights for the main users of the space to get things suited to them. This will meet their needs better than a generic one size fits all set of dimensions.
Another tip is to add multiple points for water and power around your main gardening spaces. This reduces the need to carry around equipment or materials like water, soil, fertiliser or clippings.
In fact you can also include compost or other waste bins at multiple points as well. Some of these chores may need assistance to clean up or maintain, but for day-to-day use having multiple points makes things easier.
A final tip here is although we mentioned raising things up, we can also look to bring things down. Hanging baskets or pots on pulley systems that can be pulled towards you allows you take advantage of vertical space that would otherwise be out of reach.

Expand Access For Wheelchair Users
Again, this isn’t ground-breaking information. When thinking about wheelchair access, you want to make sure any high traffic areas are flat, with a slight gradient and drainage to ensure water doesn’t sit, or worse, freeze.
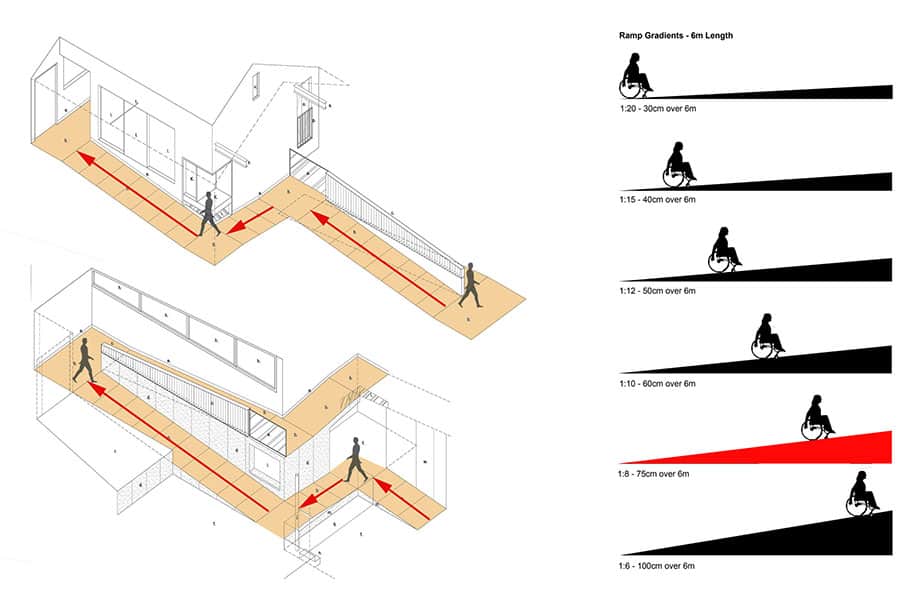
Similarly with paths, you want a shallow gradient for ramps if you have the space. Gradients are ratios – so 1:20 means you travel 20 units (like 20 feet) across for 1 unit (1 foot) up. Try to minimise the length of a slope by breaking it up into sections with flat landings in between.
As I said, 1:20 is the aim, but if space is a premium, 1:15 can work, even down to 1:12. It’s not ideal, and probably requires handrail assistance, but it is the max gradient recommended by the ADA in the US. I’d opt for 1:20 if you can.
Another tip with paths is to have a ‘camber’ on them – a bow in the middle so water will flow off the middle to the edges. This will be easier or harder to achieve depending on your material choice.
Finally when it comes to width, think about all the actions the wheelchair user could want to make. Not just straight line movement, but turning around without multiple point turns. And the type of wheelchair they are using – it’s turning circle capacity, including any tools, bags or trailers tagging along behind.
From what I’ve found, 3′ (90cm) again is a suitable minimum, but it seems 4′ (1.2 m) is better as it allows someone to walk alongside. But I’d err on larger widths if you can get away with it – particularly with the above in mind.
Speaking of materials, you want to aim for three things in particular:
- Keep things smooth & level – no unnecessary bumps, where materials connect or change
- Ensure you have something solid and firm
- BUT… make sure there is a little bit of ‘rough’ in the surface, so it has some grip – too smooth may make it slippery
I’ve created a table below outlining suitable materials for open spaces and paths, and their pro’s and con’s.
Material |
Cost |
Pros |
Cons |
|
In-situ/ Poured Concrete |
$$ |
Low maintenance |
Not environmentally friendly (can’t reuse or easily replace) |
|
Asphalt |
$$$$ |
Low maintenance |
Not environmentally friendly |
|
Concrete Paving |
$$$ |
Cheapest paving option |
Can have edges raise over time, becoming trip/catch hazards |
|
Brick Paving |
$$$ |
Nice appearance |
Susceptible to edges raising to become trip/catch hazards |
|
Stone Paving |
$$$$$ |
Nice appearance |
Expensive to buy and install |
|
Timber |
$$$ |
Nice appearance |
Quickest wearing of these materials |
|
Resin-Bound Gravel |
$$$$$ |
Lovely, different appearance |
Quite expensive |
|
Self-bound Gravel or Hoggin |
$ |
Cheap |
Loose stone surface can lead to stones wandering |
There are other things we need to consider from an access perspective. With limited mobility, finding shelter from bad weather – or to escape the heat – is important.
This could be as simple as some nice trees up to a built sheltered patio or pergola. And depending on the size of the yard, multiple spots might be required.
Another way to accommodate this is to ensure wheelchair users can quickly access shelter, or the house, by having multiple paths to reach covered areas.
Finally think about lighting – try to have lights along pathways and in working or entertaining areas. You could incorporate other landscaping approaches like uplighting feature plants or using smaller fairy lights.

Reducing Maintenance Requirements
Along with material and layout changes, it helps to reduce how many chores you need to do in the yard.
Some simple approaches include using drip irrigation watering systems. They save time, water and mean a wheelchair user won’t need to lug around watering cans or hoses to unnecessary ‘background’ plantings.
Another tip is to make these background plantings as low maintenance as possible. Use materials, or create spaces, like:
- Ground covers
- Grasses (natives work well)
- Gravel/stones (as long as they’re visual and not an access way)
- Rockeries (rocks/boulders with plants throughout)
- Raised mounds of earth (berms) planted with some of the above
One approach that I’ll explore in the design section is to split the yard into ‘working‘ and ‘passive‘ spaces.
Working spaces can be tailored to the specific gardening activities the wheelchair user wants to do. You can add your raised beds, mobile beds, tools, storage, power and watering points, sheltered areas and more in these spaces.
And watering, trimming, harvesting etc. could all be done by the wheelchair user in this space – and designed to facilitate this. This reduces the distance travelled and materials ‘hauled’.
Passive areas could be larger, visual spaces – the background plantings I touched on above. Regardless of how they’re designed or laid out, these areas can be ornamental, or cover other spaces or activities that aren’t catered to elsewhere.
So if family or friends would enjoy things like lawns, sandpits, play areas and other less wheelchair friendly spaces, you could look to have some of those in a specific area by design.
Because they’re not catering to the wheelchair user (beyond access to it, perhaps) you want to determine who will be maintaining these spaces. It might be family, maybe kind friends, or even hired help.
This sounds a little strange to suggest for a wheelchair friendly garden. But, as we’ll see in the design section, the point is to consider not just other more able users now, but users in the future.
If the house is sold or circumstances change, attempting to revert to a more generalised garden – without the specific wheelchair additions – can be as costly as they were to implement. Why not try to design something suitable for all users, now?
How People Use The Space
Some nice little tips I’ve picked up in my research made me stop and think about not just creating a suitable space for wheelchair users, but a space they want to spend time in. And most importantly, spend time in and share with others.
A simple way to do this is add seats or benches around the different areas for able bodied users of the garden to sit. This is a great addition to the ‘working’ area, so family and friends can work alongside each other and be at the same level.
Another way wheelchair users are likely to use the space is to pick up and put down tools and materials. It sounds obvious, but it means we should consider places for users to rest items rather than always on their lap.
This could take the shape of little ledges, steps or benches. Or even easier, something mobile like a lidded bucket or trolley/trailer that can be wheeled along and stopped next to the person in the wheelchair. That allows them to carry more items at once, and rest unused things alongside them within easy reach.
A final point to mention is the availability of specially developed tools for those who struggle to use common ones. It may be larger or differently shaped handles to help with certain actions. Or to reduce strain on hands and arms.
These points are pretty simple, but they can help us think about how the wheelchair user will actually use the space – and for how long. With this in mind, now it’s time for us to explore a few ways to combine all these ideas into a few different garden designs.
Designing A Wheelchair Friendly Garden
To start, we’ll go through a basic intro on the design process, and see how it can help us create some amazing, site wide designs. Here are the 6 steps I suggest beginners follow for any garden design process:
- Create a simple base plan you can trace over
- Do some basic site analysis to help identify opportunities to take advantage of, and problems you need to address
- Create a little ‘skeleton’ plan highlighting these areas with notes
- Look through inspiring examples that take advantage of similar opportunities, or find solutions to similar problems
- Create a first draft, drawing over the skeleton plan – adding the opportunities and solutions in various positions
- Explore different ideas and combinations by repeating Step 5 with different examples, ideas or inspiration
We’ve looked at some nice wheelchair accessible solutions (Step 4) above. So we’ll go through Steps 5 & 6 after I’ve walked you through 1,2 & 3.
If you have read my landscaping ideas posts before, Steps 1,2 & 3 are the same.
You will still want to do them – you just won’t need to read through them, so I’ve hidden them to reduce clutter. Where I discuss something relevant to designing a garden for wheelchair users, I’ll keep the text visible to you don’t miss anything.
If this is your first time here, simply click on the heading (or +) to see the step in more detail.
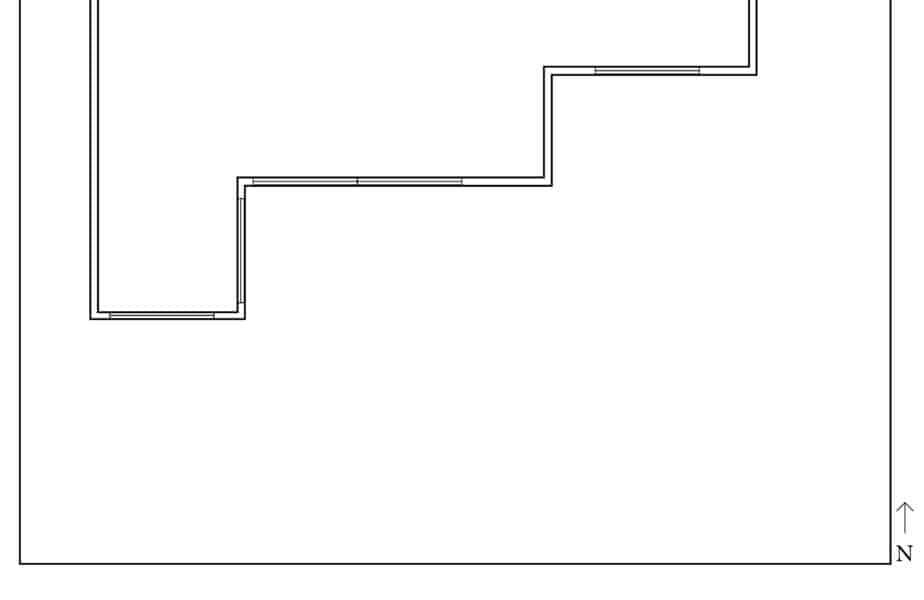
1. Create A Simple Base Plan
Get a piece of paper, pen, ruler and marker/s.
You can choose to create a scaled plan or stick to a basic outline of the space. Scaled will be more precise but take longer, and if all you want to do is explore ideas, a simple outline should be enough. Just know that if you plan to build (or have built for you) you will need a scaled design at some point.
Your base plan should include:
- Your Doors & Windows (including their heights above ground level if they start higher than floor level)
- Existing elements you will keep – trees, sheds, steps, patios etc.
- Boundary lines
- Neighbouring elements – trees, sheds, steps, patios etc. – that aren’t on your property
- Neighbours house and their doors, windows etc.
- North Arrow – so you can tell where the sun will come from and travel
- Scale (if needed – e.g. 1:100) or a Scale Bar
A few more tips to help you create a base plan that is easy to use:
- Keep the side of your house parallel with the edge of the paper – it’s easier to draw ‘off’ the house, especially if you are drawing to scale
- Try to include surrounding areas beyond this space – this will help you ‘tie’ the space into other areas of your yard, allowing you to extend your design beyond this area
- For a scaled plan, you will need site or architectural drawings to refer to, or you need to measure the space yourself
- If you aren’t drawing to scale, try your best to have the space correctly proportioned so you don’t design something completely inaccurate
- You can use some soft hatching or other marks to denote sloped areas or high and low points
- Scan/copy your first drawing so you can draw over it – I recommend maybe 5 copies, as we’ll use a few in the next two steps
Here is a pretend example I’ll use to explore some ideas. As it’s not real, it’s extremely simple – and not to scale really – and is only meant to be something I can draw on in the later steps. But, it does give you a look at a very simple base plan
2. Site Analysis – Opportunities & Problems
Take one of your base plan copies. The aim of this step is to draw or take notes on the different weather conditions in your area and how they interact with your site.
On your plan, hatch, draw or note the following:
- Where are the sunny and shady spots? How do they change across the year?
- Does this area get very windy or noisy?
- Do you have spaces where water will run or collect?
- What rooms do you have looking into the space, if any?
- Do you have neighbouring oversight? Or other things off your property that impact how the sun, rain and wind interact with the space?
Having done your base plan, you should have an idea of things like windows and doors into the space, and neighbouring elements and oversight.
You may need to do a little on-site research for things like sun, shade and wind. If you need to, spend some time outside across the day and week to see how the space feels.
Otherwise, look into the weather patterns for your region to get an idea of wind direction and strength, and rainfall, across the year.
NOTE: I haven’t included council restrictions and regulations yet, but they will be an important consideration should you look to build. If you have the time and inclination, now is a good time to look into it – particularly for easements and other access restrictions.
If you don’t want to do that research now, that’s OK. Once you’ve developed a few designs you like, you should talk to a landscaper or designer to ensure you are not violating any local rules.
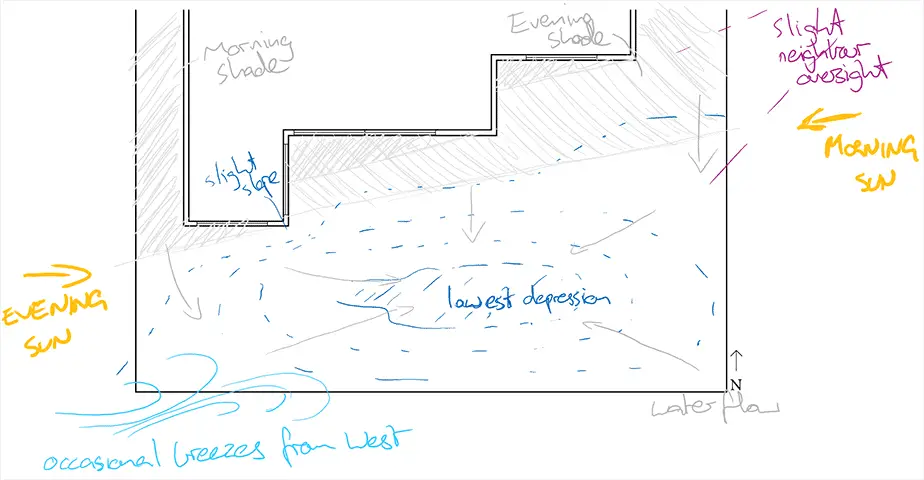
It’s a good site – lots of light from the South. Slight neighbouring oversight from the East, some shadows across the house in the evening, along with occasional breezes from the West. The lowest point is a depression in the middle of the yard, and there is a slight slope close to the corner of the house.
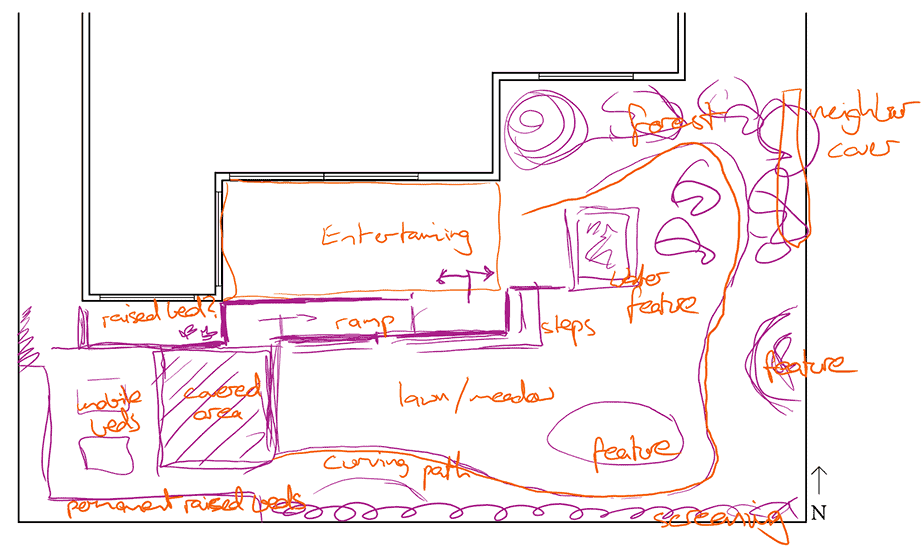
3. Create A Skeleton Plan
Take another copy of your base plan. Referring to your site analysis plan and notes, draw some simple ‘bubbles’ of the different areas in your space that are potential problems, or opportunities.
This can be as simple or complex as you like. The next step will be to try and address these ‘bubbles’ by adding some of the examples we explored above.

The problem areas are not that challenging – perhaps the most important to address is the slope next to the corner of the house. The lowest depression could be a problem or an opportunity, depending how we approach it.
And there are lots of flat open spaces that we can use for entertaining, working or other spaces.
5. & 6. Drafts & Exploring Ideas
With this prep out the way, let’s have a look at fitting some of the ideas for wheelchair users in our site. The key here is to turn off your brain a little and explore things quickly, and messily – as you’ll see.
I’m going to start by exploring my idea of separating ‘working’ space and ‘passive’ space. I’ll add some notes on the sketches and others below.
Layout 1
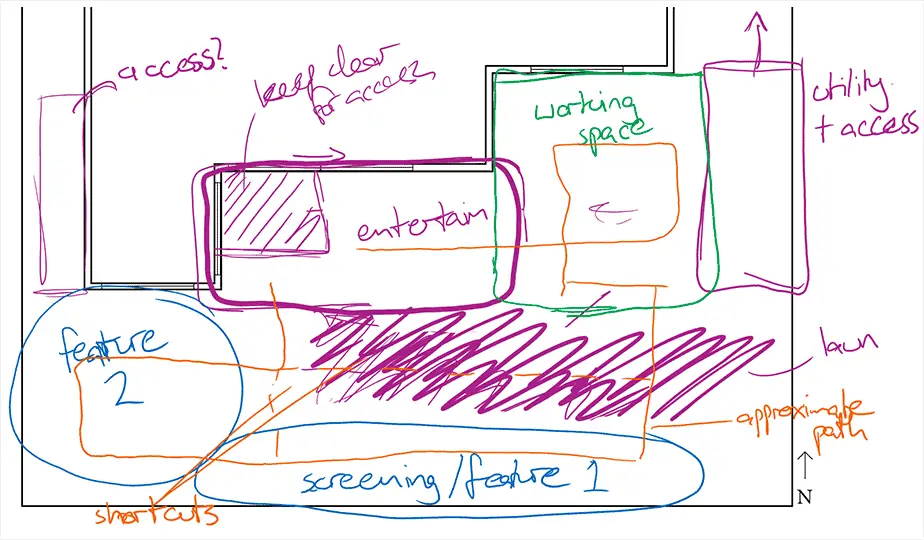
First rough outlining off spaces – a common way to explore placing activities. Keeping it simple, the entertaining space against the house – something I’ll stick to in all explorations, as it makes the most sense for wheelchair users.
I’ve put the working space near the house and features along the back and West side of the yard. A lawn fills the middle, and I’ve outlined a rough series of straight paths through the space, with some ‘shortcuts‘.
Layout 2
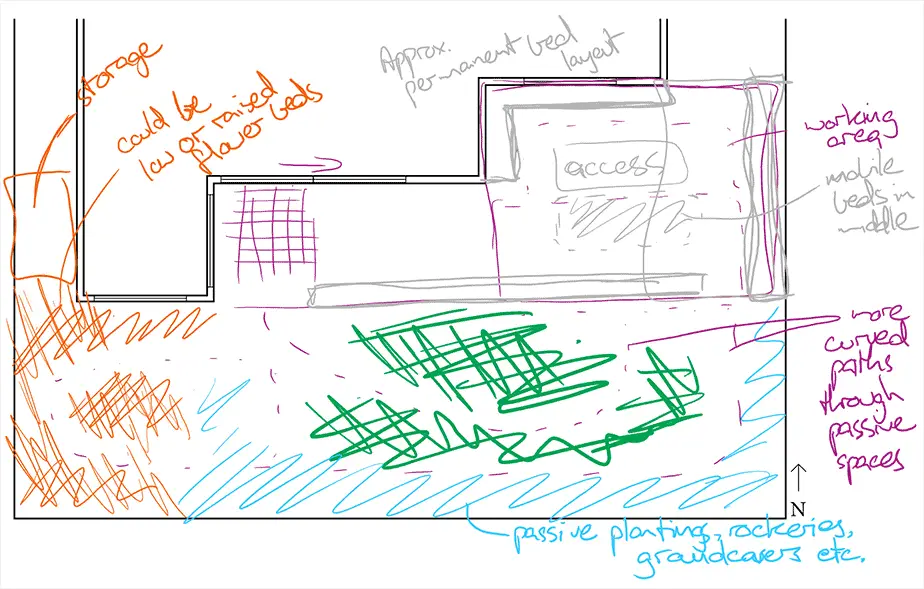
Similar to above, I’ve kept things in roughly the same positions but fleshed out the permanent raised beds in the working area. Could then have some mobile beds in the middle of the space.
I think that area would be hardscaped – concrete, paving or resin-bound gravel. Then leading off that space we have curved paths. And I thought we could have another area of raised garden beds, with some storage nearby, on the West side.
Layout 3
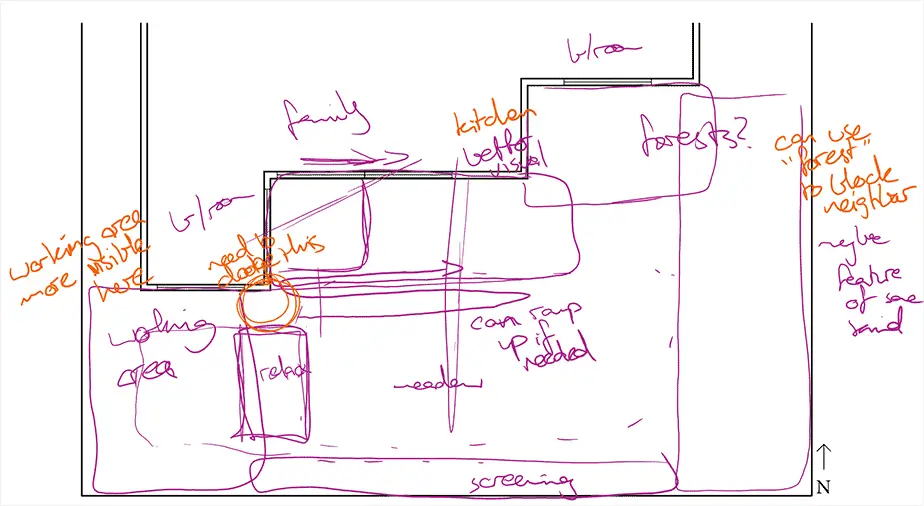
This design is a quicker sketch outlining spaces. I switched things around, moving the working area to the West side, with a covered relaxing area. The feature/”forest” area is to the East, and could grow tall enough to block neighbour oversight.
Another bonus of moving the working area is it should be more visible from within the house – with a view back towards the kitchen. I like that surveillance element, because it allows the wheelchair user to enjoy the space independently but not be out of sight.
That Eastern side of the yard could provide space for passive features like ground covers, water feature, berms or rockeries. The middle space can still hold a lawn or “meadow” – long flowing grasses – with a path through the middle.
Finally a ramp could extend from the working space along the front of the entertaining space near the house, providing easy access to those spaces.
Layout 3.1
Took the previous design – 3.1 – and tried to fill in some shapes and areas. Keeping the covered area of the working space, with room for a few mobile beds. It’s also surrounded by some permanent raised beds that should prove useful for everyone – wheelchair or not.
The path takes a curving route around the garden, from the entertaining space, past a water feature, through the “forest“, past another feature or two and back towards the working area.
Layout 3.2

I’ve refined 3.1 a little further, trying to see how it might actually come together, based on the site analysis I provided earlier (specifically the dashed blue lines as rough contour lines showing gradient).
To the slope near the corner of the house will be cut to allow a retaining wall to be built. This forms one side the working space and the ramp up to the entertaining area (which is likely to be covered in some form, not sure how yet). The other side of this ramp, at the moment, is open to allow some steps down to the “meadow” (or lawn).
The working area has raised beds along the outside, with one in the centre (to the left of where it is in the drawing). I also added some simple benches that might double as storage spaces. Because this space is lower then it was previously, we need a retaining wall to run along the fence line and support another ramp up the side of the house.
Moving out from the working area I have a curved path (maybe paving or resin-bound gravel) that runs along the outside of the meadow, with a few “shortcuts” in there. Not sure what material they’ll be – perhaps just low cut lawn/grass for access when dry.
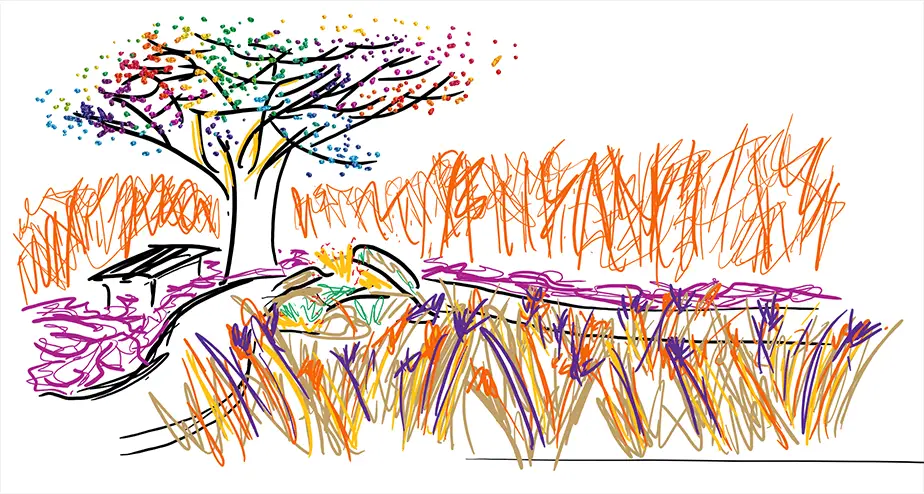
We’ve got screening plants along the Southern and Eastern sides, with a rockery and large feature tree to provide some shade – also includes another bench/chair for companions. I’d also add low maintenance plants like ground covers for these screening beds.
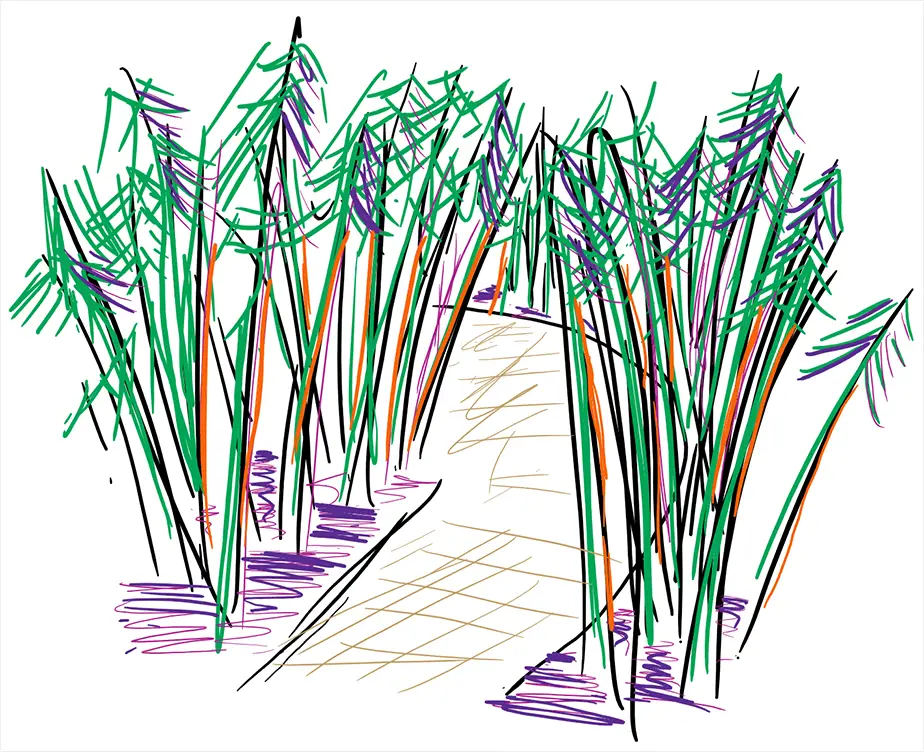
The path then enters the “forest” area – I’m thinking bamboo for now but might explore a few different options. Bamboo would require lined garden beds to prevent it spreading. It would work well to block neighbours, however.
Finally we wind our way back up to the entertaining space (should note the path would probably slope slightly along it’s journey). We pass a raised water feature/pond. This might be challenging for a wheelchair user to maintain, so might fall under the passive side of the yard.
Anyway, this is the bones of the idea. I’m not sure of all the materials I’d choose – a lot depends on funds. I’m not certain of the rockery or water feature either.
They could be more feature trees or sitting spaces to look across the meadow. Or more raised garden beds.
But all in all, it’s a quick plan I’m happy to move forward with. Below are a few rough sketches showing the space so you get an idea of what it might “feel” like.
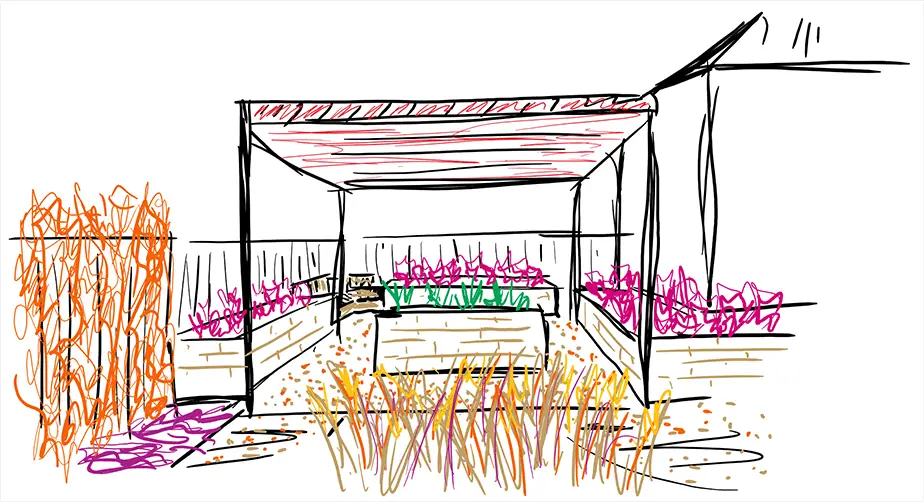
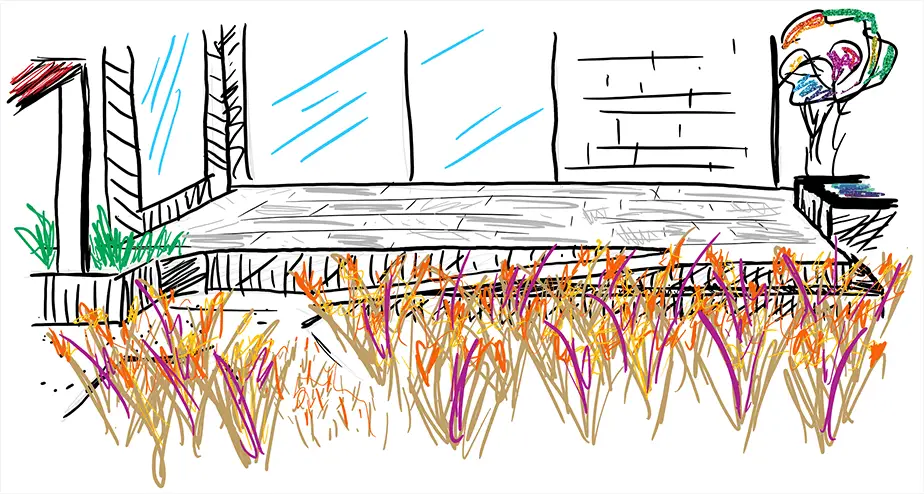
And that’s it for this post. I hope you enjoyed the little exploration into designing a garden for wheelchair users, but trying to make it more than a series of ‘bolt-on’ fixes.
I hope you see some ways to take the ideas above, and add them to an overall design. Something that maintains flexibility into the future and suits the needs of all users.
Feel free to share your thoughts, comments, or ideas on how you could use some wheelchair accessible ideas in your space.