It’s pretty easy to “cover” a household utility like an air conditioner. I’ve gone through a few simple examples myself here.
But to ensure your solution actually works in your garden or backyard, you need to go a little beyond merely covering it.
You need to embed it in a design. Blend it into an existing (or “future”) space. So you not only hide the air conditioning unit, but perhaps turn an otherwise unwanted space into one worth spending time in.
Let’s have a look at what I mean, and how to do it.
A Quick Example Of A Solution “Blending” Into A Garden Design
Front Yard Utility Box – A Garden Bed, Not Just A Hedge Screen
I’m going to compare two images from a previous article, and show a basic outline of the concept I’m talking about.
So we can see a solution here – planting a few hedge or screening plants around the outside of the utility box. We’ve met the criteria – cover the box – and I would say fairly cheaply, which is a win.
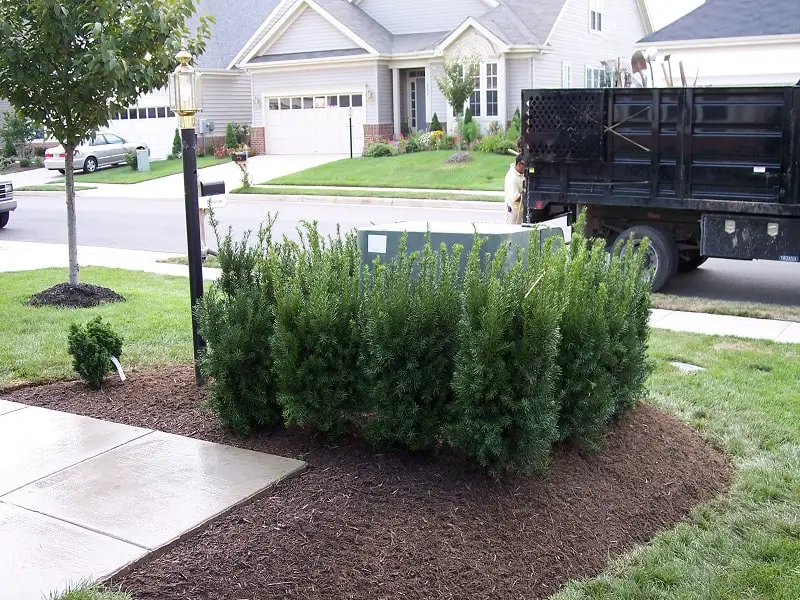
Image from qlnl.com
One good thing they’ve done is leave access on the road side. This means it won’t be a pretty view driving past, but it does allow access to the box should the service provider need it.
And that is vital.
The last thing you want is some technician ripping out (legally, mind you) something you’ve placed there. And depending on the utility you want to hide, you could do worse.
Like void your warranty.
So just be careful with how you cover or hide things.
Anyway, let’s have a look at what I think is a much better approach to covering this kind of utility box.
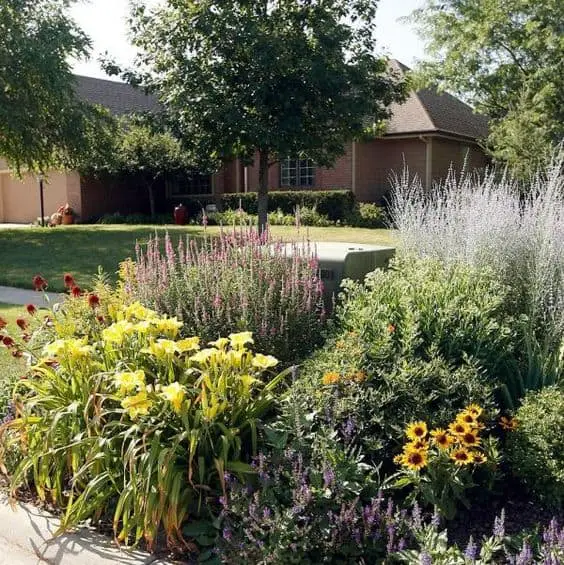
Above we see a similar situation – a utility box out the front of a house.
And they’ve followed a similar solution to the hiding problem – using plants to hide the unit. But by expanding the solution beyond the immediate space around the unit itself, they’ve created something much nicer.
They’ve taken the time to create a real garden bed – with layers of plantings. colours and textures.
Now it doesn’t completely cover the unit, so it still allows access, but this time from the footpath. This little garden bed is a much nicer view to drive past than the previous image.
I think they could have taken it a step further and planted out more of the nature strip. Or continued the garden bed across the path up into the property itself.
Despite that, this approach was probably all the owners felt they needed.
So you can see in these two images how just expanding beyond the borders of the immediate ‘solution’ you can create something nicer and more memorable. Let’s have a look at another example down the side of the house.
How To Hide Your Air Conditioning Unit – The Professional Approach
Looking For Opportunities To Do “Magic”
Like the example above, our intent when looking at a situation like this is to create a simple way to cover or hide something ugly. I’m calling this section “Looking For Magic” because I want to suggest you can do more than simply plonk a solution down.
If you take the time to look and think, you can find opportunities to add to your house and garden beyond normal, conventional approaches you might consider or see.
Before you start thinking about solutions, you actually need to step back and think bigger picture. To do this, you need to conduct some basic site analysis.
I cover this whole process in more detail here, but I’ll work through it below for this specific (fake) scenario.
Site Analysis – How To Understand Your Garden’s Site & Weather Conditions
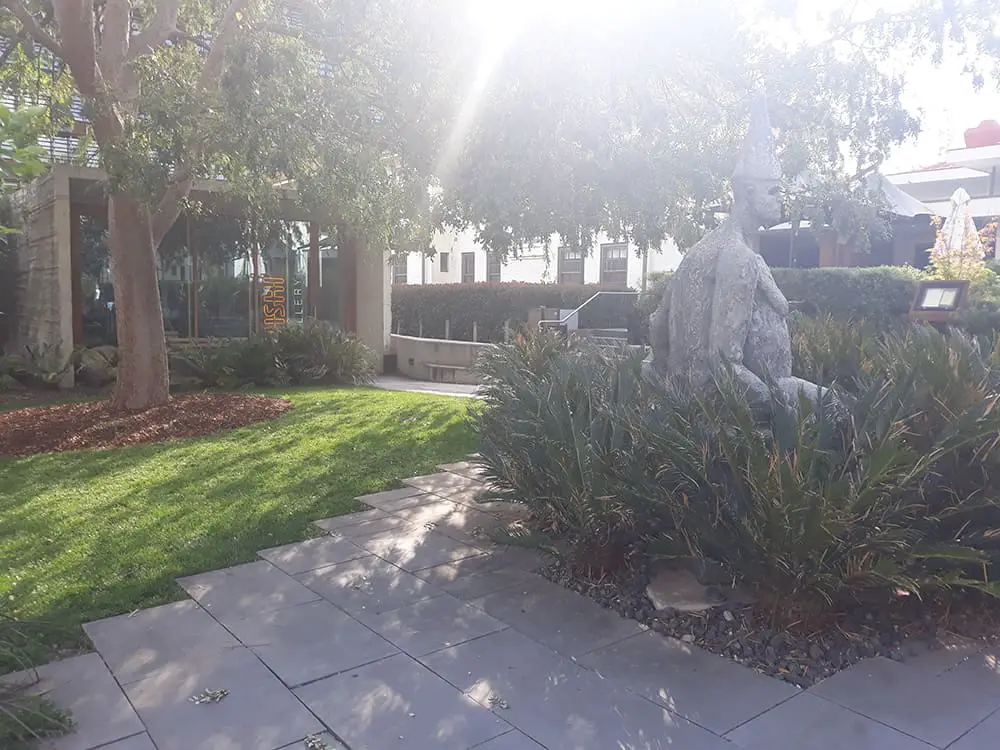
Here is the example space we’ll be working with. It may or may not be similar to your situation, but hopefully you can follow along the steps I’m taking to understand the space better.
The first basic analysis I want to conduct is to look at the local weather and environmental conditions for this area.
I want to understand, and perhaps ‘map’:
- How much sunlight does this area get?
- How does that change across the year?
- Relatedly, where do shadows fall?
- What is the wind like through this area? Is it a wind tunnel, or a protected space?
- How strong does this wind get?
- Same with rain – does it get lashed in storms, or is it more protected?
- Are you in danger of pooling or collecting water?
- Are you on a slope? If you wanted to build something here, would it be more challenging than a basic DIY job?
This is a basic look at this area. The idea is to determine if it’s a space that has good or bad weather conditions.
If the conditions are surprisingly better than you thought, what kinds of things could you do to take advantage of this space?
What To Add To A Landscape Design – Activities And Features
I break down most spaces in a garden into two categories; activities and features.
Activities are things you leave the house to do. You ‘enter’ the space and interact with the space directly.
An activity could be vague. Like an informal play space with children or pets – say a lawn. Or specific – a vegetable garden of a certain size because you need X square feet to plant what you want to.
A feature is something you like to look at (or hear/ smell/ touch etc.). You don’t need to physically occupy the space to ‘use’ it.
Think garden beds, feature trees, water features, sculptures – things like that.
Now of course there is crossover. Most areas are a combination of the two – somewhere on the spectrum between the two extremes.. But I generally think of it as what you prioritise.
A hammock area can look fantastic, but if the hammock is poorly oriented, or too exposed, or difficult to get into and out of, then it’s a poorly designed space or product.
Because it doesn’t allow you to use the space like you want to – it doesn’t function well.
What Activities Or Features Do You Want In Your Garden? Can You Add Them Here?
Having touched on activities and features, in this example we could consider some options that I don’t currently have in my front or backyard. Or that I do have, but may have the opportunity to move here instead.
Because I’m making this yard up, I’m going to pretend it actually has quite favourable conditions.
It gets some nice afternoon sun. And is offset from the neighbouring fence by a few metres – enough space to create something comfortable, maintain access and plant something to keep it private if needed.
So something I’ve fake wanted in my fake yard is a little reading and relaxing area. Something quiet and sunny.
Let’s look at how I could design an area that allows me to enjoy that activity, across the year (if that’s possible) and still do the thing I wanted to do in the first place – cover the air conditioning unit.
Refining Your Landscape Design Layout
If I were following the normal process I suggest when it comes to landscape design, I’d have:
- A few pieces of inspiration nearby
- My criteria for how I want the space to work, or how I want it to look
- Worked on a few different iterations, exploring layouts and ideas
But, in this case I’m going to pretend I’ve done all that.
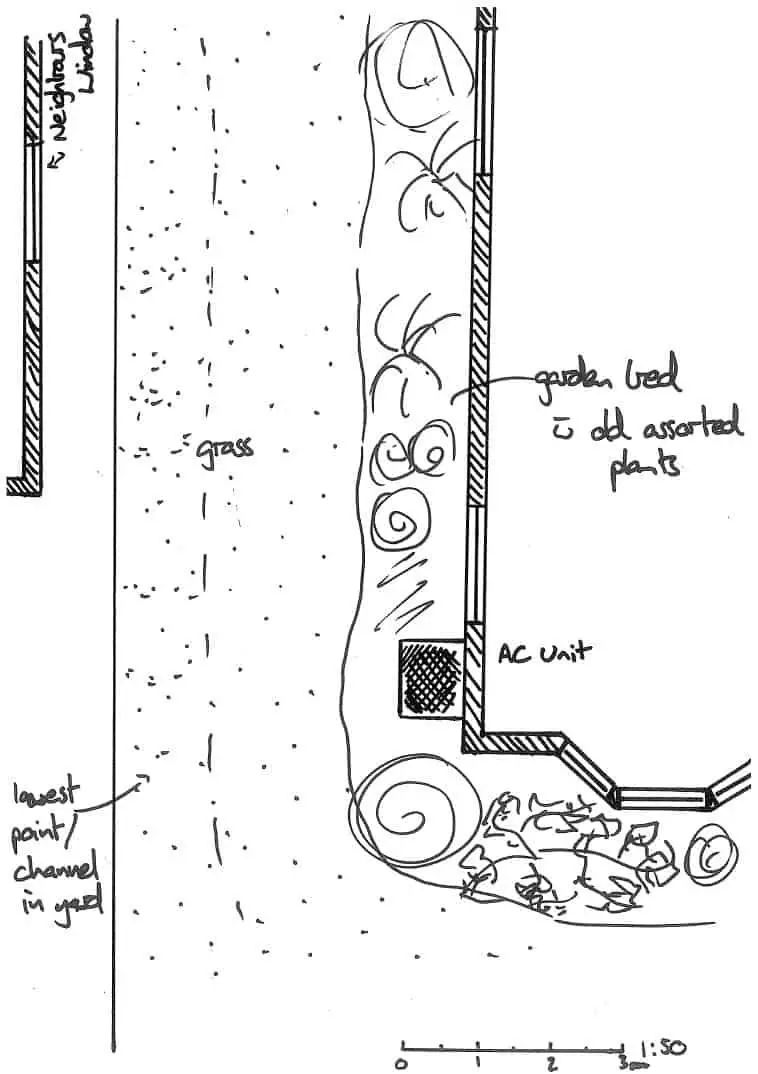
Here is a quick example of some basic site analysis I did for the original plan I showed above. It’s pretty rough but shows:
- The area faces roughly south
- Is in shadow during the morning and late afternoon/evening
- Get’s breezes during summer, but is sheltered from strong winds in winter
- The lowest point is nearest the fence, with a very gentle channel running down towards the road

A rough site analysis of the space. Red refers to shadows – in shade in the morning, but open in the afternoon, with slight changes from summer to winter.
Blue shows the wind – lighter winds in summer blow through the area, but it is protected from stronger cold winds in winter.
Green indicates approximate water flow – it flows from the house towards the fence, then slowly down towards the end of the yard.
I’ll pretend I’ve reached a layout I’m happy with, and we can explore it. I think this should illustrate the point I’m trying to make well enough without going into all that other detail you can read elsewhere.
So this is the basic concept/plan/layout I’ve come up with. Nothing fancy, but let’s look at some of the main components.
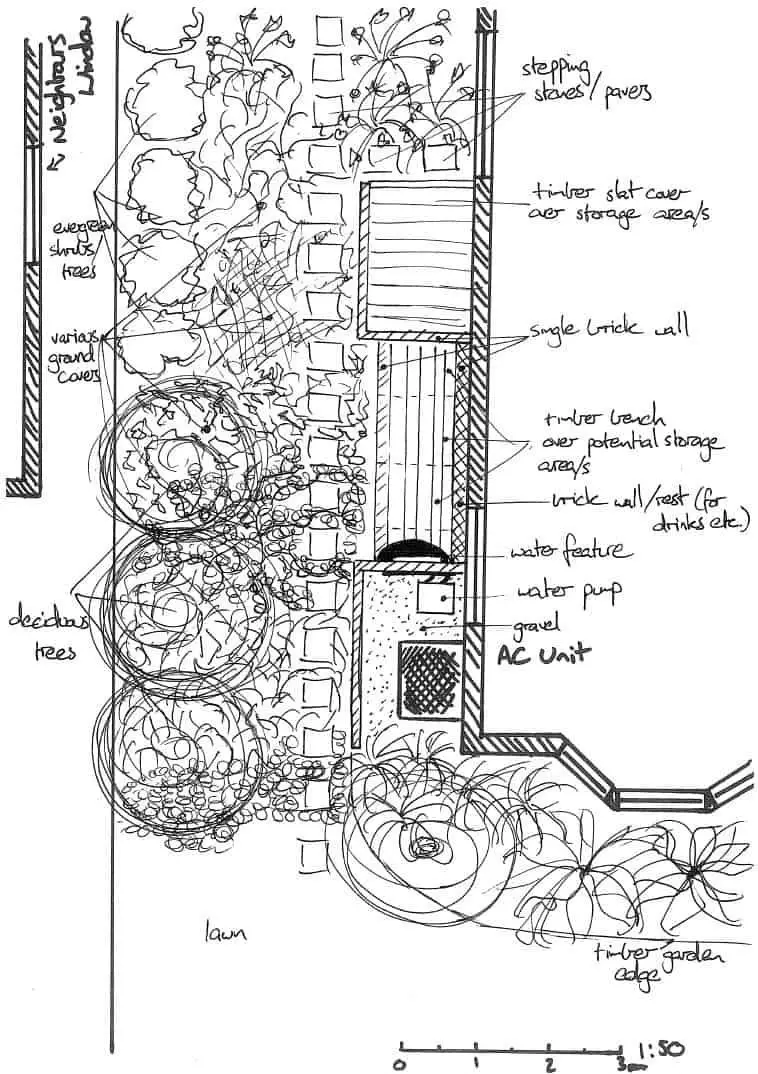
It’s a fairly simple design. The AC unit has two brick walls around it as cover. Next to the wall is a bench seat that runs along to another brick wall. This wall can act as a storage area. A water feature sits at the AC unit end of the bench to reduce the noise it may produce.
Next to the fence are some deciduous feature trees. Further up are some evergreen trees to block neighbours from view. Finally the ground is a mixture of groundcovers, with stepping stones in between for access.
Using Brick Walls To Cover The Air Conditioning Unit
I opted for brick to match the fake brick house. I love the warmth of the material, especially when it captures afternoon sun.
The layout I opted for is a tall brick wall (about 120 cm – 4 ft) that surrounds the air conditioning unit on 2 sides.
Both walls are offset from the unit to provide decent access for any technician to get to those sides. The open side is then planted to provide a bit of coverage without restricting access.
I continue the brick wall under the bench seat, and then have another higher wall on the other end. This offsets the ‘weight‘ of the wall around the unit a little.
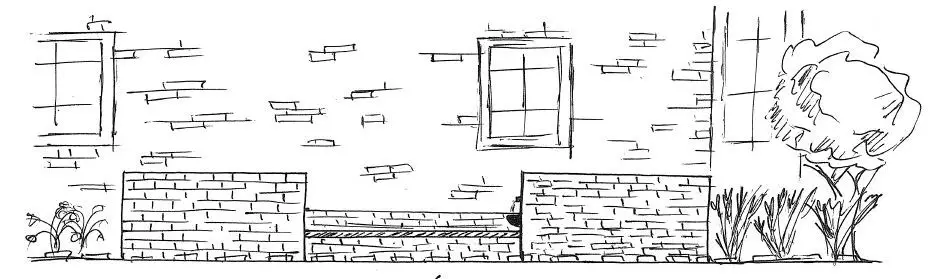
This is an elevation (side on) view of the area. We see the two taller brick walls on each side, providing storage and cover for the AC unit.
In between is the timber bench, with a smaller brick ledge against the house. You can also see the plants and water feature.
The left side brick wall will be a storage area. I’m thinking something weatherproof to store blankets, cushions and the like. It could also house other outdoor equipment – hoses and gardening stuff. Or these could go beneath the seat itself.
Timber Bench Seat And Water Feature
I went for a timber bench seat because it works well with the brick. The timber matches my fake timber deck somewhere else in this made up house.
As I said, the seat could be built to have a storage area beneath it. And perhaps timber slats above the air conditioner unit to provide more noise dampening and protection. Not to mention the storage area in the other brick raised section.
Another smaller detail is providing a ledge area – probably just a continuation of the brick walls – to support drinks and maybe a small plate of food. Nothing crazy, but a little touch I added when I thought about how I would actually use the space.

Here is a rough perspective sketch showing the concept.
You can see the water feature clearly now – it’s purpose is to cancel out some of the noise of the AC unit. The benefit of using a heavy material like brick is I can easily mount a small water feature onto it.
I’ve also provided enough space on the back of the wall for the pump and the air conditioner unit. Again, access is important should someone need to fix anything.
Another option could be to move the water feature so you can lean against that brick wall as well. Perhaps the water feature could go against the wall of the house, in the centre of the bench.
The left brick space has a timber cover – supposed to be more weather proof. The right space is spaced slats.
Surrounding Plantings And Path
I already mentioned the plantings in front of the open side of the air conditioning unit. These will just be some native grasses/ shrubs that I have to whipper-snipper trim once a year.
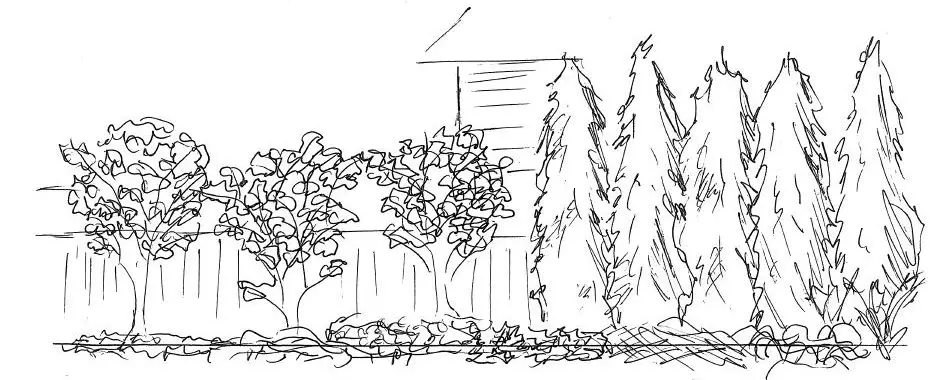
I want to provide some privacy near the neighbours overlooking window, so I think I’ll opt for some evergreen trees to line that area of the fence – some sort of conifer perhaps.
Further down the fence line I’ll look to plant some small deciduous feature trees. These will hopefully provide some nice dappled shade in summer, while allowing sunlight through in autumn/ winter.
Instead of lawn in this area I’ll look to plant a mosaic of different groundcovers. And dotted amongst the groundcovers I’ll add some simple stepping stones to access along the side of the house, the storage areas and the bench seat.
Look Beyond The “Problem” To Blend In A “Solution”
Although I haven’t gone into the specifics of my design – it’s just a concept really – I hope you understand the point I’m making.
Don’t look for a simple, but often ugly, solution. See what other opportunities you have to either add to your garden, or change the layout to make it better.
From finding a way to hide an ugly air conditioner unit, we ended up with a nice, cosy sitting space. Somewhere to enjoy the afternoon sun, with a drink nearby, maybe rugged up in some blankets if it’s chilly.
So by looking beyond my first concern, I’ve added a bit more value to my garden.
Common Questions
Why Do We Need A Garden Design Simply To Cover A Small Utility Box?
Realistically you don’t.
You could use any of the ideas I outlined here. But, as you’ll see, things work better when you are more deliberate in your approach.
A design can be as vague or as detailed as you want, but at a minimum we want to have an idea of:
- Your chosen style (if you have something you want to follow)
- Your preferred colour palette
- A basic material palette
If you take the time to work through it and create a full garden design, you will be able to add an approximate layout or outline of spaces into which you can incorporate a cover.
This last point is what I want to walk you through today.
Instead of treating each problem on it’s own, in isolation, take some time to see how you can incorporate your chosen solution into a broader design.
This approach may lead you to spending more money than you thought on covering the ugly unit/ box.
But if you are enhancing the space, making it something you use or enjoy more than you previously did, the increased cost may be worth it.
But I Don’t Have The Money Or Time To Fix The Whole Space!
This is where the beauty of a finalised (or at least approximate) plan comes in. Just because it’s down on paper, it doesn’t mean you need to build and finish it in one hit.
As you saw here, there is no reason you can’t immediately build the ‘solution’ you want – covering the unit – and then add the other parts of the design later on.
Sure it might look a little strange at first. But I promise you it’s no stranger than some of the solutions I’ve seen elsewhere – where the cover stands out just as much as the box or unit itself.
This staggered or phased building approach is much easier to follow if you are clear on what the other areas will look like.
You know the approximate material and colour palette you are working towards. And hopefully how the space will be used.
And that’s it for this post.
I hope you found it useful. If you have any questions or want to share your own ways to blend ‘solutions’ into larger designs or ideas, feel free to leave a comment below!