Not every design needs a landscape planting plan. But they can be very useful to help you understand what specific plants you want to use. And how many you actually need.
This second point – calculating quantity – is the main reason to work through this process.
We’ll explore the plan in two parts – placing the plants and trees, and adding annotations to the plants. A proper landscape planting plan includes a plant schedule, which we’ll also look at below.
The Landscape Planting Plan
A planting plan should provide enough information so a builder/ landscaper/ contractor can accurately place all the plants across the site. To do this, they need to know how many plants there are and where they go… it’s not really that complicated.
One thing to note: it’s likely that plants won’t be placed in these exact positions. A landscape planting plan is more indicative than prescriptive.
In reality you figure out a lot of the positioning ‘in situ’ – on site. This planning mainly helps you calculate quantities.
If you haven’t seen anything about drawing up a ‘skeleton’ plan to work from, check out how to develop one, and why, in my landscape design plan article. We’ll touch on developing a landscape planting plan like the one below, using the skeleton plan as a ‘base’ to work from.
Starting Your Landscape Planting Plan

You can see from the plan above, the base of a planting plan is basically circles with crosses in the middle. Each circle suggests a mature size of a plant, with the cross in the middle suggesting the centre of the plant – where the smaller plant you purchased would be planted.
I say suggested because the natural world (or any world really) rarely follows your plans. You can prepare your garden beds and plant everything by the book, but you’ll still find weird quirks.
Certain plants won’t grow that well, while their identical neighbours flourish. Plants you think should struggle will explode and require more maintenance than planned.
There are many tricks to actually planting out a planting bed, but I don’t want to go into too much detail here. One tip I can give you is, if you are mass planting something, stick to odd numbers.
When you plant something as a group, it tends to look more natural if you stagger or tessellate the plants. This works better with an odd number – 5, 7 ,9 etc. – than even. Even numbers give a more formal, ‘unnatural’ appearance.
What Do I Need To Know Beforehand?
So, back to actually drawing your landscape planting plan. It starts, most likely, with some research. You need some idea of:
- What specific types of plants you are using in your design
- Their growing requirements – growth rate, good growing conditions, mature size and more
You may find you aren’t 100% certain of the exact plants you will be using. Or you need some more expert advice, or further research.
This is OK.
Although my example shows specific plant choices, these are always subject to change later on.
It’s possible one of your criteria touches on the size of the plant/ tree.
If that’s the case, we can use that as a starting point. If not, look at any plant or tree that you are using as inspiration – what are the mature sizes of it/ them?
Use those as a starting point.
These approximate mature sizes will dictate the size of the circles in the landscape planting plan. Obviously these are estimates only, but they can help you determine the quantities you need.
The next thing you need is to know the minimum planting distance for your specific plants. Let’s look at how to explore this in two different areas of the plan above.
How Far Apart Should I Plant?
There are some useful rules of thumb we can follow, depending on the plant type and location. It also depends on the height you want the plants to reach.
A good tip is to aim for plants that grow higher than your desired height. Many plants can reach 1/3 or 1/2 their mature height in the first few years. Picking plants like this means you quickly reach your required height.
That said, this means you will need to prune or otherwise maintain those plants, to prevent them from becoming too large and overwhelming.
So you need to determine what you are willing to prioritise – quick growth to reach the height, or slower growth but potentially less maintenance down the road.
Screening Plants & Hedges
Screening plantings are plants that don’t fully block out a space or view. Think bamboo – thinner stems and branches. It will allow some dappled light and maybe wind through.
On the other hand, hedges have closer growing habits, especially when pruned. They generally fully block access, wind and sight – creating more of a full wall. Box hedge is a popular plant for low hedges.
A good way to judge the distance between plants is the 3:1 rule. So if you want a hedge or screen 3m high, plant them 1m apart.
That said, if 3m is the mature height of the plant, it may take years to reach that. So if you want to have a denser screen/ hedge quicker, then plant them slightly closer together – 0.9 or 0.75 m apart.
In most cases, if you have a specific plant choice in mind, you will find information on how best to plant it ‘on the box’ or online.

So, with all this out the way, how do we draw it?
Easily, in fact.
In this case we’re drawing a linear garden bed. All we need to care about is the distance from one plant to the next. We don’t need to think about plants to the left or right of them.
Begin by determining the mature width of the plant. In the sketch above it’s about 1m wide.
So I can start by placing my first ‘centre point’ around half that distance from the end of my garden bed (so 50 cm or 500 mm). You can draw a little ‘+‘ to signify the centre of the plant – where it will be planted.
Then, I measure out the desired distance I want to plant at.
Here, I care less about creating a full screen – I’m comfortable with some light getting through, given it will mainly shade the side of the house. So in this case I measure out 1m from the ‘+’ and draw another ‘+’.
Repeat this process all the way along the bed until the end.
Then, draw in rough circles to indicate the mature width or spread of the plant. And that is the landscape planting plan for your screen or hedge – anything where you plant in straight lines.
Sensory Garden Bed
This design has a sensory garden bed as a main activity area. The aim is to pick plants that are not just visually interesting, but also nice to touch, smell or interact with in other ways. A space you’re compelled to walk (or step) through and explore.
The plant choices here are based on more research, to find plants that fit one or more of those criteria. The difference between drawing the garden bed above and this garden bed is now we are dealing with planting area, rather than a linear line of plants.

You can see circles of various sizes, along with a few asterisk like symbols, and some blank spaces.
The asterisk’s refer to groundcovers. I haven’t suggested a mature size because I’m not sure how they will spread and grow. In many cases these will be maintained and trimmed down a little to ensure they don’t run amok.
The blank spaces are where some stepping stones will be placed. The sensory garden will be more ‘wild’ than other planted areas, so people will need to wander through them from stepping stone to stepping stone.
And of course the circles and + refer to plants and feature trees. And to try and figure out where to plant those, we need to talk about planting density.
Planting Density
As I said, it’s fairly easy to find information about mature sizes and approximate planting distances. This helps when planting in a straight line, but looking at a group of plants – or a mass planting area – can be harder to calculate.
The best way is to divide a square area – such as 1m squared – by the appropriate planting distance – e.g. 400 mm (or 0.4 m).
This gives 1 / 0.4 = 2.5. This means we need 2.5 plants per side of our square.
So to figure out how many plants per square area, we multiply one side by another. In this case, 2.5 x 2.5 = 6.25 plants in this single square metre of space. This is what we use to measure approximate planting density.
So What Do I Do With This Information?
Our value of 6.25 plants per square metre is informative, but not really useful. Remember I said one aim of the landscape planting plan is to help determine quantity? We now have a per metre planting rate. Multiply it by our total area and you have a fairly accurate count of how many you need.
So if we were mass planting a space – or perhaps planting things with similar spacing requirements – we can multiply the area by our planting density. For example, this sensory garden has an approximate area of 28 m2. if we wanted to mass plant the area, we multiply 28 x 6.25 = 175 plants.
This is a lot of plants. But there are ways to make this more manageable.
Reduce Planting Density
The first is to reduce the density. Instead of 6.25 per square metre, try 5. This reduces out total amount down to 140. Now, this will change the appearance of the space.
It’s likely to look less ‘bushy’ and may take longer for the space to fill up. That’s because you’re waiting for the plants to mature a little more to ‘fill up’ the space.
Alternatively, we could choose planting options that have larger spacing requirements – like 600 mm. This would reduce our number of plants down to:
1/ 0.6 = 1.67
1.67 x 1.67 = 2.79
28 x 2.79 = 78.12
This is basically half what we needed previously, and probably more cost effective.
If you want to fill an area quickly, you want to plant at a higher density. If you’re willing to wait a bit for the plants to mature, you can opt to reduce density (and therefore price). Or you can choose a plant option that has a larger spacing requirement, to reduce density overall.
Vary Your Planting Options
Another option, instead of a whole bed of mass plantings, is to vary the planting options across the space. This is the approach I’d take with the sensory garden bed, given I want to focus on more than just the ‘look’ of the plants.
In this case, I’ve got a selection of plants I want to include in the space. Because of the intent of the area, I have some specific plants I want to include. The way I approached this space is to have some larger ‘anchor’ plants and trees that I wanted to place, then I’d fill in smaller plants around them.
I’ll break down the space a little bit, and describe how I placed some of the anchor plantings, and then filled in around them.
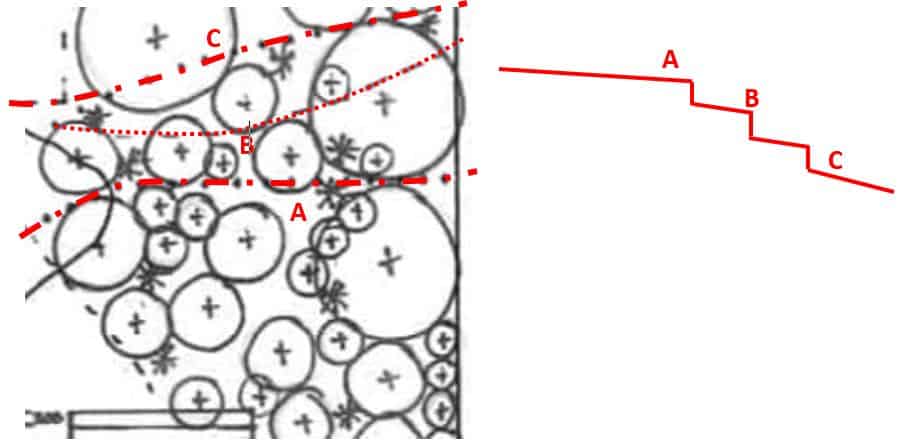

So you can see in the images above that the sensory garden will start on a level area and then flow down a slope. This makes the space difficult to traverse – especially for those with limited mobility. But, it makes it a bit more dynamic and open to exploration.
You can see I outlined an approximate path my stepping stones will cover. This will be confirmed on site, once the plants and stones have been delivered.
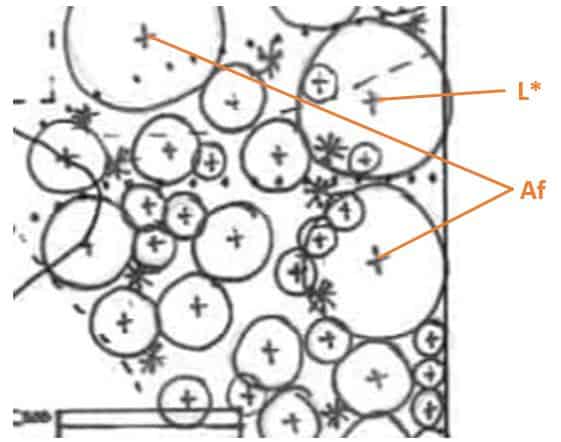
To start this space, I added two anchor trees along the fence line – staggered down the terraced slope. Both trees are small, but provide a bit of privacy.
A third tree sits at the base of the slope, next to what will be a levelled area for a fire pit. You can see I’ve labelled the trees – these are the annotations I mentioned, and something we’ll explore more below. So in this case I have two Af, with one L*. More on what those are below.
Adding Larger Grasses & Shrubs
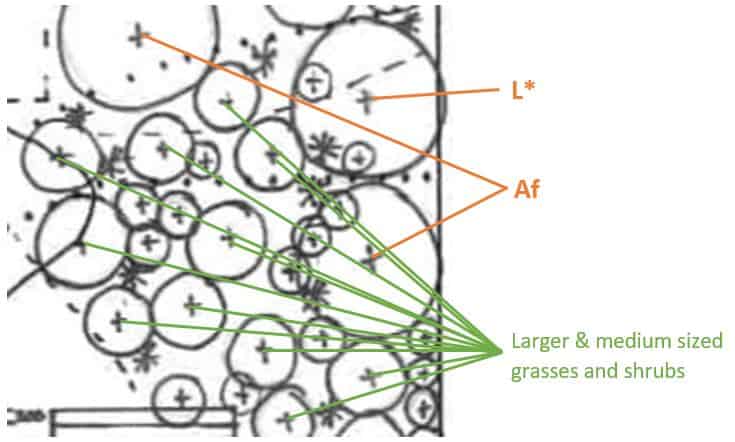
For the grasses and shrubs, I had a selection of plants I wanted to include, but didn’t have the quantity. As I mentioned right at the top, the layout you see here is indicative, but it allowed me to roughly estimate how many of each ‘size’ of plant I’d need.
Each plant I selected grows to around 1m wide, give or take. This gives me a good size to carve up space. I’ve placed these in separate locations throughout the sensory garden.
They are spaced out because I want them to act as miniature ‘walls’ – especially for children. Instead of a long row of them, I want them to divide spaces, but still have little ‘peeks’ to plantings behind them.
Most garden beds people design are more structured than this. Often you’ll see multiples of a plant in the same location. That’s not the aim here. Remember, this space is focusing on the experience within it, not it’s appearance from without. This is why the larger grasses and shrubs are scattered throughout the area.
These plants are too large to grow beneath my trees, so they aren’t forming an undercarriage beneath them – that’s a job for smaller plantings that I’ve also dotted around the space.
Adding Smaller Plants & Groundcovers
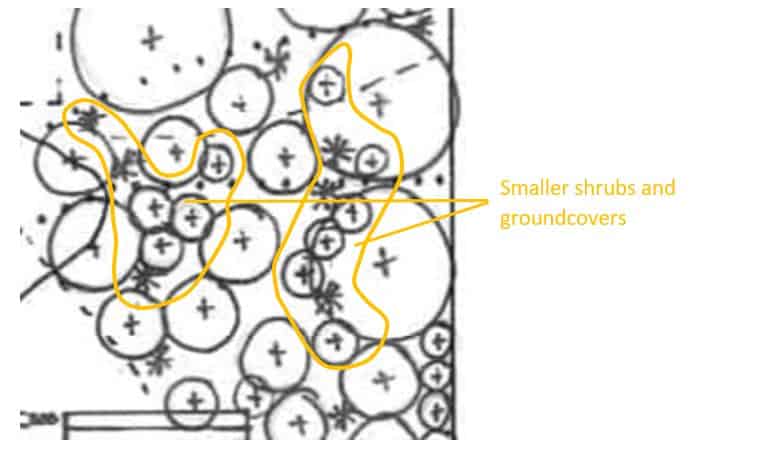
To help form some of the undercarriage and add layers to the space, I’ve added smaller plantings beneath the trees, along with groundcovers here and there.
If the main aim of this space was to act as a visual backdrop, it would be arranged differently. In this case I like the variation in height and how smaller plants – visible from the deck – will peek through between larger grasses and shrubs.
The groundcovers provide some cover and flexibility. They will be the predominate form of undercarriage – the lower layer – beneath the trees. They also work great on slopes, covering a lot of… ground… for a small cost.
My approach to placing the smaller plants and groundcovers is pretty basic – pick spots behind or under the larger anchor plants and trees. Any space left over will probably hold stepping stones, and the groundcovers will do some heavy lifting, filling in areas that otherwise look bare.
As I’ve mentioned before, this may not be the final layout. Before fully preparing the area – soil, drainage and irrigation – we (or the landscapers) would layout the plants to check how things work collectively. Once we had a layout we are happy with, the preparation could occur and then the plants will be planted.
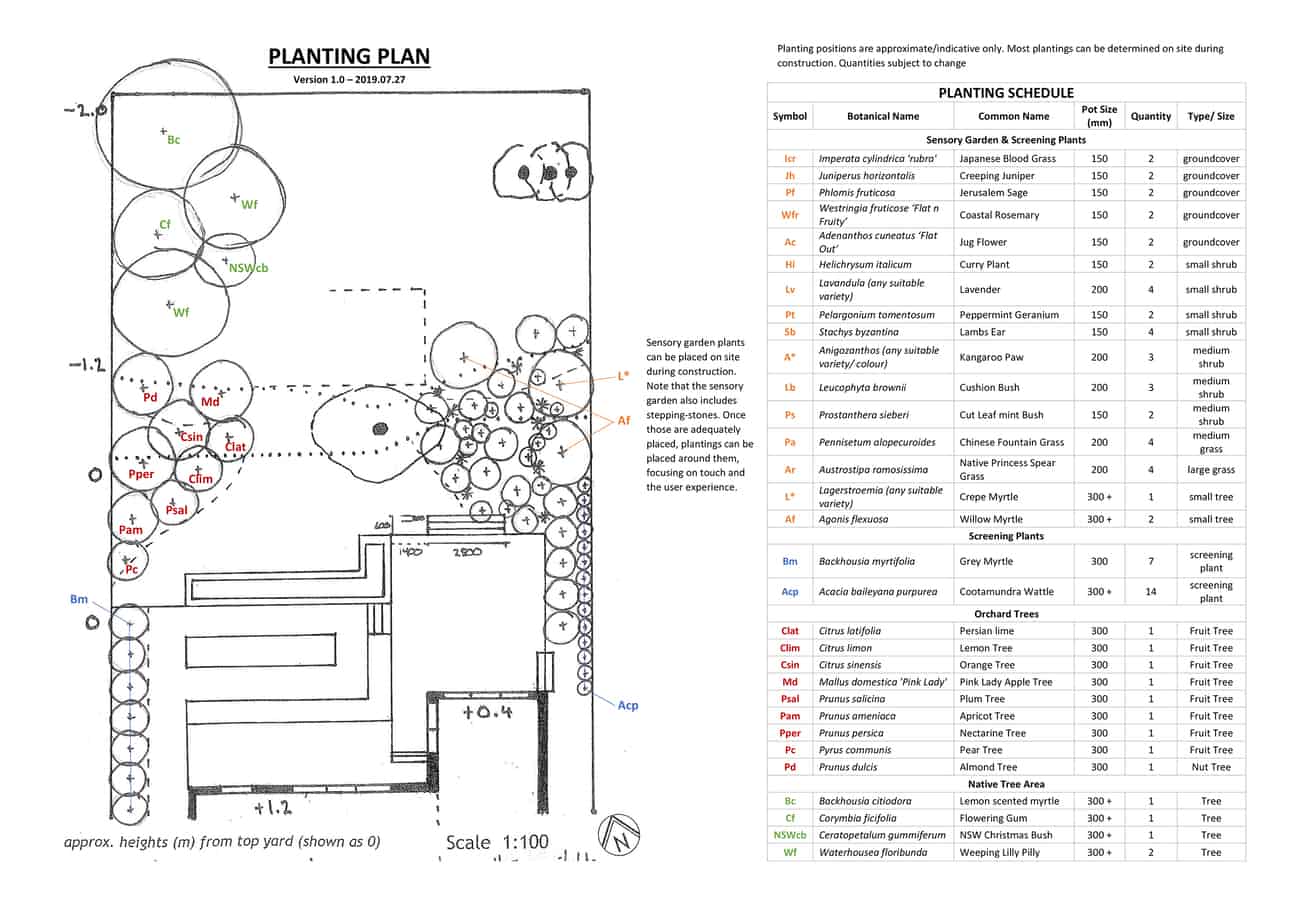
Landscape Planting Plan & Schedule
I’d usually present my landscape planting plan and schedule together, like this.

Let’s break them apart and have a look at both.
Landscape Planting Plan
I’ve outlined some basic approaches to placing plants (our circles and crosses) already. And we’ve already seen a few examples of planting annotations above. Here we’ll look at applying them to the whole plan.
The first thing you may notice is the annotations are just abbreviations. Given the length of many plant names, it’s easier to shorten them and then outline more specific details in a planting schedule. In most cases, you want to find the scientific name for the plant you want, and abbreviate that.
We use scientific names to reduce confusion. Common names of plants can cover multiple species, or change from region to region. Scientific names reduce ambiguity, and ensure what you source matches what you want.
So Agonis flexuosa (Willow Myrtle) becomes Af on the plan. Just to keep things consistent, you always write scientific names in italics. And the second word (the species) is written in lower case.
Sometimes you’ll come across ‘cultivars’. These are just different versions within a species of plant. My Japanese Blood Grass has a cultivar ‘rubra’ to distinguish it from other Imperata cylindrica species.
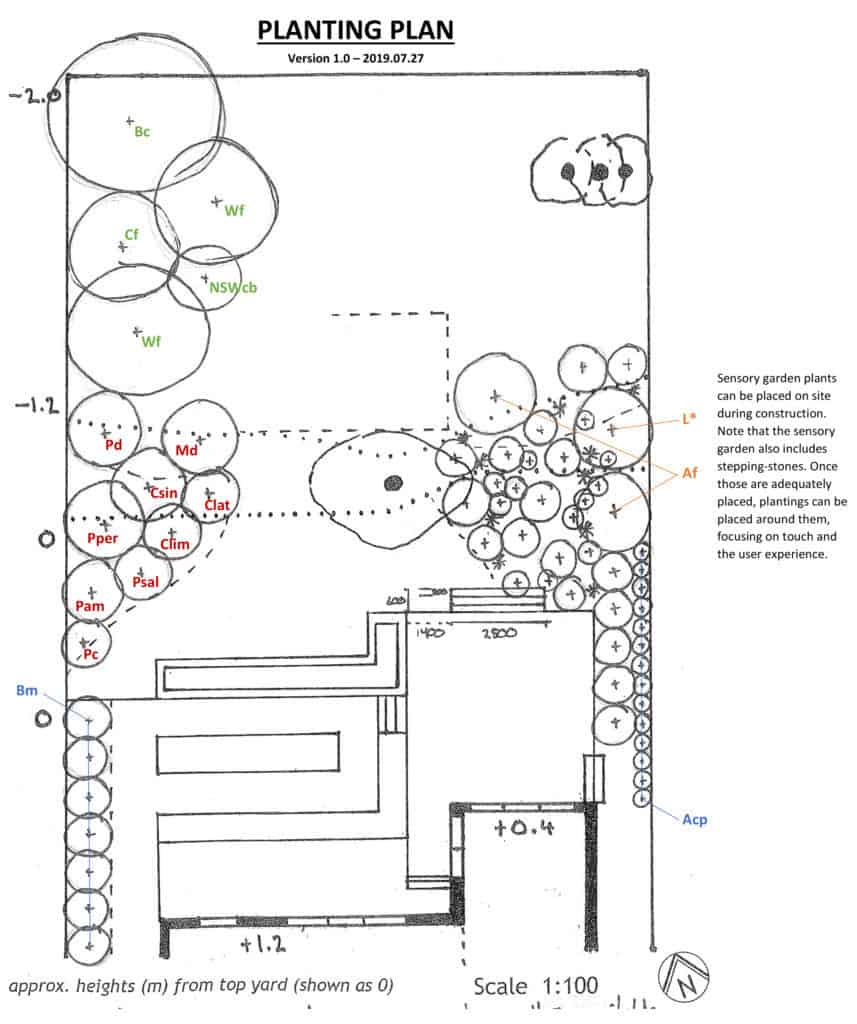
Another thing you’ll notice in the plan is how plants of the same type are linked together and annotated once – rather than refer to each plant separately. This works best if you have a row of plantings, such as my Bm and Acp screens.
You will also notice sometimes I’ve written the annotation directly on the plant. This is up to you really – if you have room, and it is easy to understand, you can do this. If not, try to have them along the sides, with lines pointing to the specific plant in the plan.
With our annotated (although abbreviated) plan in place, we need some way of providing more detail for whoever is supplying and/or planting everything. We need a planting schedule.
Planting Schedule
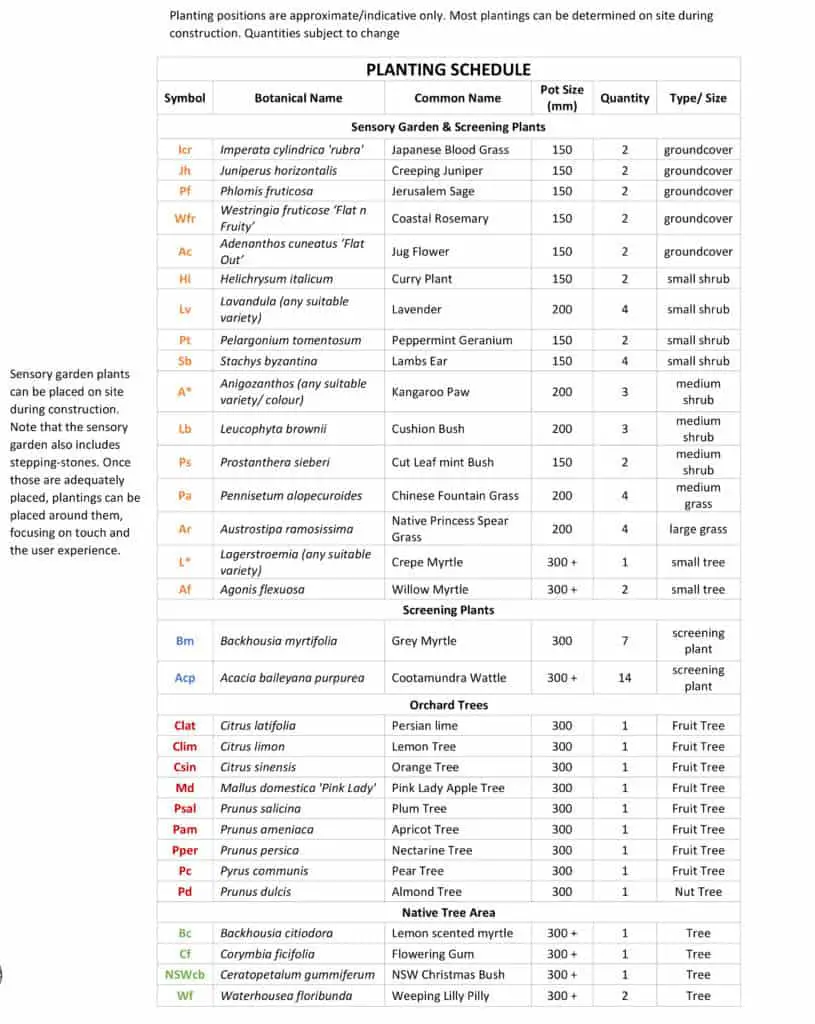
Planting schedules are where you provide all the detail the plan itself is missing. To make things easier for me, I separate them into different garden beds. This may or may not work for you – it depends on how many plants you are sharing across your design.
You can see my schedule contains:
- Symbol/ Abbreviation
- Scientific Name
- Common Name
- Pot Size
- Quantity
- Type
Type may not be necessary, but I found it useful to order my different sections into small, medium and large plants (when mature that is, not necessarily pot sizes).
The symbol/ abbreviation obviously helps you refer to the plan easily.
The scientific and common names are specifically what you want to plant.
Pot size may not be something you can answer now, but even a basic search of your local hardware stores or nurseries will hopefully show a few options.
Generally, the larger the pot size, the more expensive the plant. You need to determine if you want to spend the money to get larger, more mature plants, or are comfortable with the cheaper smaller options.
The answer may change depending on the plant, how many you need, and it’s location in your design.
Quantity is the next column, which is something you may know before drawing the plan, or may determine as you draw it.
I haven’t done it here, but you could add Cost Per Plant and Total Cost columns next to quantity, so you can keep track of your total plant costs.
What Happens If What I Want Isn’t Available?
This is why, during my design process, I suggest you develop back-up options. Availability of plants may change across the seasons. So having an understanding of why you like something, and some options that tick those boxes, is extremely useful.
If this happens to you, go with one of your alternatives. Or wait until your preferred plant comes into growing season again and is available for purchase.
This is why I believe having a master plan of your whole site is so valuable. You know what you want and how much you need. You now have the chance to wait around until things become available, or can act to snap up a bargain.
Most people make plans and try to implement them in the same weekend. Once they find the things they want aren’t available, they have to change tactics, trying to piece things together with inferior options.
Another likely scenario is you find your preferred plant is available, but at too large or too small a size.
As I said above, you then have to make choices – do you pay more to get a mature version of what you want? Or go with the smaller versions and wait longer for them to reach maturity?
I can’t answer that for you, but hopefully you understand why it’s so useful to have criteria that define what you want and why. Rather than simply wanting something from an image. Define things and you’ll have more options.
Putting Your Landscape Planting Plan Together
This is as challenging as it sounds. Once you’ve drawn your landscape planting plan, you should be able to count how many of each plant you think you’ll need and add that to the schedule.
I usually draw out my planting plan, then scan it in. I insert it into a Word document – usually A3 size, landscape orientation. This depends on the initial layout of the plan – mine was portrait, so I can easily place it to one side of the word doc, leaving room for my planting schedule on the other side.
I generally do my schedules in excel. Setting your planting schedule up in excel – with prices – means you can adjust your plan in ‘real time’. That is, if you find 20 of one plant is actually more money than you expected, you can change something to reduce the cost. It could be the plant choice or the number you need (increase planting density, or where they will be planted).
Being able to see your approximate plant costs add up as you build your plan and schedule can be sobering. But, more importantly, it’s informative, and something you can design with – remember, constraints inform design!
Having Landscapers Source Your Plants
One last thing to note, especially when it comes to purchasing plants. I mentioned in my landscape design plan article that it’s often cheaper for a contractor/ landscaper to purchase plants for you. They can get things at cost/ trade price, which may be 20-30% cheaper than what you pay at a hardware store or nursery.
That said, many contractors will add a little markup from their end. It may not be shown as part of an itemised list, but by the time they quote to cut/ fill, add drainage and irrigation, prepare the beds for planting and labour costs to plant, they can add in an overall plants cost and add their markup there.
I’m not pointing this out to suggest it’s immoral – it’s all part of doing business. Just don’t calculate the total cost of plants, then reduce it by 30% and expect that to be the price someone quotes you. Do your research so you aren’t overcharged, but don’t expect charity.
And that’s it for developing your landscape planting plan (and planting schedule). I hope you found this article useful. If you have any questions, or tips for other readers, feel free to share them below.
Hi Matt,
I’m from Bangladesh and just began to learn formal way of landscape design. I see your article is very useful for me. Thank you very much.